The Projects/Jobs and Time Tracking module in AccountingSuite is a powerful tool designed to streamline project management, enhance productivity, and ensure accurate billing for businesses that operate on a project or job basis. When combined with the ability to create Sales Invoices directly from tracked time, this module becomes an indispensable part of your company businesses success.
Projects/Jobs allows the user to group transactions in the system for the purposes of reporting and tracking. A project/job is usually created for a short or long term grouping need to achieve profit in some actions with the customer’s needs. For grouping transactions for a permanent purpose or in other goals use Classes.
To add a project to a document for tracking purposes, it must first be created and associated with a Customer. Each project may have one customer but one customer may have many projects.
Managing project costs has never been simpler with Projects & Time module. Our Projects functionality spans the application and projects created here can be tagged on quotes, orders, invoices, bills, payments, receipts – practically everything. The time tracking module allows for recording time spent by task on a project. It makes a powerful way to report on expenses and profits for your small and large projects.
Projects / Jobs are of two types:
- T&M – time and materials, where the client is billed based on actual time and materials consumed/hours spent.
- Fixed – client is charged with a lump sum, regardless on the actual time spent.
Both Classes and Projects / Jobs are optional and can be used separately or together to meet the business needs. Classes represent a high-level breakdown (e.g. Business Units, Lines of Business), whereas the Projects / Jobs are designed for a more precise and narrow analysis.

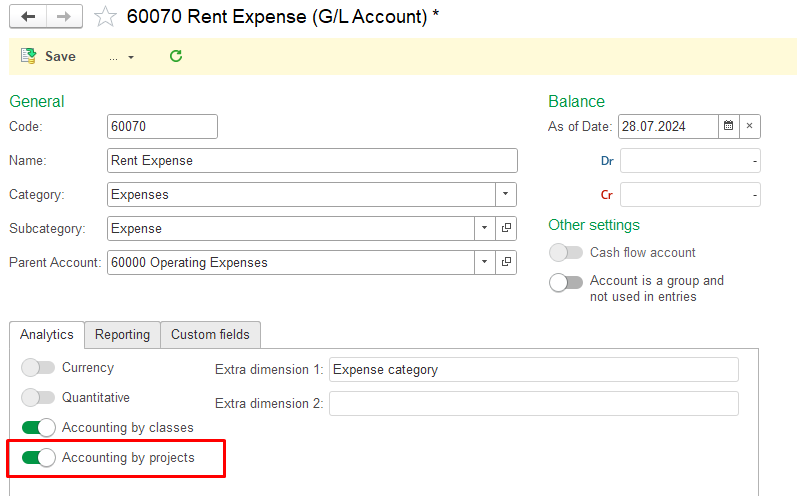
Enable accounting by Projects #
- Navigate to Lists – Chart of accounts.
- Open each account, that will be affected by the Project postings and tick the toggle Accounting by projects.
Create a new Project / Job #
- In the Lists, select Project / Jobs
- Navigate to the Project / Jobs section where all existing projects and jobs are listed.
- Click on Create in Project / Jobs
- Press the Create button to open the form for entering the details of a new Project / Jobs.
- Enter Project / Jobs name
- Provide a clear and descriptive name for the Project / Jobs to ensure it can be easily identified.
- Select the Project group
- Choose the appropriate Project group to categorize the project. Project groups help in organizing and reporting projects more efficiently.
- Select the Company
- Assign the Project / Jobs to the relevant company
- Note: If no Company is selected, the project will be considered an internal Project / Jobs (not associated with any external customer).
- Assign the Project / Jobs to the relevant company
- Project period
- Set the planned start and end dates for the Project / Jobs if known.
- Important: If the Project / Jobs period is not set, it will be treated as open-ended.
- Set the planned start and end dates for the Project / Jobs if known.
- Status
- Select the current Status of the Project / Jobs:
- Draft: The project is in preparation and has not yet started.
- In Progress: The project is actively being worked on.
- Completed: The project has been finished and all work is done.
- Canceled: The project has been terminated and will not be completed.
- Select the current Status of the Project / Jobs:
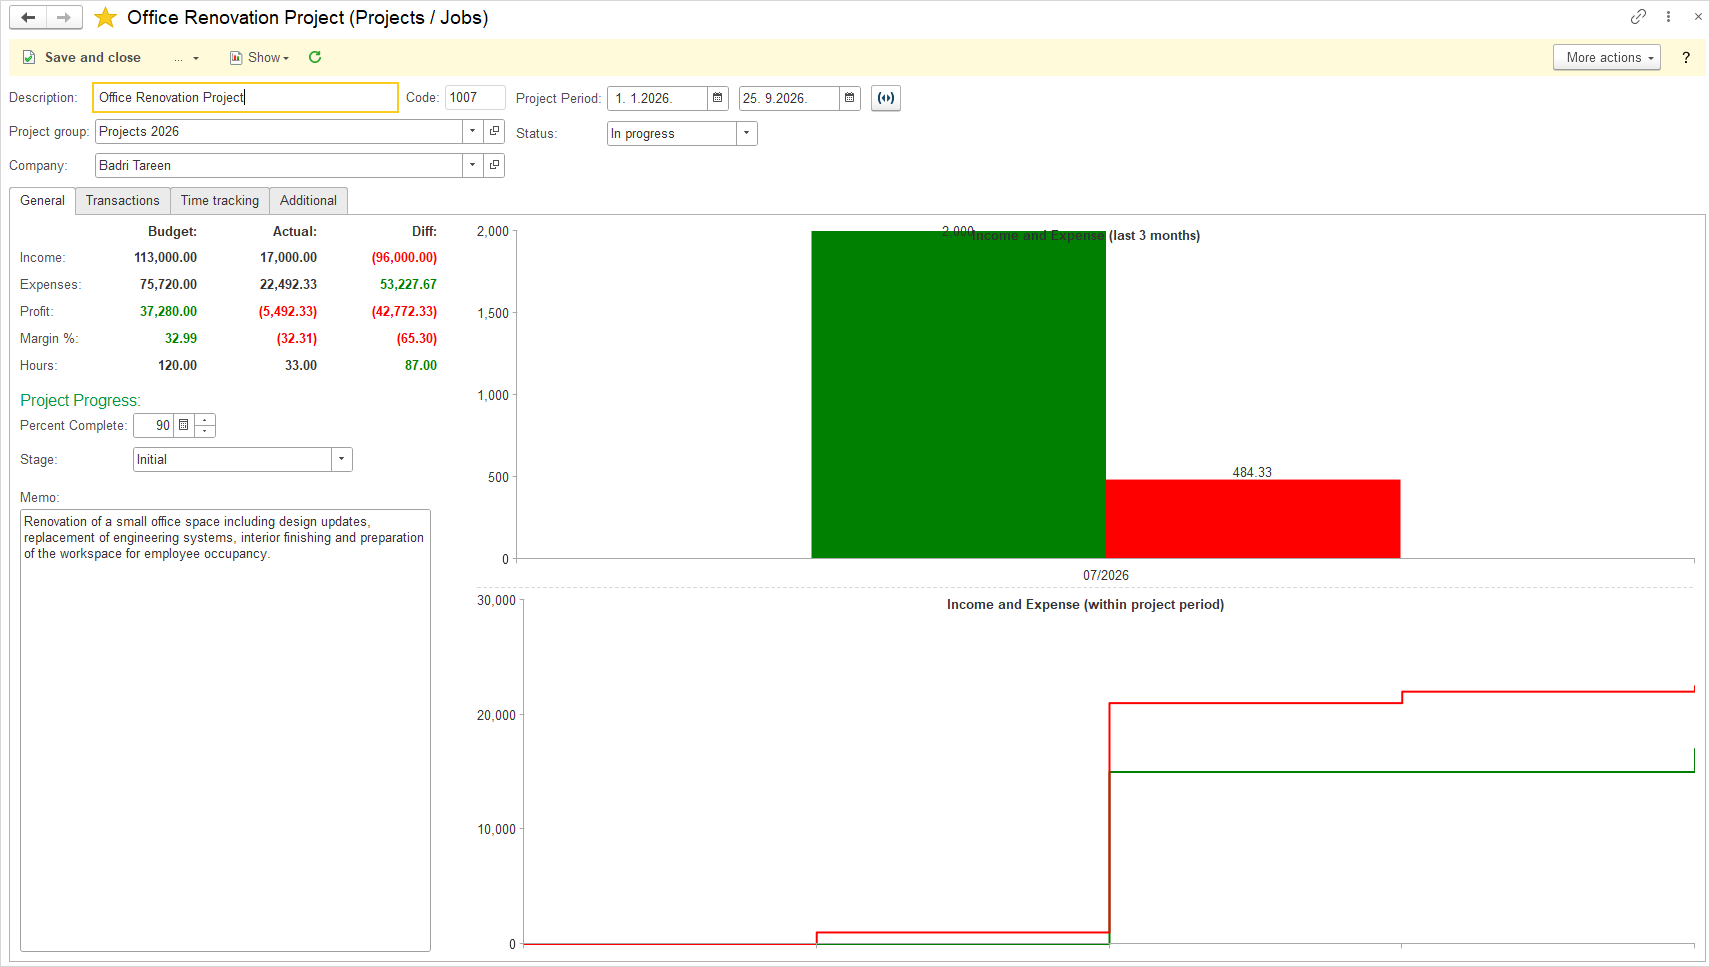
- Optionally, enter budget amounts to have budget vs. actual by project after
- Income – Expected project revenues, all G/L accounts with Income category, entered manually.
- Expense – Expected expenses and project costs, all G/L invoices with the Expense category
- Profit – The projected profit, calculated as expected income minus expected expens
- Margin % – The projected profit margin, calculated as profit divided by income, expressed as a percentage.
- Hours – Hours worked by employees on a project that are billable to the client, recorded in the Time Tracking document.
- Project Progress
- Percent Complete – The percentage of project completion, entered manually.
- Stage – The current stage of the project. Default stages are provided, and additional stages can be created.
- Memo
- Click Save and close to finish.
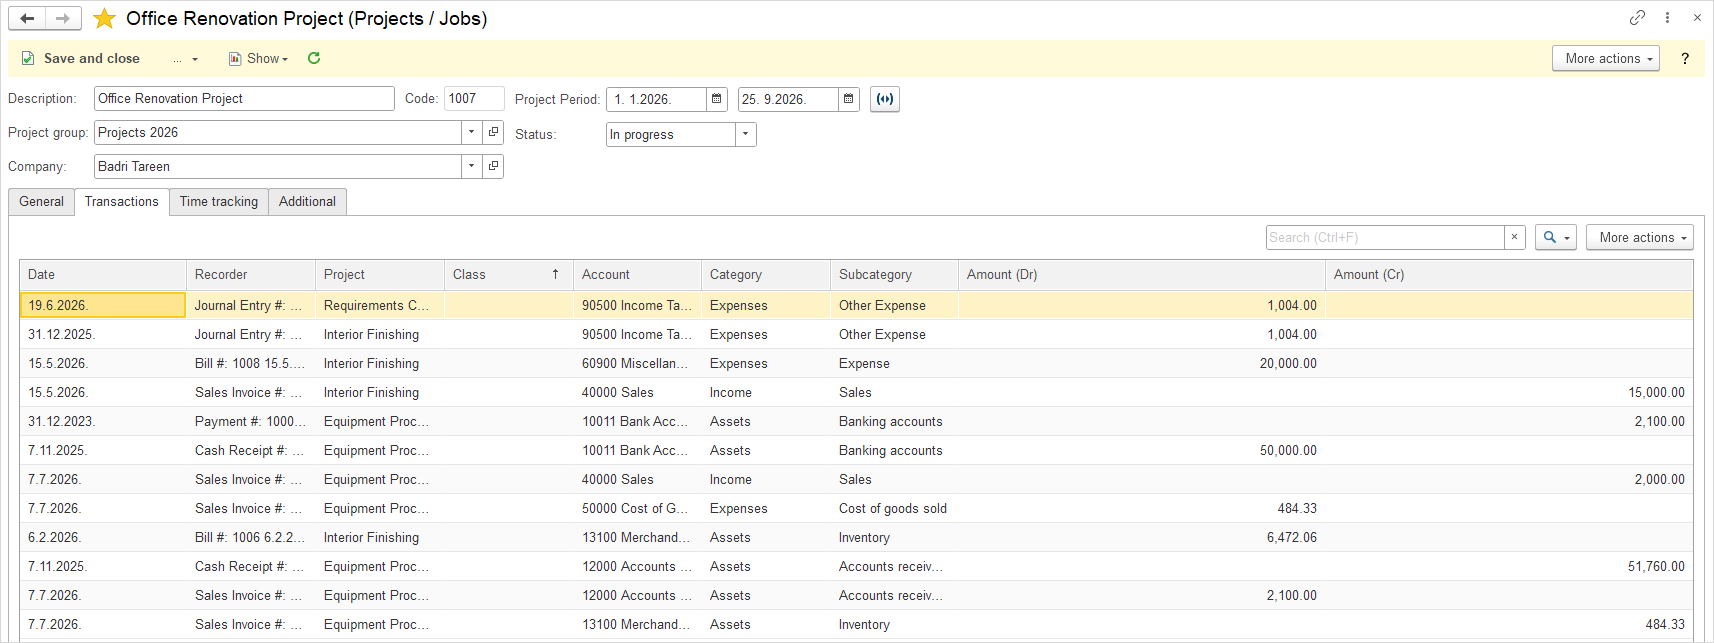
The Transactions tab displays all documents and transactions associated with the specific project.
It provides a centralized view of all activities recorded within the project, as well as access to the details of individual documents.
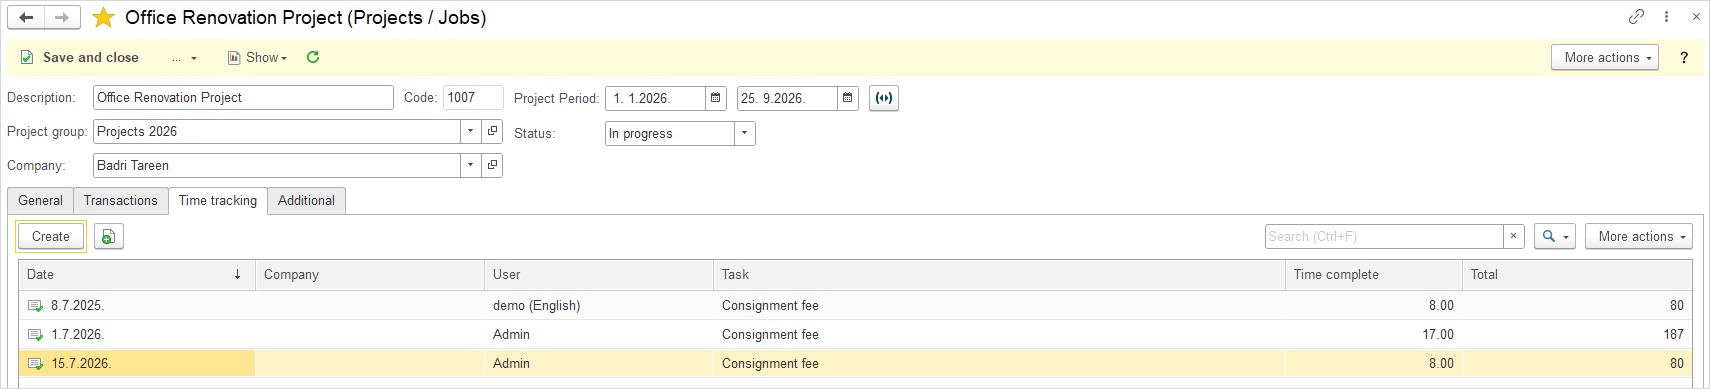
The Time Tracking tab displays the time tracked for the project. For detailed information, see the Time Tracking documentation.
Project / Job Management #
The Project / Jobs directory offers two methods of working: via a List and a Kanban board. These two views allow users to choose the most convenient way to manage and visualize Project and Job – the List is ideal for quick filtering and sorting, while the Kanban board provides a clear picture of the project and job flow through different stages of the project lifecycle.
In the Project / Job List, the following key information is displayed: Project / Job, Customer, Start date, End date, Stage, Status, Type, (Budget) Income, (Budget) Expense, (Budget) Hours, Complete %, Memo, and a Filter button.
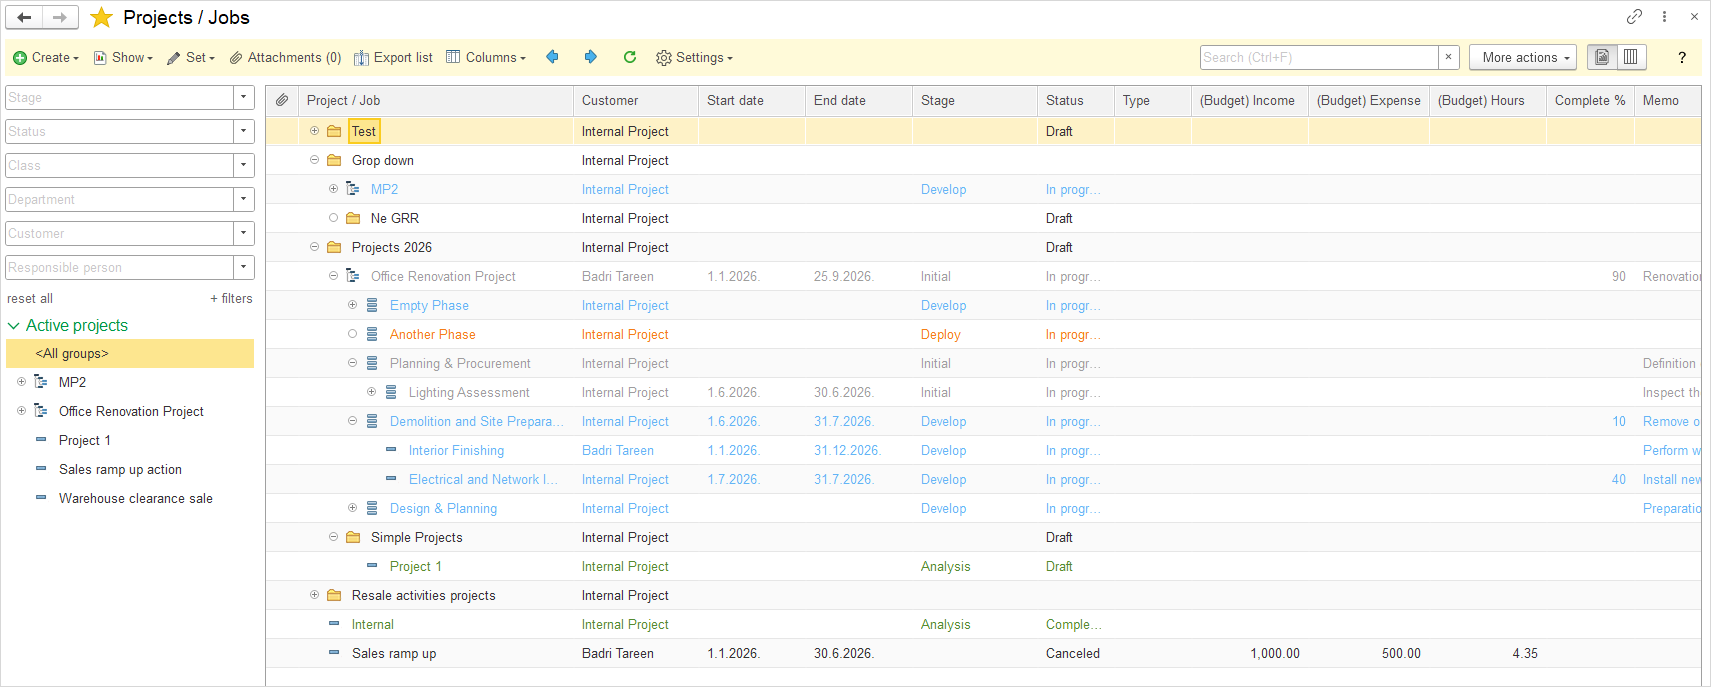
When the List view is opened, the Set pencil icon appears. This pencil allows changes to the Status, Stage, and Completed % for a Master Project, Phase, or Job without opening them.
On the left side, by default, several filters are available: Stage, Status, Class, Department, Customer, and Responsible person. A new filter can be added by clicking the +Filter button and selecting the desired filter.
Additionally, on the left side there is an Active Project tab: by clicking <All groups> in the List view, all created projects are displayed regardless of their status.
Beside <All groups>, projects that are currently active are also displayed, and by clicking on a specific project, all of its Phases and Jobs can be viewed.
Working with projects and jobs using the Kanban method allows for easy drag-and-drop of jobs across the board, reflecting changes in their Stage, such as Initial, Analysis, Develop, Deploy, Final Stage.
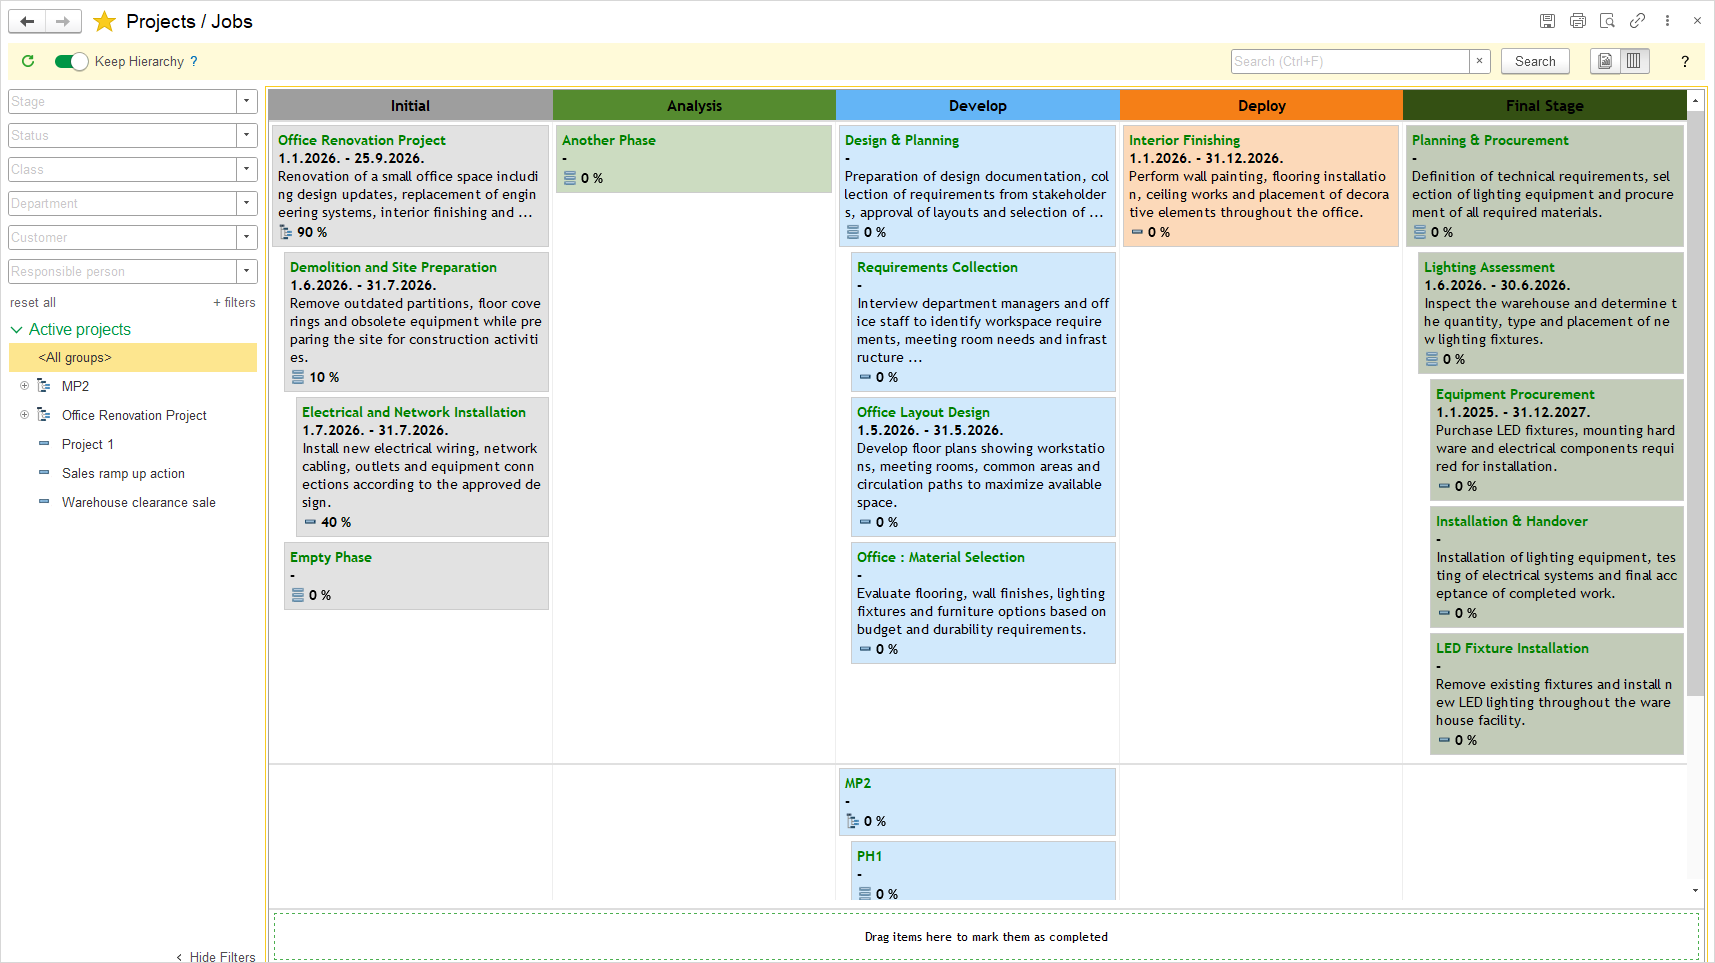
On the left side, by default, several filters are available: Stage, Status, Class, Department, Customer, and Responsible person. A new filter can be added by clicking the +Filter button and selecting the desired filter.
Additionally, on the left side there is an Active Project tab: by clicking <All groups> in the Kanban, all created projects are displayed regardless of their status.
Beside <All groups>, projects that are currently active are also displayed, and by clicking on a specific project, all of its Phases and Jobs can be viewed.
Tree view mode #
You can add groups with sub-groups to your projects. And use the Tree mode of viewing.
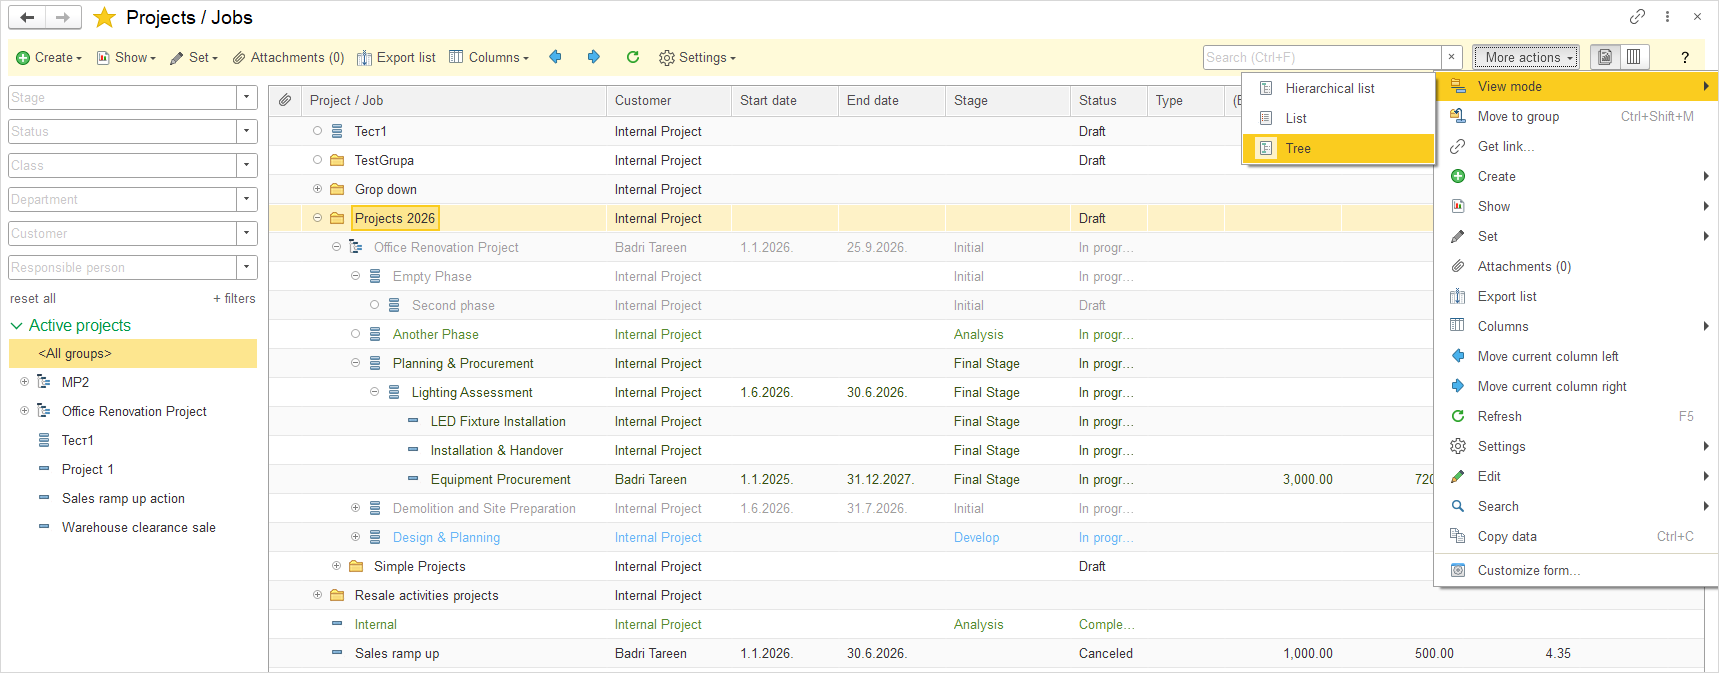
Use More actions – View mode for switching between view modes:
- Hierarchical list
- List
- Tree
The Tree mode will help you with structured Projects.
The project hierarchy is structured as Master Project → Phase → Project / Job. A Master Project can contain multiple Phases, while each Phase can consist of multiple Project / Job. This hierarchy enables data to be grouped and analyzed from the highest project level down to individual Jobs.
Application of the Project in Accounting Entries #
Same rules apply to Class application in accounting entries.
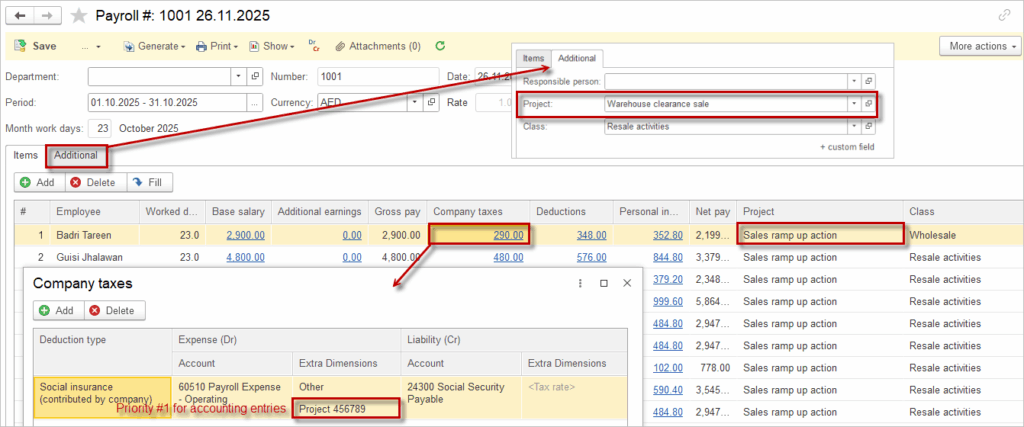
The Project attribute can be entered at different levels within the document. The rule that applies is: lower-level details take precedence over higher-level ones.
This means the following: The Project specified in the header (the Additional tab of the document) flows into the lines of the tabular section. In the line items, the Project can be manually changed or deleted. If there is a Project clarification inside a line item, it can also be modified or removed.
In the screenshot below, the Project attribute is set as Warehouse clearance sale. However, the user manually changed the Project for line item to Sales ramp up action. The Project specified at the line item level takes precedence and will be used in the accounting entries (even if it is empty). For a particular line item, user has changed Project in the Company taxes tab to Project 456789. For the entry in 60510 Payroll expense account the Project 456789 will be used. For all other accounting entries resulting from the first line item, the Sales ramp up action project will be used.