This article is about how to keep your on-premise AccountingSuite version up to date and apply patches to quickly fix critical bugs.

The cloud AccountingSuite version will be updated automatically and there are no such menu items for installing patches. Please contact us, if you need install your Extension with Customizations. How to install Extension to on-premises AccountingSuite please see Extensions and Additional Reports.
Cloud AccountingSuite extension need to be public only with AccountingSuite’s Admin Team for security reasons and after some tests for work in cloud.
You can check your extensions only on your on-premise AccountingSuite version.
To install your extension provide to us:
- File of extension.
- Address of Cloud database to install it.
- Manual and Solution Design documents.
After the audit, there may be requirements for further fixes for customization for the Cloud. The extension should not create an increased load on the application in the cloud.
Such extensions may be denied installation in the Cloud version. Use an on-premise database instead.
After successful tests, the extension will be published in the specified area.
Keep in mind: With a planned AccountingSuite update of the cloud version to a new release, your customization may stop working and will be disabled. You will need to release a new customization version and send it to us again for audit and publication.
For more please see
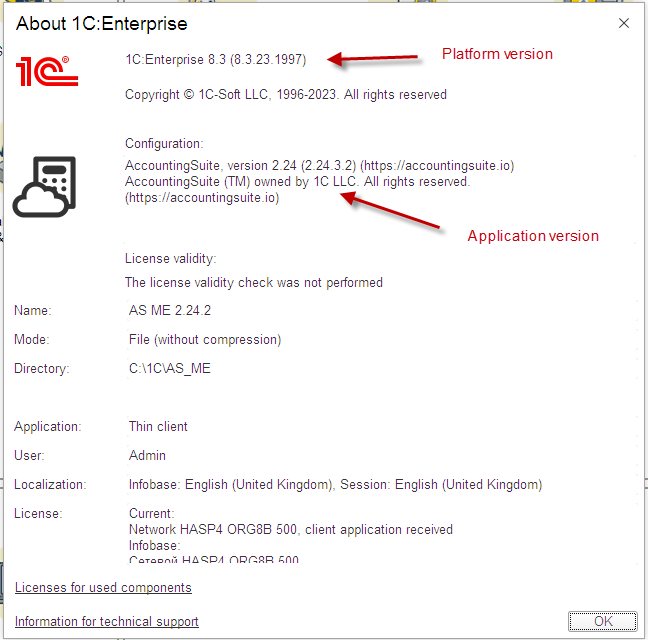
You can check your version number in Top menu – About.

For new versions of AccountingSuite to work, you may need to update the 1C Platform to a new release. The AccountingSuite system will display a message that a new 1C Platform version is required if there is no compatibility with the old version.

Please note: Versions should be updated sequentially by the third number. If you have an older version, check the 1C Platform version first. Install the actual one. Next, in the AccountingSuite version archive, download all missing .cf files for version numbers for installation.
For example, you have 2.24.12, you need to upgrade to 2.25.3. You need to install 2.25.1, then after working out the upgrade procedure, install 2.25.2, then after working out the upgrade procedure, install 2.25.3.
Release updates #
To keep your accounting software up to date, your AccountingSuite must always be updated to the latest version. Please check our website for the latest updates.
Please backup your database before applying updates and patches to ensure that you are preserving the existing state of your accounting data.
If you have customization, then do not update database yourself. Contact the partner who made the customizations. Updating can disable all customizations and lead to data loss. It must be first updated all modifications and then update the database taking into account customizations.
Use Install updates and patches on Admin Panel – Update and service – Application update menu.
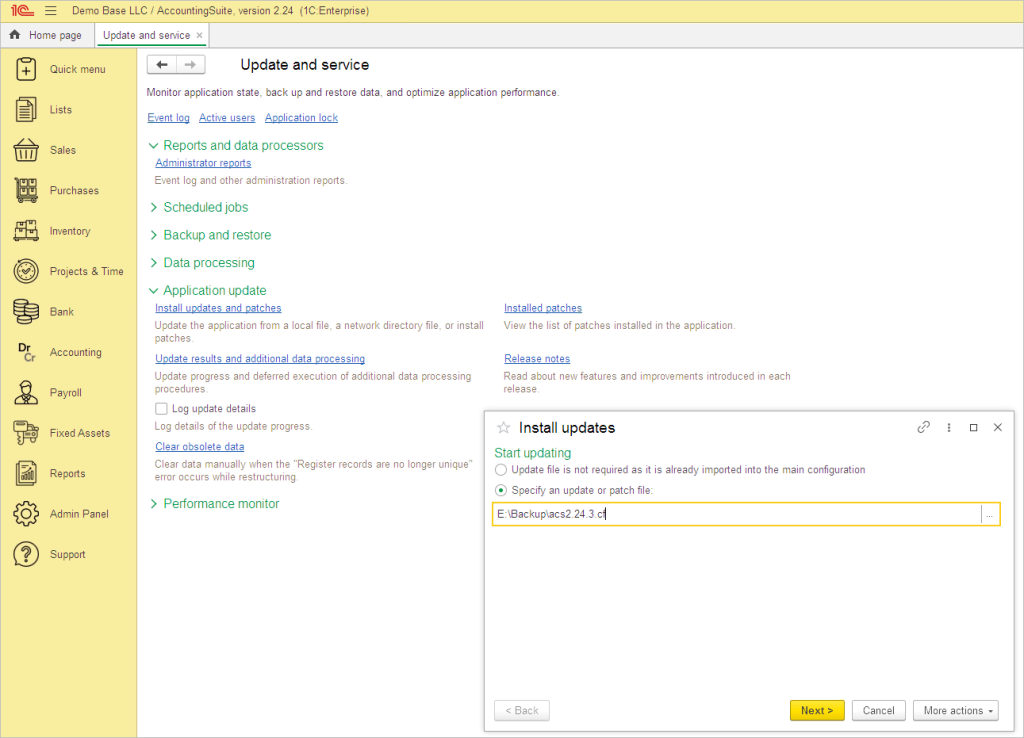
Download the update file from our website. Select the update file from your drive and click Next.
Then click Continue on Security warning form.
Please close all other users’ active sessions before pressing the Next button. And be sure that you have done Backup.
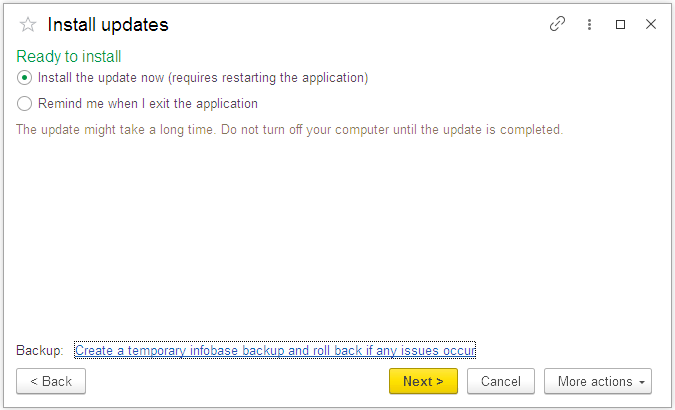
Wait a while when the update process starts.
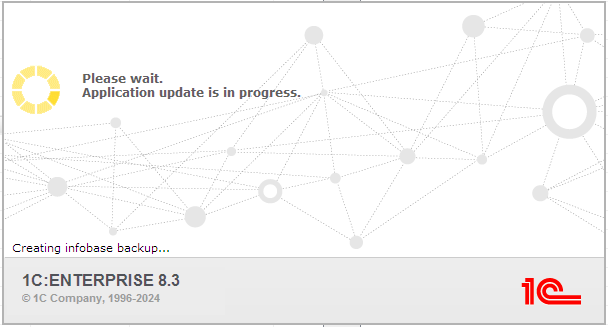
After all the procedures, the system will start itself and be updated. You can check your version number in Top menu – About.
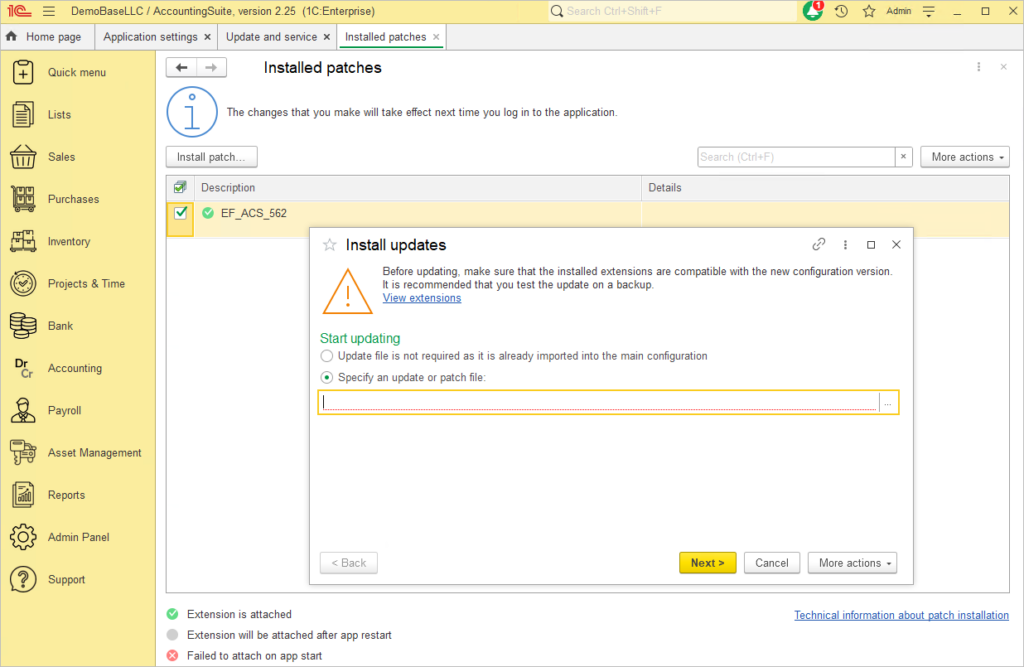
Patches installation #
To quickly fix errors, AccountingSuite has patches – small *.epd or *.cfe format files (specially prepared configuration extensions) that are designed to fix a specific error in a specific application release before fully updating this application. When installing the next application release, in which this error has already been fixed, the patch loses its relevance and is deleted automatically.
Use Install updates and patches on Admin Panel – Update and service – Application update menu to install patch.
Use Installed patches on Admin Panel – Update and service – Application update menu to see and manage installed patches.
From this form you can Install patch or uncheck it. Use right mouse click menu to Delete patch.
Please restart your AccountingSuite to apply new patch after installation.
Clearing Cache After System or Platform Updates #
After updating AccountingSuite (ACS), the 1C:Enterprise Platform, or your server environment, you may encounter unexpected errors, display issues, or performance slowdowns. These issues are often caused by outdated or conflicting data stored in the cache.
This guide outlines three primary methods to clear cached data to resolve these problems.
Clear User Settings & Cache via the ACS Admin Panel #
For issues occurring within the AccountingSuite web application (e.g., interface errors, settings not applying), the most effective method is to clear the user’s personal settings directly from the Admin Panel. This removes saved interface layouts, report options, and other personalized data.
Steps:
- Navigate to Admin Panel → Security settings → Users.
- Select the specific user experiencing the error.
- Go to the Other settings tab.
- Locate the Personal settings section and click the Clear button.
- Confirm the action.
For bulk operations: If multiple users are affected or the application is unstable, administrators can use the Clear Settings link in the main Security settings menu to clear settings for selected users or all users at once.
Clear Local 1C:Enterprise Client Cache #
If you are using the client 1C:Enterprise and encounter connection errors or strange application behavior after a platform update, clearing the local file cache on the user’s machine is necessary.
Steps:
- Open the 1C:Enterprise launch window.
- Select the problematic infobase and click Edit. Note the connection path, then close the window (do not launch the infobase).
- Open File Explorer and navigate to the local cache directory:
C:\Users\<YourUserName>\AppData\Roaming\1C\1cv8\ - Inside this folder, you will see folders with long, hyphenated names (e.g.,
7357d7d9-c54b-4846-9f56-471667e95a14). These correspond to your infobases. - Delete the folder matching your infobase. To identify the correct one, sort by “Date modified” and delete the most recent folder, or delete all contents of the
1cv8folder (this is safe, as the cache will be rebuilt automatically).
Clear Browser Cache for Web Clients #
For users accessing the ACS database via a web interface, browser caching often causes forms to display old data or functionality to break after a deployment.
Steps:
- Instruct users to clear their browser’s saved settings and cache.
- Manually clear browsing data (cached images and files) for the specific site (
accountingsuite.ioor your web server IP) in the browser’s privacy settings. - If you are using the AdBlock add-on then set it up to be disabled for ACS site.
- For optimal results, perform a hard refresh on a web page:
- Windows/Linux:
Ctrl + Shift + RorCtrl + F5 - Mac:
Cmd + Shift + R
- Windows/Linux:
Additional Context for Administrators #
- Server-Level Connection Issues: If you receive a “1C:Enterprise server not found” error after a renewal, client cache clearing is a recommended troubleshooting step. However, always verify that the 1C Server Agent service is running and that port 1541 is accessible through the firewall first.
- Session Management: To apply updates on the server, use the 1C Server Administration Utility to enable Single-user mode and abort hanging sessions before clearing caches.
By following these steps in order—starting from the application level (ACS Admin), moving to the client machine (1C file cache), and finally the browser – you can resolve the majority of post-update anomalies.