There are several option for posting beginning balances for customers, vendors, inventory and any other general ledger accounts in the AccountingSuite. Combine these options when moving to AccountingSuite from your previous accounting data or system as at the transfer date.
Before you start importing the initial accounting balances, study the data import scheme. You need to transfer all the master data first.
Opening Balances Options Overview #
| Option 1 Journal Entry | Option 2 Import Documents with Opening Balances | Option 3 All Historical Transaction Import | |
| Supports inventory attributes (Lot etc.) | No | Yes | Yes |
| Supports correct inventory costing method | No | Yes | Yes |
| Correct Aging AR/Aging AP can be derived after import | No | Yes | Yes |
| Correct Sales /Purchases history reports can be derived after import (incl. Customer / Vendor Details reports can be derived) | No | No | Yes |
| Transaction date | Start accounting date minus 1 (ex. 31 Dec for 01 Jan) | Real date for AR/AP Aging reports and Inventory FIFO | Real historical date |
| Best suitable for | All opening balances except for: AR, AP, Inventory | AR, AP, Inventory | All entries, no limitations |
Option 1 – Entering Balances using Journal Entry #
To record certain account balances as of the opening date Journal Entry (table import or manual entry) can be used.
Importing the balances with Journal Entry has certain limitations for customers and vendors balances. Use the dedicated Importing open AR/AP and Importing Inventory tools instead of a Journal Entry, because they create proper invoices, bills, and inventory adjustments that drive aging and stock reports.
When importing the opening balances with a Journal Entry, you would not import the entire documents posting, but rather just the remaining balance corresponding with the opening balances account. For example, instead of recording Cr Revenue, Dr Cost of goods sold, Dr Accounts Receivable, Cr Inventory for a sales doc it would be just record Dr AR and Cr Opening balance.
Advantages:
- quick and ease.
Disadvantages:
- applying customer / vendor credits for this opening balances will have to performed manually, because the system will not have enough traceable information (Document extra dimension) to do it automatically;
- dates and document numbers are not entered;
- no Aging Report will be available for these entries, as Due Dates are not entered either;
- Costing methods (FIFO and Weighted average) will be distorted for the Inventory entered in this manner.
Option 2 – Import Documents with Opening Balances #
Option 2 is to create document (Sales invoices for Customers, Bills for Vendors and Inventory Adjustment for Items) for each separate historical transaction, that ends in an open balance of Accounts Receivable, Accounts Payable or Inventory on stock as at the transfer date.
Advantages:
- all relevant information for calculation of overdue payables and receivables, inventory valuation will be in place.
Disadvantages:
- time and accuracy consuming.
Option 3 – All Historical Transaction Import #
Allows you to completely transfer all documents from your previous account system.
We recommend transferring all historical documents as drafts and opening balances for start date to save historical information for analysis and control. Otherwise, the exact match of the final G/L accounting transactions after the documents will be posted in the new system is not guaranteed.
Step-by-step guide for document import
Advantages:
- all historical information for calculation of overdue payables and receivables, inventory valuation will be in place.
Disadvantages:
- significant time and accuracy consuming.
Importing Journal Entries #
How to import Journal entry with Data Import Tool

How to import Journal Entries
Importing the balances with Journal Entry has certain limitations. Use the dedicated Importing open AR/AP and Importing Inventory tools instead of a Journal Entry, because they create proper invoices, bills, and inventory adjustments that drive aging and stock reports.
1. Navigate to Accounting → Journal Entries. Create a new Journal entry and click Import from file.
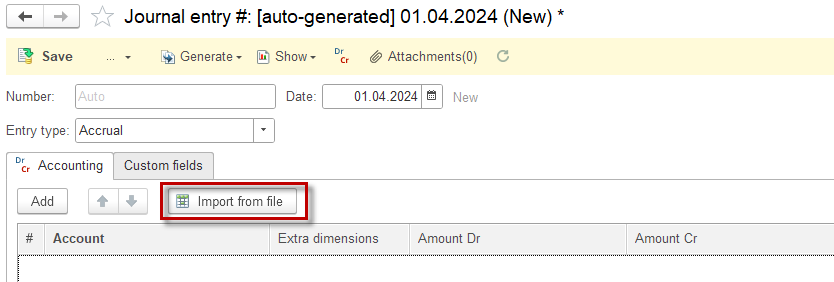
2. Fill in the table manually or copy and paste data from a spreadsheet.
3. Tick the checkbox Cells contains value to choose the data from the dropdown list.
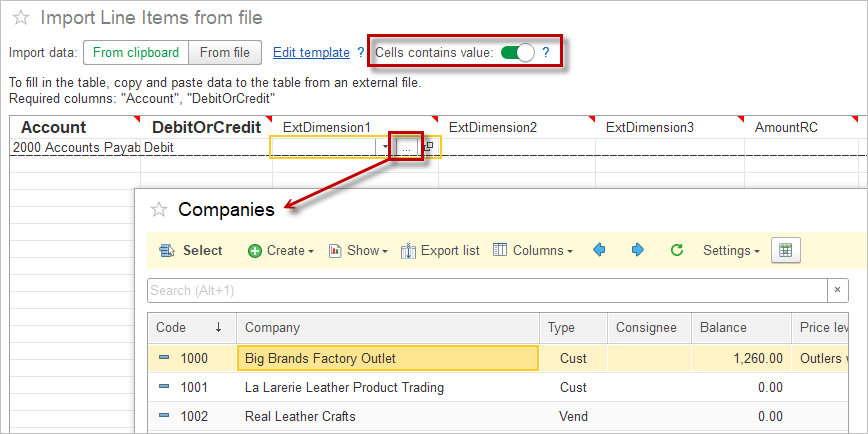
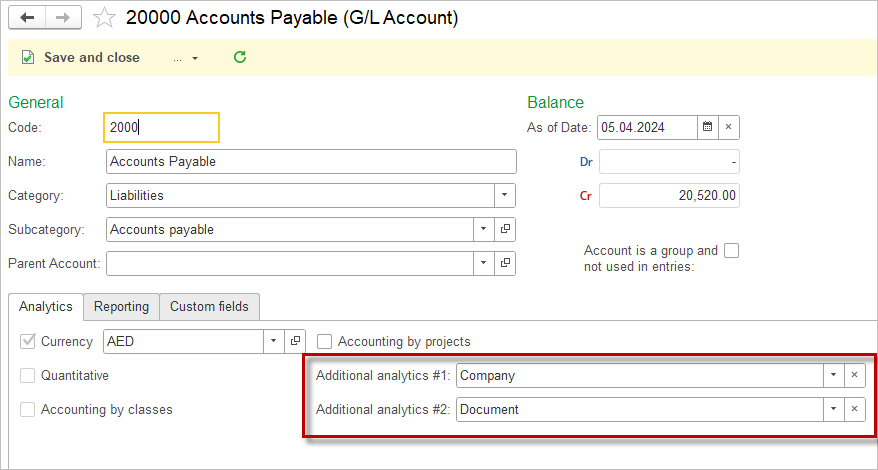
4. To check what Extra dimensions does the selected account have, open the account.
5. Fill in the table and click Next
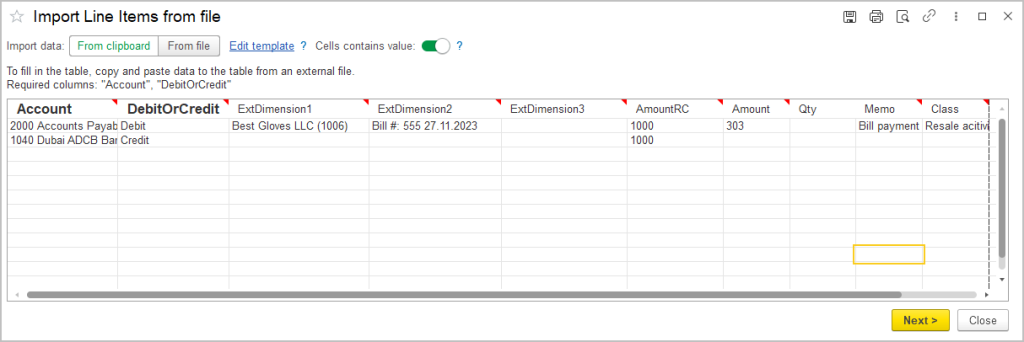
6. Use G/L account 30000 Opening balance to compensate all entered initial balances.
7. Save the Journal entry
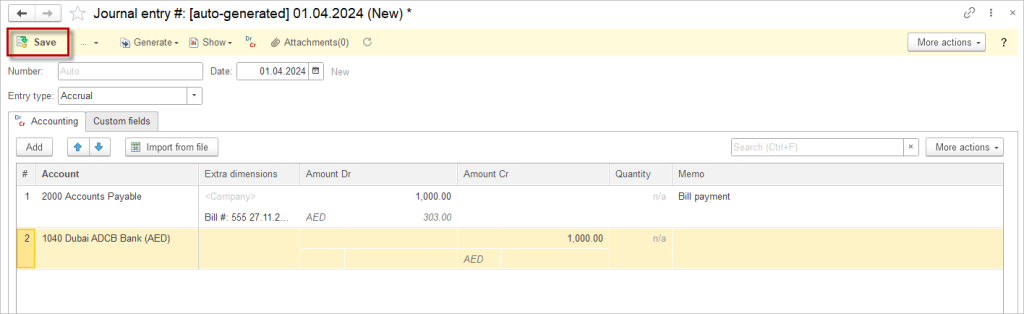

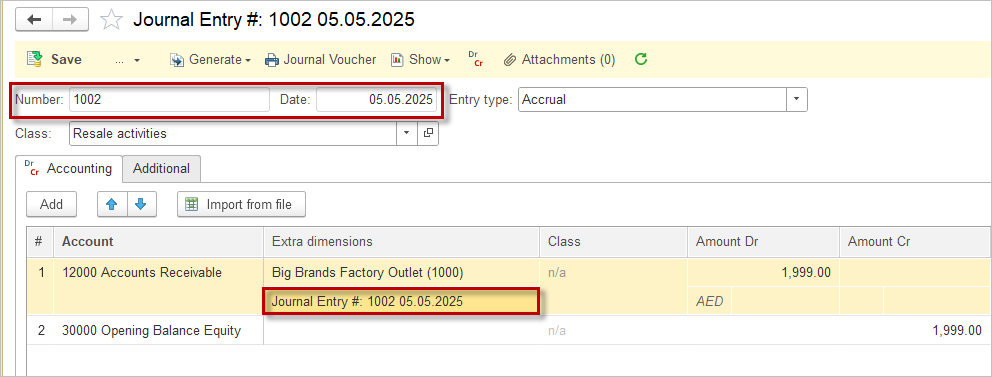
To be able to apply the payment to the AR/AP entered by the Journal entry, please refer to it itself into the Document Extra dimension (Journal entry refers to itself):
Open Inventory Balances #
Inventory Adjustment document can be used for importing the inventory opening balances.
The Costing Method applicable to the opening inventory is essential for import:
For the Weighted Average method, items can be imported in a single Inventory Adjustment document, as batch tracking and receipt dates are not relevant to the correct calculation of cost.
For the FIFO costing method, however, it is crucial to import the historical receipt dates, as this data determines the cost sequence applied to outgoing inventory. For the FIFO costing method, items within one Inventory Adjustment document are considered as one batch with one receipt date.
Therefore, to ensure proper FIFO costing, make sure that information about the receipt dates for closing inventory from the previous accounting system is available, and create a single Inventory Adjustment document for each receipt date.
How to import Inventory Adjustment Documents
1. Navigate to Inventory → Inventory Adjustments.
2. To import multiple document, select Import from file on the documents list. To create one Inventory adjustment, click Create and Import from file.
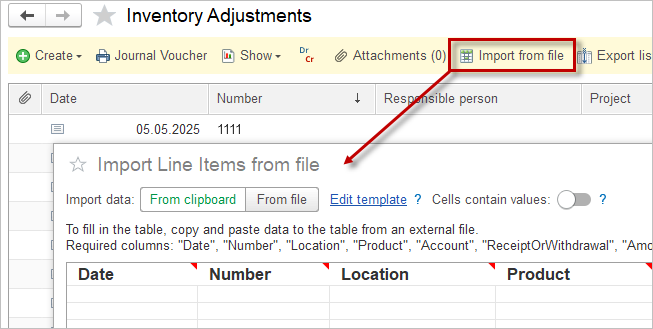
3. The Import window opens, showing the columns required for import. Required columns are marked in bold.
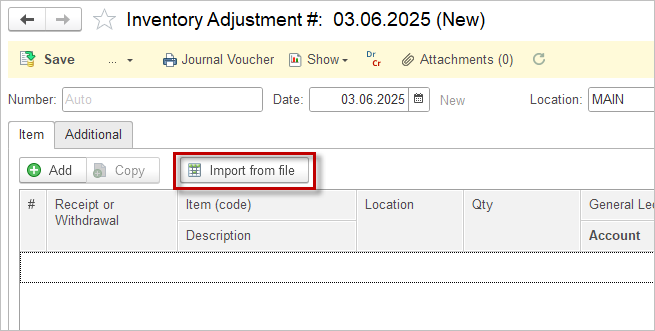
4. If you would like to import additional data along with the required columns, click Edit template to add more columns and tick the additional columns. Use the arrows to change the order of the columns.
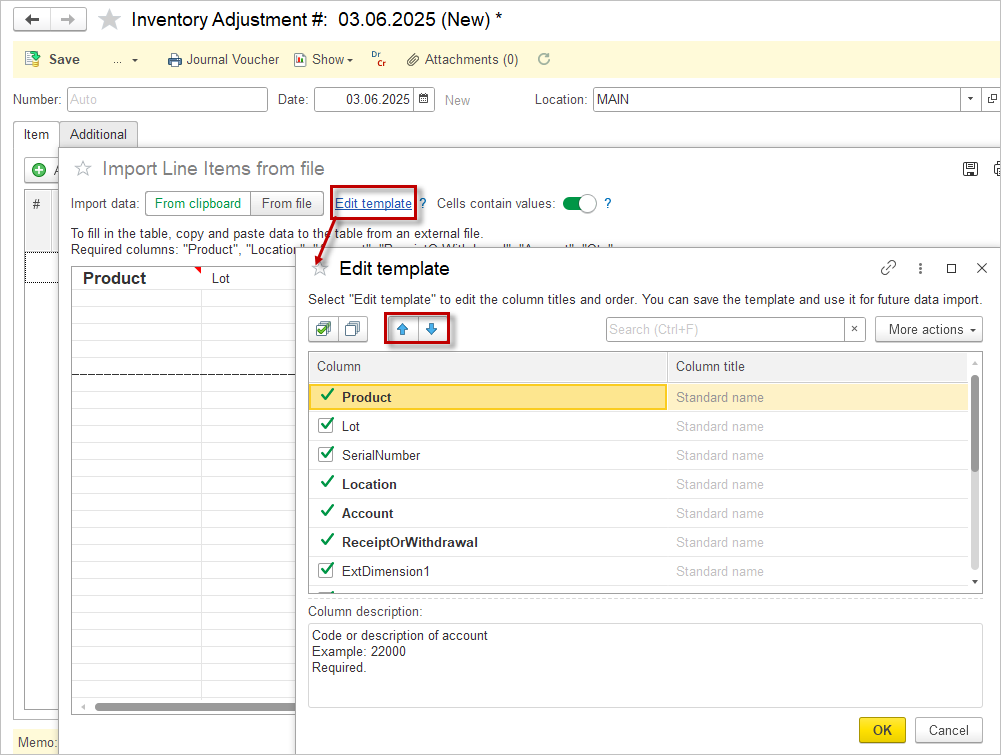
5. Fill in the table manually or copy and paste data from a spreadsheet.
Or select From File and Save the template to your computer. Fill in the table and then click Import spreadsheet
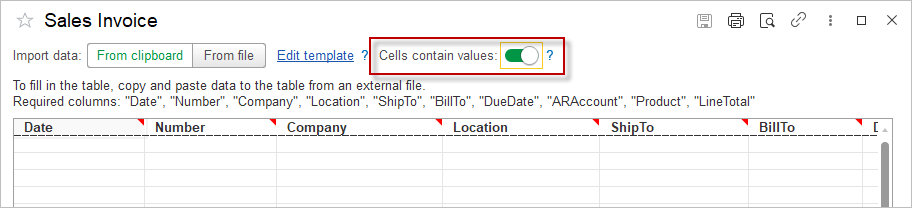
6. Tick the checkbox Cells contains value to select the data from the dropdown list.
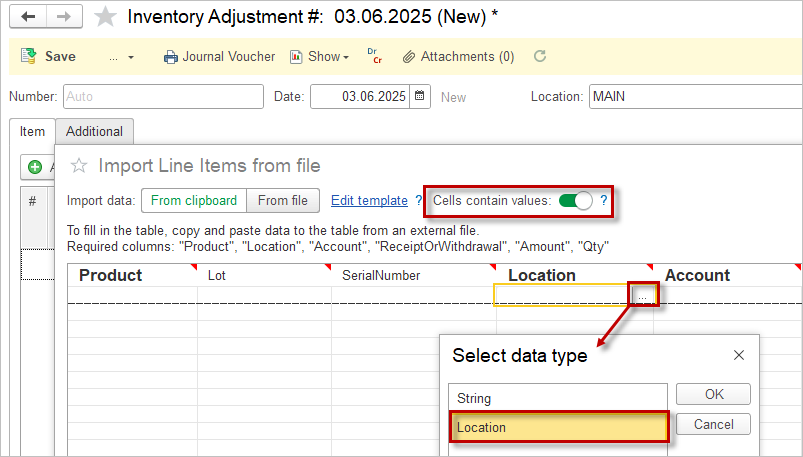
7. Click Next after filling in the table.
8. The result of the import will be displayed.
Open Accounts Payable / Accounts Receivable #
This import is designed to create fake historical documents (Sales invoice for AR and Bill for AP), for the following purposes:
- that they can be referred to later in the Apply Vendor / Apply Customer credits document once the payment will have been collected/performed (“Document” Extra dimension will be filled with these documents);
- of Aging AR/Aging AP reports to assess the outstanding invoices and bills, categorizing them by the length of time they have been unpaid to help manage cash flow and identify potential collection or payment issues.
The documents posted by these imports (Sales invoice for Accounts Receivable and Bill for Accpunts Payable) have a hidden manual posting mode and will make the following accounting entries without real transaction in Revenue, Cost of Goods Sold, Inventory and Taxes:
For accounts payable:
Dr 30000 Opening balance (set in the Accounting Settings)
Cr Accounts Payable (specified in the import table)
For accounts receivable:
Dr Accounts Receivable (specified in the import table)
Cr 30000 Opening balances (set in the Accounting Settings)
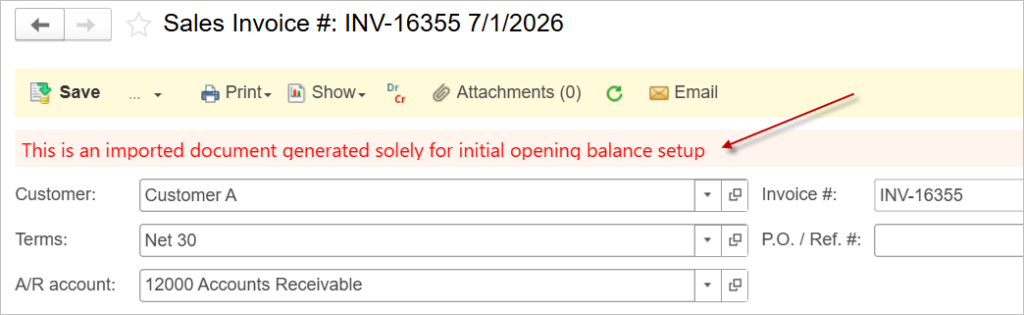
Please note: These are not full-fledged documents. They are only for entering customer and vendor debt balances. These documents do not need to be edited later. There will be no impact on the G/L entries. If you need to change the amount of the document, you need to delete such opening document and import it again.
Do not use Journal Entry documents to enter customer and vendor beginning balances. For the balance, you need to specify the Extra-Dimension analytics Document. This mechanism will create such documents automatically and then allow you to accept payments using them.
Otherwise, the balance will be total without allocation of invoices, and there will be a loss of accounting for each document.
The amounts must be imported, including all applicable taxes, in the same way as they appear in the Trial Balance from the previous accounting system.
How to import Open AP/ AR
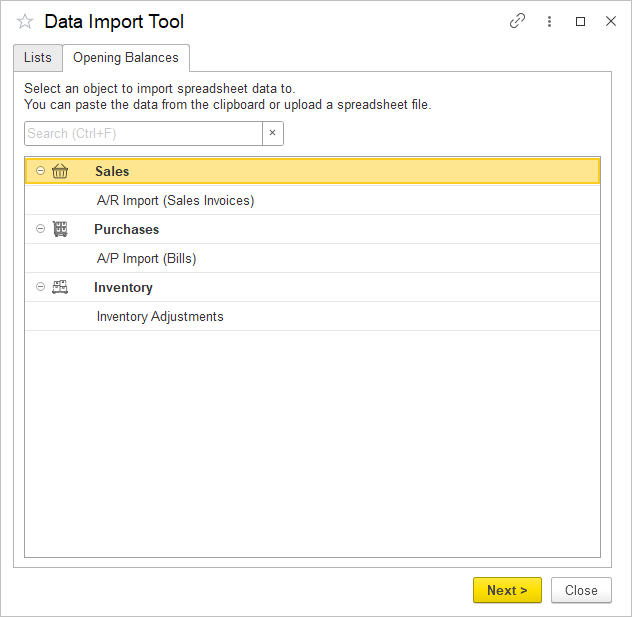
1. Navigate to Admin Panel → Data Import Tool.
2. Select Accounts Payables Import (Bills) or Accounts Receivables Import (Sales Invoices).
3. The Import window opens, showing the columns required for import. Required columns are marked in bold.
4. Date is accepted in the following formats:
- MM/DD/YYYY
- DD/MM/YYYY
- MM.DD.YYYY 00:00:00 (24 hours format)
- DD.MM.YYYY 00:00:00 (24 hours format)
- MM.DD.YYYY 00:00:00 A.M. (AM/PM format)
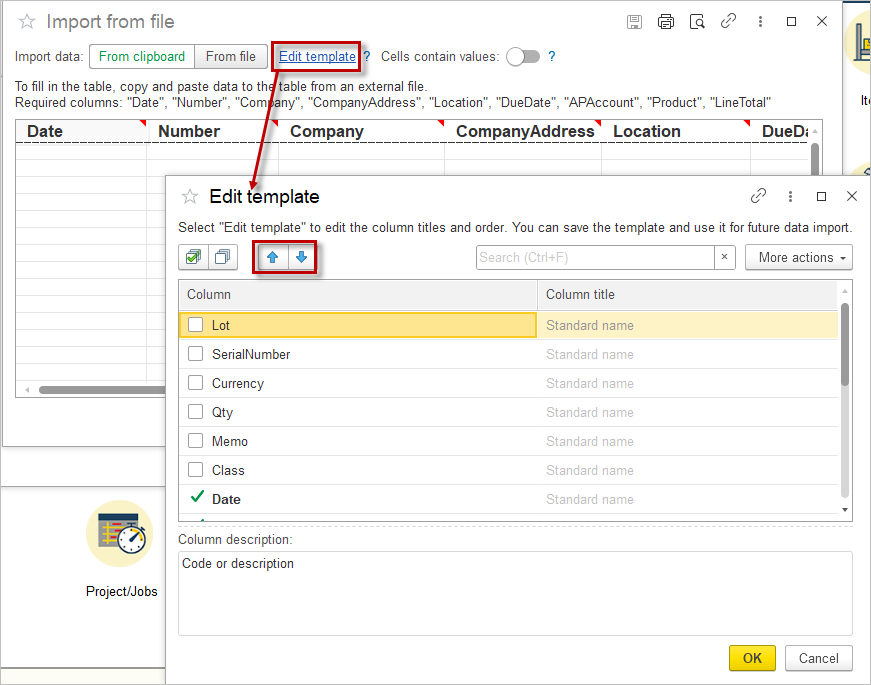
5. If you would like to import additional data along with the required columns, click Edit template to add more columns and tick the additional columns. Use the arrows to change the order of the columns. Additional information can be imported as a Custom field. Create a Custom Field for Bill or Sales Invoice document and add it in the Edit template window.
6. Fill in the table manually or copy and paste data from a spreadsheet.
Or select From File and Save the template to your computer. Fill in the table and then click Import spreadsheet
7. Tick the checkbox Cells contains value to select the data from the dropdown list.
8. Click Next after filling in the table.
9.The result of the import will be displayed. An informational message will appear at the top of imported documents to distinguish them from regular documents.
Handling items in opening‑balance invoices
- Two approaches are allowed to fill Product field in the opening documents:
- Simplified – one service item (e.g., “Opening Balance”) with no breakdown and all amount for this invoice;
- Detailed – actual product lines with amounts per lines for historical reference.
- Items need to be assigned with an empty Tax Group (Tax calculation is not required, as receivables and payables are imported at gross amounts).
- In either case, no individual accounting entries are created – the entire amount posts to account 30000 Opening balance.
- Requirement: the invoice must include at least one positive‑value line (total amount non‑zero).
Verifying Opening Balances via the Trial Balance Report #
After importing your opening balances, it is critical to verify that the data has been transferred correctly and that your starting position is accurate. The Trial Balance report is the primary tool for this control, with a specific focus on account 30000 Opening balance. Follow the steps below to ensure a clean and reliable cutover.
Before You Begin: Finalize the Previous System #
Before you start importing any data into AccountingSuite, ensure that your previous accounting system is fully closed and finalized as of the transfer date:
- Close the accounting period in your legacy system so that no further transactions can be entered for that period.
- Calculate and post all currency exchange differences to reflect the correct values in your reporting currency.
- Determine and post the financial result (net profit or loss) for the period, so that all revenue and expense accounts are closed into retained earnings.
Once these steps are complete, your legacy system’s Trial Balance as of the transfer date represents the definitive starting point for your new AccountingSuite instance. All account balances you import must match this Trial Balance exactly.
The Role of Account 30000 Opening Balance #
In AccountingSuite, account 30000 Opening balance is used as the balancing account for all opening balance entries. Whether you import via Journal Entry, the dedicated AR/AP import, or Inventory Adjustments, every opening balance posting is made in correspondence with this account.
This design means that after all opening balances have been entered as of the start date (e.g., January 1), account 30000 Opening balance must have a zero balance. In other words, the total debits and total credits of all opening balance entries must be equal – they must balance against each other through the 30000 account.
How to Verify with the Trial Balance #
- Navigate to Reports → Trial Balance.
- Set the report date to your opening date (e.g., January 1, 2026).
- Run the report and locate account 30000 Opening balance.
If the import was successful and all balances were entered correctly, the balance of account 30000 should be zero. If it shows a debit or credit balance, it means there is a discrepancy between the total debits and total credits of the opening balances you have entered.
What to Do If Account 30000 Does Not Balance #
If you have imported all balances from your previous system and account 30000 still shows a residual balance, this typically indicates accumulated errors or unresolved issues in the legacy data. If you are unable to locate and correct the specific discrepancies in the source data, you can close the gap with a manual Journal Entry:
- Debit or Credit account 30000 Opening balance for the remaining amount.
- Offset the entry to account 39000 Retained Earnings (or the appropriate equity account for accumulated profits/losses).
This approach formally writes off the residual difference against the prior period’s financial result and brings the opening balance account to zero.
Important: This should only be used as a last resort when all other attempts to reconcile the data have been exhausted. It is always preferable to correct the underlying data to ensure a true and fair starting position.
Protecting the Opening Period from Subsequent Changes #
Once your opening balances are verified and account 30000 is zero, you must protect this data from accidental modifications:
- Do not run the Period Closing Wizard for the opening period itself. The opening balances are already correct and include all required currency adjustments and the prior period’s financial result. Closing the period via the wizard is not necessary and could interfere with the integrity of the opening data.
- Instead, use the Closing the Book function to lock the opening period against any further edits. This prevents users from inadvertently changing the opening balances after they have been verified.
- When you are ready to begin regular operations, set the Period Closing Wizard to close the Start of Accounting for Period Closing (e.g., January) – which is the month following your opening date. For example, if your opening balances are dated December 31, your first operational month is January. This ensures that the opening period itself is not recalculated or affected by month-end closing processes, keeping it safe from revaluations or other adjustments.
This methodological approach ensures that your opening balances are not only imported correctly but also verified, protected, and ready for ongoing accounting in AccountingSuite.