
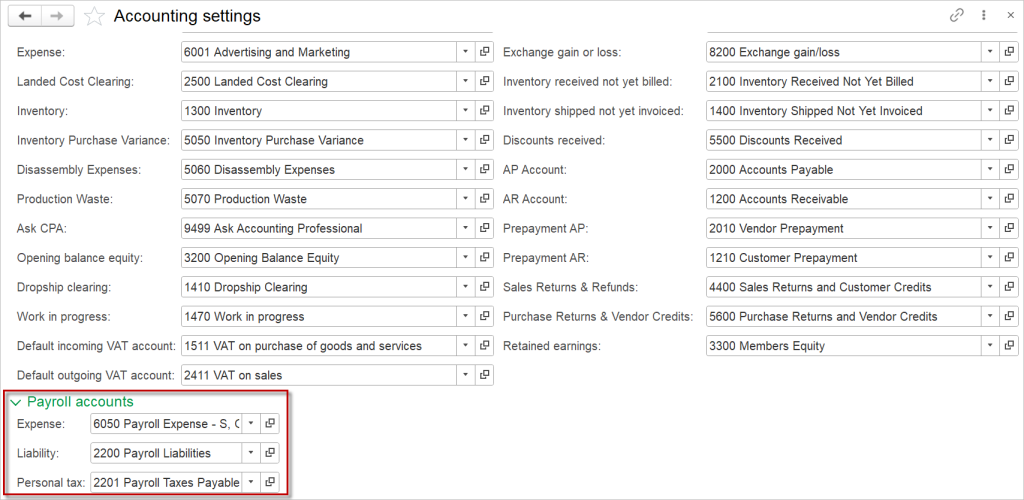
To start accounting for payroll, maintain the respective Accounting settings:
- Expense account
- Liability – the account to be used for entering liabilities to employees
- Personal tax – the account to be used for entering liabilities to tax authorities
Payroll is the document, where you can:
- record wages and salaries
- record additional earnings (such as bonuses)
- withhold deductions or taxes payable by the employee (such as income tax)
- accrual for presonal-related company taxes
- generate payroll payment.
- Navigate to Payroll – Documents – Payroll
- Click Create
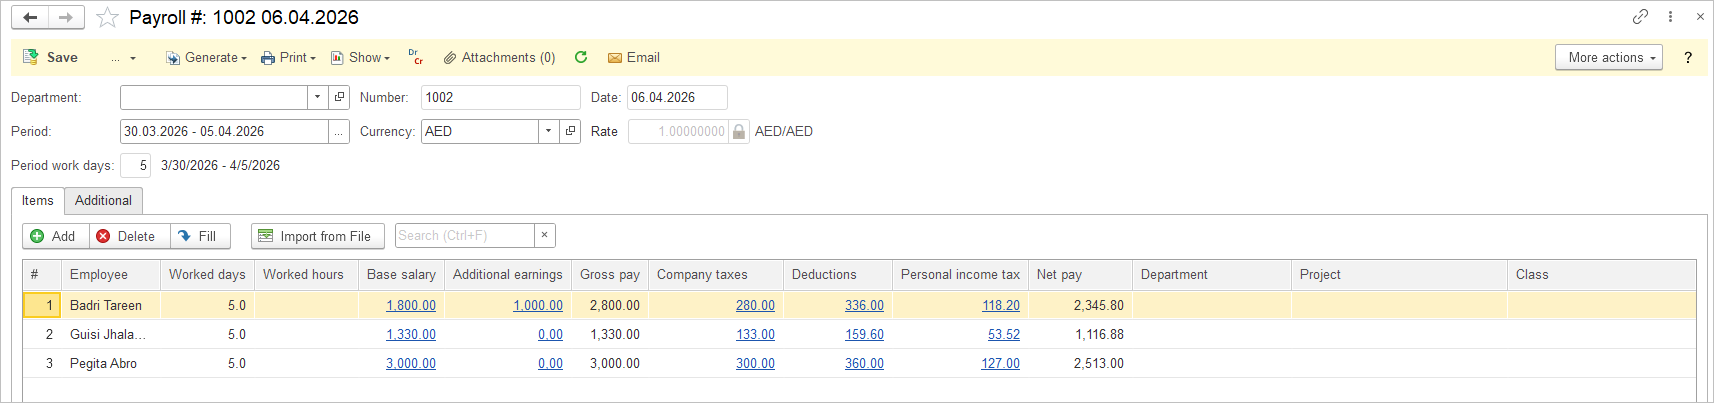
- Choose the Department (optional) and time period. Time period can be custom, e.g. two weeks or a week. Built-in check will not allow to account for the same Employee and the same time period twice.
- Number of work days will be calculated automatically based on the Timesheet document or based on Business Calendar (if Timesheet functionality is diabled). If an employee’s salary is calculated based on hours worked, their hours will be displayed in the Worked Hours column.
- Click Fill to fill in the list of Employees, hired before the date of the document. If Department is chosen, list will be filled in automaticaly with employees associated to it.
- Check the number of days and hours worked. These values cannot be edited manually in the Payroll document. To change them, post the corresponding documents (see Reduce the Number of Days Worked) and refill the Payroll document.
Accounting #
Wages and salaries within Payroll document create the following transactions in the General Journal:
- Debits: Payroll expense account (set in the respective Earning type)
- Credits: Payroll liability (default account set in Accouting settings)
How Basic Salary Is Calculated #
ThThe amount in the Basic salaries tab is used in the formula of the Earning type. Depending on the formula, it can be:
- a rate per day or per hour – e.g. [Salary amount] × [Worked days]. The monthly amount depends on how many days or hours the employee worked.
- a monthly salary – e.g. [Salary amount] / [Standard days] × [Days worked]. The salary is prorated to the days actually worked; a fully worked month is always paid in full, regardless of the number of working days in the month.
In both cases, days are counted as whole units: any day with time worked counts as one full working day, even if the employee worked only 1 hour. To pay only for the hours actually worked, set up the salary by hours, e.g. [Salary amount] × [Worked hours].
Reduce the Number of Days Worked #
The number of days and hours worked cannot be edited manually in the Payroll document. They are always calculated from the documents posted for the period, so the payroll data stays consistent with your time records. To change the days or hours worked, post the corresponding document and then refill the Payroll document.
If the Timesheet functionality is enabled, the days and hours worked are taken from the Timesheet document. To change them, edit the hours in the Timesheet. We recommend using the Timesheet to record working time.
If the Timesheet functionality is disabled, the days worked are calculated from the Work Schedule. In this case, to reduce the number of days an employee worked:
- Create a Personnel Order with the operation type Unauthorized Absence and specify the period when the employee did not work.
- Make sure Unauthorized Absence is added to the Displacing calculation types of the employee’s base salary Earning type (see Earning Types).
- Create or refill the Payroll document. The absence days are excluded from Worked days, and Base salary is calculated only for the days actually worked.

Record Additional Earnings #
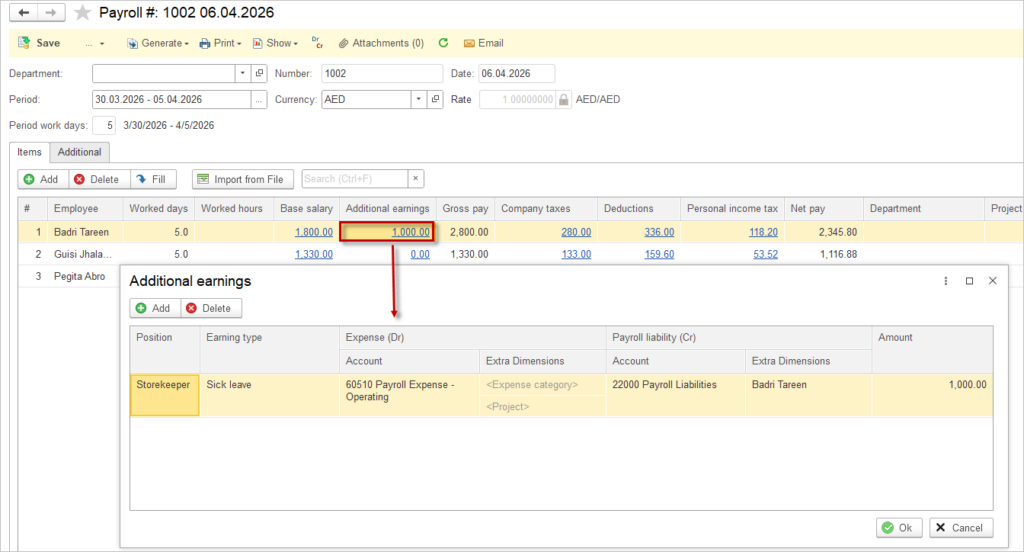
- In the column Additional earning choose the respective Earning type
- If earning type is calculated based on days actually worked, the amount will be calculated automatically
- If earning type has manual input, fill in the amount
- If you have entered Personnel Order absence documents, all earnings calculated for those periods will be displayed here.
Accounting #
Additional earnings within Payroll document create the following transactions in the General Journal:
- Debits: Payroll expense account (set in the respective Earning type)
- Credits: Payroll liability (default account set in Accouting settings)
Record Company Taxes #
- In the column Company taxes choose the respective Deduction type
- If the deduction type is calculated based on precentage, the amount will be calculated automatically
- If deduction type has manual input, fill in the amount
Accounting #
Company taxes within Payroll document create the following transactions in the General Journal:
- Debits: Payroll expense account (set in the Accouting settings)
- Credits: Payroll liability (set in the respecitve Deduction type)
Record Deductions #
- In the column Deductions choose the respective Deduction type
- If the deduction type is calculated based on precentage, the amount will be calculated automatically
- If deduction type has manual input, fill in the amount
Accounting #
Dedutions within Payroll document create the following transactions in the General Journal:
- Debits: Payroll liability (default account set in Accouting settings)
- Credits: Liability account (set in the respective Deduction type)
Record Personal Income Tax #
- Navigate to Payroll – Lists – Personal Income Tax ans specify the PIT rate and deduction.
- In the column Personal income tax, the tax will be calculated automatically.
Accounting #
Personal income tax within Payroll document create the following transactions in the General Journal:
- Debits: Payroll liability (default account set in Accounting settings)
- Credits: Personal income tax liability
Please refer to a separate article on how to create a payroll payment.
Import the Payroll Document #
Importing payroll documents saves time by avoiding duplicate calculations and manual entry in the accounting system. It reduces errors through validated external processing and ensures better compliance with complex regulations.
- Please make sure that required Earning types, Deduction types and Employees are entered into the system.
- Create a new Payroll document and specify the time period.
- Click Import from file.
- The Import window opens, showing the columns required for import. Click Edit template to add more columns and tick the additional columns. Use the arrows to change the order of the columns. The minimum information required for import includes the Employee, the Earning type with its amount, and/or the Deduction type with its amount.

5. Fill in the table manually or copy and paste data from a spreadsheet.
Or select From File and Save the template to your computer. Fill in the table and then click Import spreadsheet
6. Tick the checkbox Cells contains value to select the data from the dropdown list.

7. Click Next after filling in the table. The result of the import will be displayed.
8. Save the document.
9. Imported Payroll documents are marked with a pencil icon:


When importing a payroll document, AccountingSuite performs no independent payroll calculations. Only the imported values are posted directly to the General Ledger accounts. Verify all payroll data externally for accuracy and compliance before import.
Payslip #
Payslips in AccountingSuite are generated as separate sheets for each employee listed in the Payroll document, providing compliant breakdowns of individual earnings, deductions, taxes, and net pay.
From any Payroll document, navigate to Print > Payslip and run the form to instantly produce these personalized payslips. Users can further customize the output by editing the print form template (see print form templates documentation) to match specific business requirements, local regulations, or branding needs.

