
In business, it is common to have a counterparty that acts both as a Customer (you sell to them) and as a Vendor (you buy from them). Over time, this creates mutual obligations – you owe them for purchases, and they owe you for sales.
Instead of making two separate payments, you can perform a mutual settlement (offset / compensation). This operation cancels out the reciprocal claims and liabilities, reducing the actual cash flow to the net balance only.
This article explains three ways to perform such an offset in AccountingSuite, with step‑by‑step instructions and practical recommendations.
Before you begin, make sure the counterparty is correctly configured:
- Go to Companies → find your counterparty.
- Ensure both checkboxes are enabled:
- Customer – to track their receivables (Sales invoices).
- Vendor – to track their payables (Bill).
With this setting, AccountingSuite will recognize the same Company in both roles and allow you to see the consolidated balance on their card.
Method 1: Using Apply Credits (Recommended) #
This is the primary and most straightforward method for mutual offset. It uses two separate but mirrored documents – one for the Customer side and one for the Vendor side.
Step 1 – Close the customer’s receivable #
- Go to Sales → Apply Customer Credits.
- Select your counterparty as the Customer.
- You will see a list of:
- Open Invoices (what they owe you)
- Available Customer Credit Memos (if any)
- Match the open invoices against the credits you want to apply.
- The system will automatically create a Journal Entry that debits and credits the Accounts Receivable account, effectively reducing the customer’s debt.
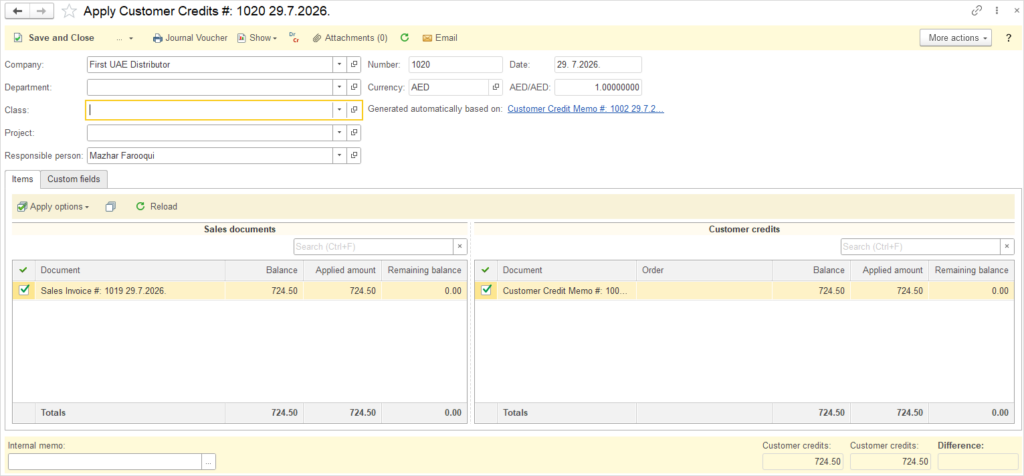
Step 2 – Close the Vendor’s payable #
- Go to Purchases → Apply Vendor Credits.
- Select the same counterparty but now as a Vendor.
- You will see:
- Open Bills (what you owe them)
- Available Vendor Credit Memo
- Match the bills against the credits to offset your Payable.
- Save the document.
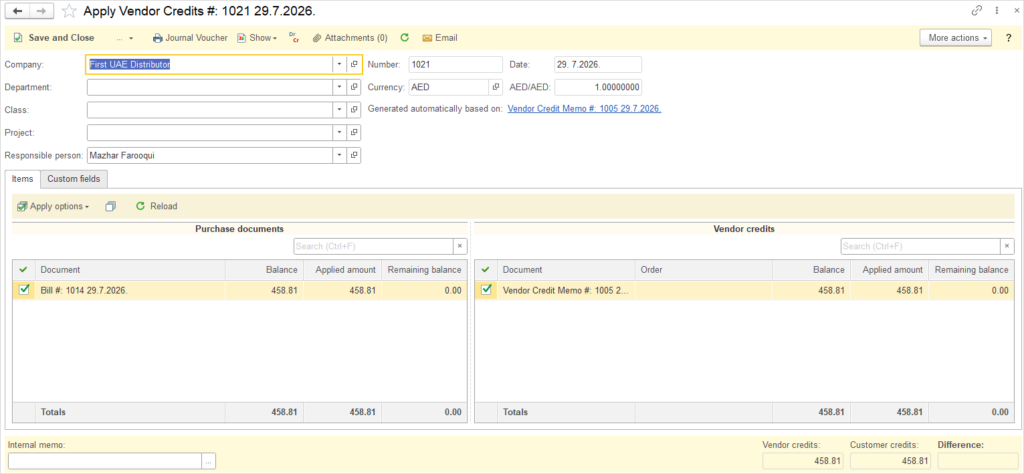
Both obligations are legally and accounting‑wise closed. Each document clearly references the original invoices/bills that are being offset.
Journal Entry Effect (Method 1)
| Account | Debit | Credit |
|---|---|---|
| Accounts Receivable | — | Amount (customer side) |
| Accounts Payable | Amount (vendor side) | — |
In practice, these are two separate entries from two documents, but the net effect is a mutual offset.
Method 2: Using a Journal Entry (Manual) #
For users who prefer full control over the accounting entries, a manual Journal Entry can be used.
Follow the next steps:
- Go to Accounting → Journal Entries → Create New.
- Create a single journal entry with two lines:
| Line | Account | Debit | Credit | Contact |
|---|---|---|---|---|
| 1 | Accounts Payable (your debt to vendor) | Amount | — | Counterparty (as Vendor) |
| 2 | Accounts Receivable (customer’s debt to you) | — | Amount | Counterparty (as Customer) |
- For more information on how to create Journal Entries, please refer to the document Journal Entries.
- Save and post the entry.
Both balances are reduced simultaneously in a single accounting event.
Considerations:
- This method requires manual verification of open amounts.
- It does not link directly to specific invoices/bills unless you add references in the memo.
- Suitable for power users who understand double‑entry bookkeeping.
Method 3: Using a Bill with the Accounts Receivable Account #
In this approach: Create a Bill (incoming invoice) but, in the line items, select the Accounts Receivable account instead of the usual Accounts Payable account.
How it works technically #
A standard Bill posts:
- Debit → Expense/Asset account
- Credit → Accounts Payable
If you replace the credit account with Accounts Receivable, the bill effectively credits your receivable balance, reducing what the Customer owes you.
Follow the next steps:
- Go to Purchases → Bills → Create New.
- Select your counterparty as the Vendor.
- In the G/L Accounts line:
- Set the Account to Accounts Receivable (instead of the default AP).
- Enter the amount to be offset.
- Use the Memo field to reference the original sales invoices being settled.
- Save the Bill.
Important Caveats #
| Aspect | Comment |
|---|---|
| Accounting logic | This is non‑standard. A Bill normally increases your AP. Using AR here inverts that logic. |
| Reporting | May confuse financial reports if not properly documented. |
| Audit trail | Less transparent than Method 1. |
| Recommended for | Advanced users only, who fully understand the chart of accounts structure. |
We do not recommend this method for routine use unless you are absolutely certain about your accounting setup.
Comparison Table #
| Criteria | Method 1: Apply Credits | Method 2: Journal Entry | Method 3: Bill + AR |
|---|---|---|---|
| Primary purpose | Built for offsets | Universal tool | Workaround |
| Links to original docs | Yes | Manual only | Manual only |
| Ease of use | Easy | Moderate | Moderate |
| Risk of errors | Low | Medium | High |
| Audit transparency | High | Medium | Low |
| Recommended | Yes | Yes (for advanced) | Not recommended |
Final Recommendations #
- Use Method 1 (Apply Customer Credits + Apply Vendor Credits) for all routine mutual settlements. It is safe, transparent, and fully supported by AccountingSuite‘s workflow.
- Use Method 2 (Journal Entry) if you need a consolidated single entry and have strong accounting knowledge.
- Avoid Method 3 (Bill with A/R) unless you have a specific internal policy that requires this style and you fully understand the reporting implications.
Additional tips:
- Always add a reference number or date of the offset agreement in the document memo.
- You can view the consolidated balance for any counterparty by opening their Company card — this helps verify the remaining exposure after the offset.
- If amounts do not match exactly, you can settle partial amounts using any of the methods above.