
Please note: This will be available in release 2.26.5.
Purchase Requisition is an internal document used to request the procurement of Item or Services. It serves as the initial step in the procurement process, allowing departments to formally communicate their purchasing needs to the procurement team. Depending on the selected supply method, a Purchase Requisition can be used to support supply cases and generate documents:
- Buy item from vendor to inventory location with vendor’s prices canvassing sheet process. Generate – Purchase Order
- Internal consumption of goods or low-value assets from stock in the warehouse. Generate – Inventory Adjustment
- Moving inventory to a Purchase Requisition location from inventory on stock in another warehouse. Generate – Warehouse Transfer (only with Multi-Location enabled)
This section provides a comprehensive overview of the Purchase Requisition lifecycle, including the creation of requisitions, the definition of Item and Vendor details, the Canvassing process, and the generation of Supply requisition documents. Additionally, the integration with the Approval Workflow is described, ensuring that each requisition follows the appropriate approval path before procurement activities begin.
Create Purchase Requisition #
- Navigate to Purchases → Purchase Requisition
- Department – the unit submitting the requisition and for whose purposes the purchase is being made.
- Ship to – the location to which the goods are to be delivered following the completion of the purchase.
- Enter a Promise Date, if desired.
- Status – When the Approval Workflow is enabled, the Status changes automatically. When the Workflow is disabled, the Status is changed manually:
- Open – The requisition has been created, but no procurement process has been initiated. No purchase order has been issued.
- To Supply – The requisition has been approved and forwarded to procurement. The issuance of a purchase order is in preparation. You cannot change the desired items after approvement to supply.
- Partially supplied – Partially delivered. A portion of the quantity has been received, but the remaining quantity has not yet been delivered.
- Closed – The requisition is closed. The entire quantity has been delivered or canceled. There are no further obligations.
- Enter a PO Number or let the system auto-assign one.
- Change the Date if necessary.
- Preferred vendor, preferred vendor address is optional.

Item Tab #
- Supply method
- Purchase – The item is procured externally from a Vendor via a Purchase order.
- Stock Withdrawal – The item is issued directly from existing internal inventory.
- Warehouse Transfer – The item is moved between two storage locations within the same organization.
- Enter Item, Description, Lot, UoM
- Required Qty – The total quantity of an item that is requested on a Purchase requisition.
- To Supply Qty – Represents the quantity yet to be procured.
- Expected Cost – The anticipated cost per unit of the item, expressed in currency.
- Expected Total – Represents the expected total value obtained by multiplying the expected price by the required quantity.
- To Supply Total – Represents the total expected value of the quantity yet to be procured, calculated as To Supply Qty multiplied by the expected price.
- Location from – for Warehouse Transfer method.
- Enter Promise date, Memo, Project, Memo, Class
- Supply Document is a link to a document that initiates or records an inventory change within procurement, adjustment, or transfer, and encompasses the following types of documents: Purchase Order, Inventory Adjustment, and Warehouse Transfer.

By clicking on Line Canvassing Details, the Canvassing Sheet Details screen opens. This screen is used to record quotes from Vendors from whom you plan to purchase products. Next to the title Canvassing Sheet Details, you will see the fields Line and a Number. The Line number changes automatically and depends on the Item’s line number in the Items tab. Each Item has its own new Canvassing sheet.
To add a new Vendor click the Add button and select the desired Vendor or create new Vendor and the following details must be entered:
- Quantity – The quantity of the product being purchased from this vendor
- Quantity Quoted – The quantity quoted by the Vendor. If the Quantity entered exceeds the Quantity indicated in the table on the Items tab, the To Supply Qty field will turn red, as this indicates that you are procuring more than required
- Total Quote – Total quote amount in currency
- Delivery Date – Expected delivery date from the vendor
- Taxes and statutory charges – VAT Rate (%), VAT, WHT Rate (%), WHT, Excise Rate (%), Excise, Levy Rate (%) Levy (the list of taxes depends on Tax Settings)
- Supply Document: The Supply Document field displays the Purchase Order document.
- Note: The document is created when you proceed to the Generate – Supply Requirements Document. Only after it is created there, it will be displayed in the Supply Document field.
- After the Vendor and all other necessary information have been entered, a green checkmark is required next to the Vendor. Otherwise, it will not appear during the creation of the Supply Requirements Document.

Canvassing Sheet #
You can hold a tender for the best price from different suppliers, put everything together and select and approve on the best offer on the market.
The Canvassing Sheet is a part of the Purchase Requisition document and contains two tabs: Group by Item and Group by Vendor. Both tabs share the same common data, which are explained in detail below:
- to Supply – The area that consolidates all data regarding the expected procurement
- Item / Vendor – The name of the Item, or the name of the Vendor in case of procurement
- Lot – The batch or Lot number assigned to the Item
- Quantity Expected / to supply – The expected quantity to be delivered
- Price expected / to supply – The expected price per unit of measure
- Total Expected / to supply – The total expected value, calculated as quantity multiplied by price
- Supply document – Displays only the Purchase order number
Group by Item #
The Group by Item tab displays all Items from the Purchase Requisition document, whereby for items with the procurement method set to Purchase, the corresponding Vendors are also shown.

Group by Vendor #
The Group by Vendor tab displays only Vendors and the Items procured from them, grouped by Vendor.

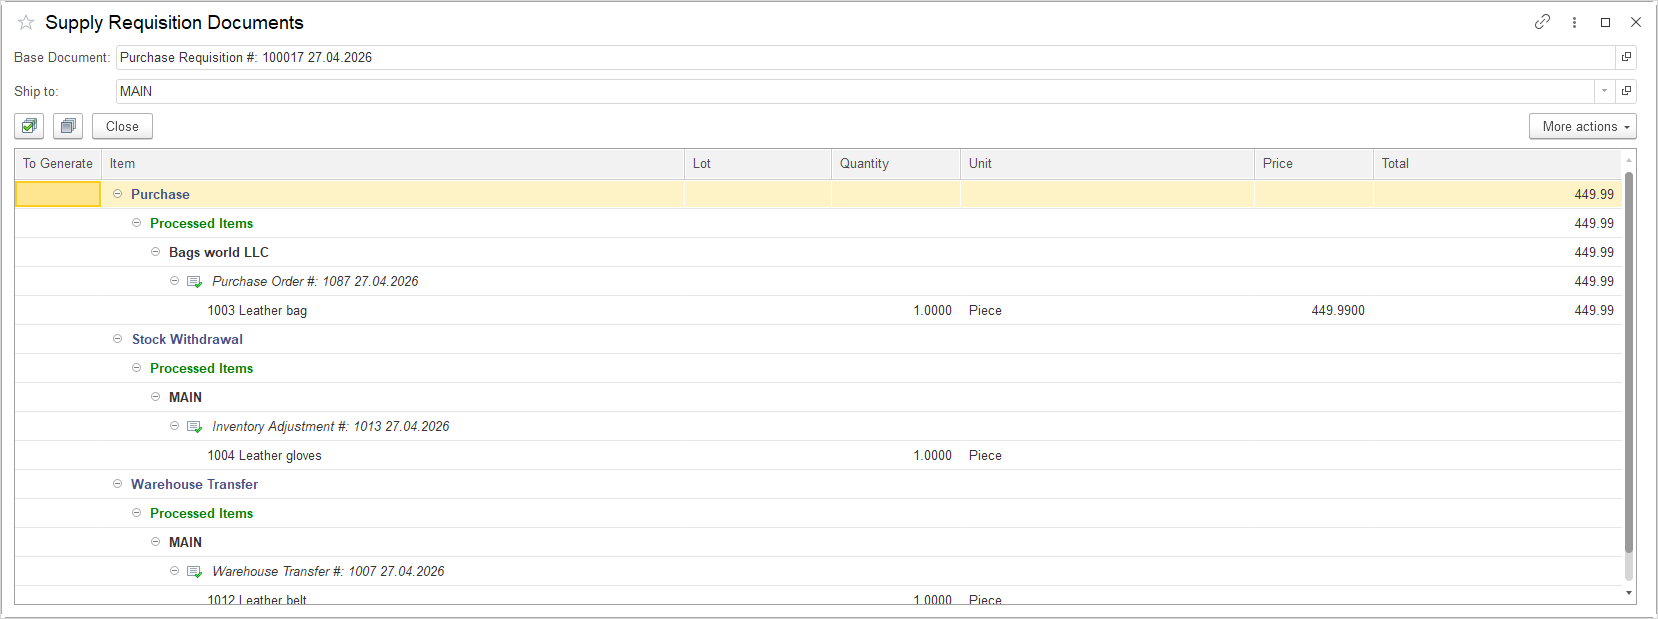
Supply Requisition Documents #
Supply Requisition Document represents an output document created on the basis of a Purchase Requisition. Its purpose is to enable the creation of an appropriate supporting document for the procurement process, depending on the selected Supply Method. Depending on the selected method, the following documents are created:
- Purchase – a Purchase Order is created
- Stock Withdrawal – an Inventory Adjustment document is created
- Warehouse Transfer – a Warehouse Transfer document is created
After creating a Purchase Requisition, click Generate → Supply Requisition Documents.
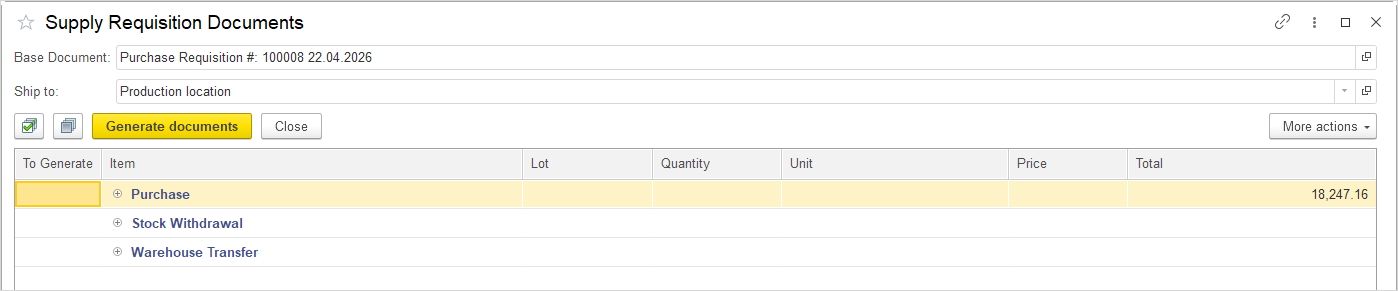
The following information is displayed:
- Based Document – The number of the Purchase Requisition document on the basis of which this document was created.
- Ship to – The location to which the goods are to be delivered upon completion of the procurement process. This information was entered when the Purchase Requisition was created.
- Supply Method – The tabular section displays the available Supply Methods, as follows:
- Purchase – Click the plus button next to Purchase to display the products to be purchased from the vendor. If a vendor has been previously entered, it will be displayed. After selecting the items and clicking Generate, a Purchase Order is created.
- Stock Withdrawal – Click the plus button next to Stock Withdrawal to display items to be issued directly from existing internal inventory. After selecting the items and clicking Generate, an Inventory Adjustment document is created.
- Warehouse Transfer – Click the plus button next to Warehouse Transfer to display the source and requested storage locations. After selecting the items and clicking Generate, a Warehouse Transfer document is created.
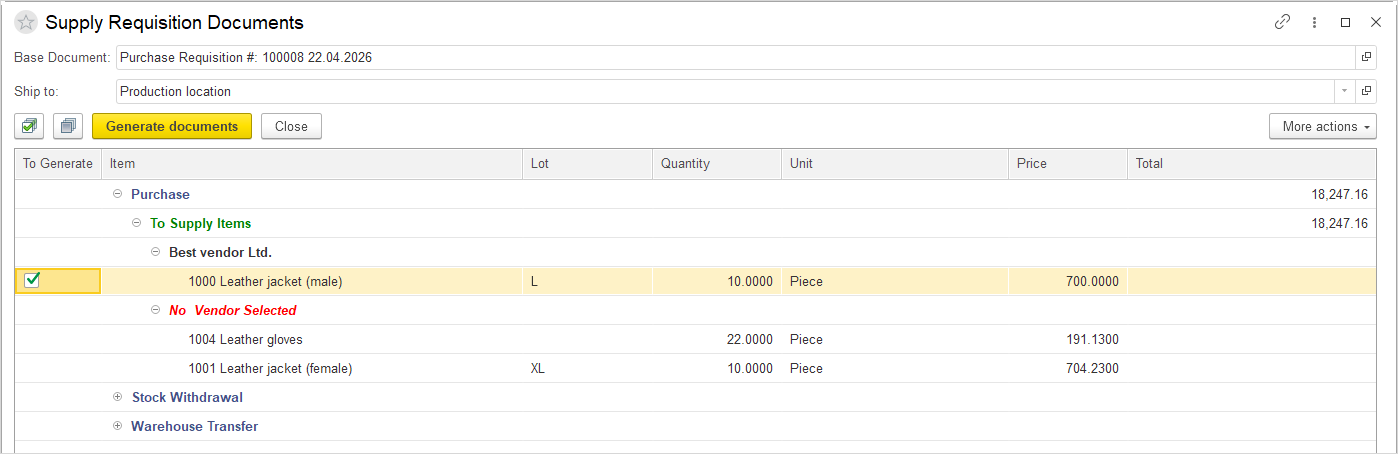
The Generate button remains available as long as there are unselected items or not all supporting documents (Purchase Order, Inventory Adjustment, Warehouse Transfer) have been created. Once all items have been selected and all documents have been generated, the Generate button is removed and the Close button appears.
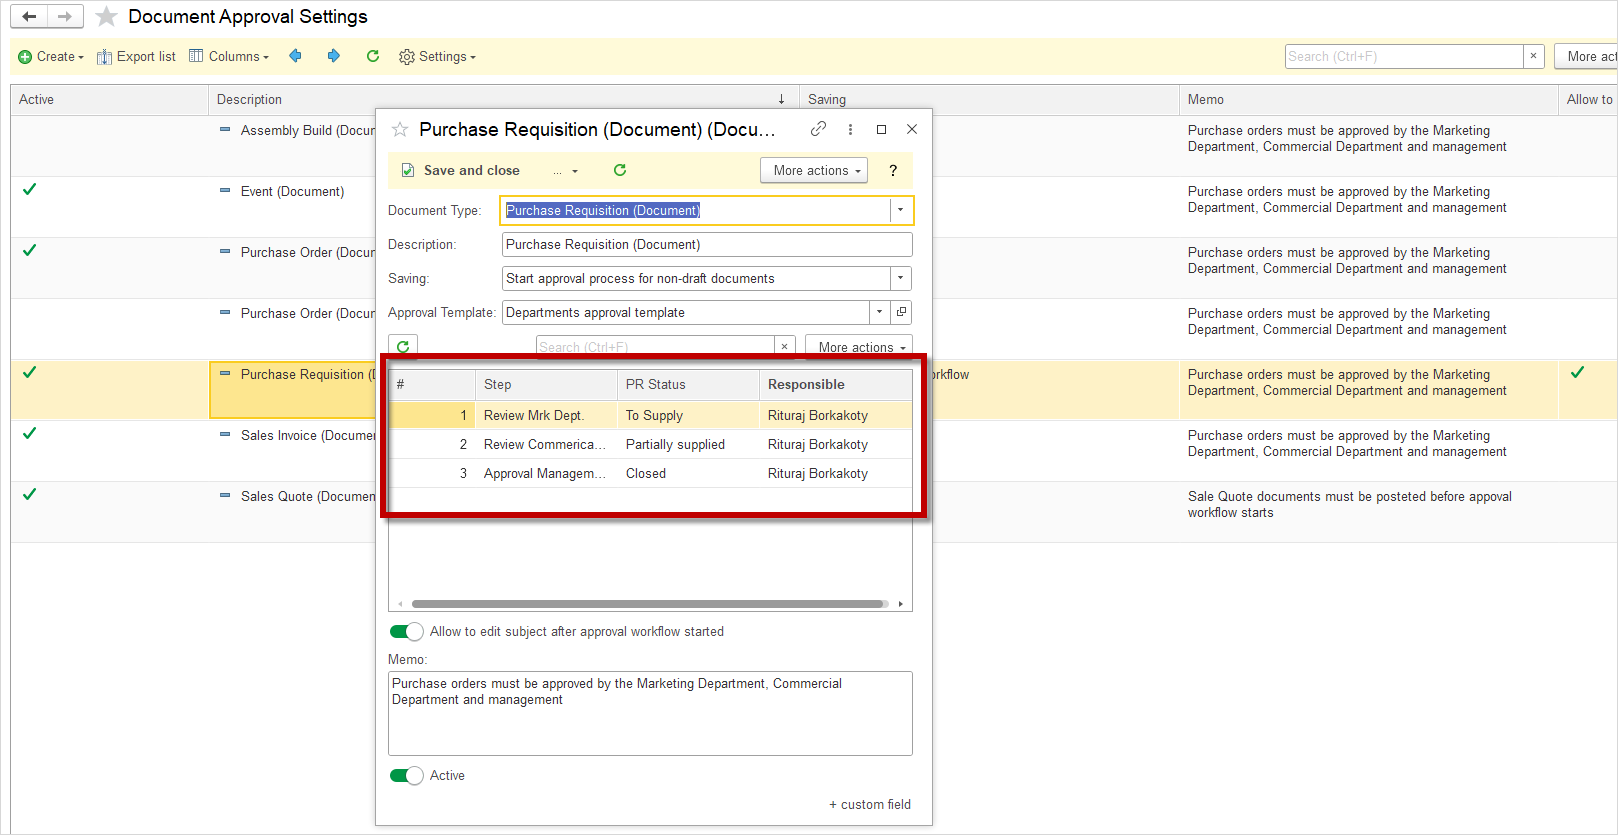
Purchase Requisitions Approval Workflow #
Once the Purchase Requisition has been created, the Start Approval Workflow button may be clicked.
For further information see the Approval Workflow and Approval Workflow Settings guides, please read the documentation.
Before starting the Approval Workflow process, be aware of a specific feature of this document. In the Document Approval Settings for the Purchase Requisition, each approval step requires a document status to be specified. Once the document approval is initiated, the document status changes automatically as it progresses through the approval steps. After the Approval Workflow starts, manual changes to the document status are no longer possible.
Print Forms Purchase Requisition #
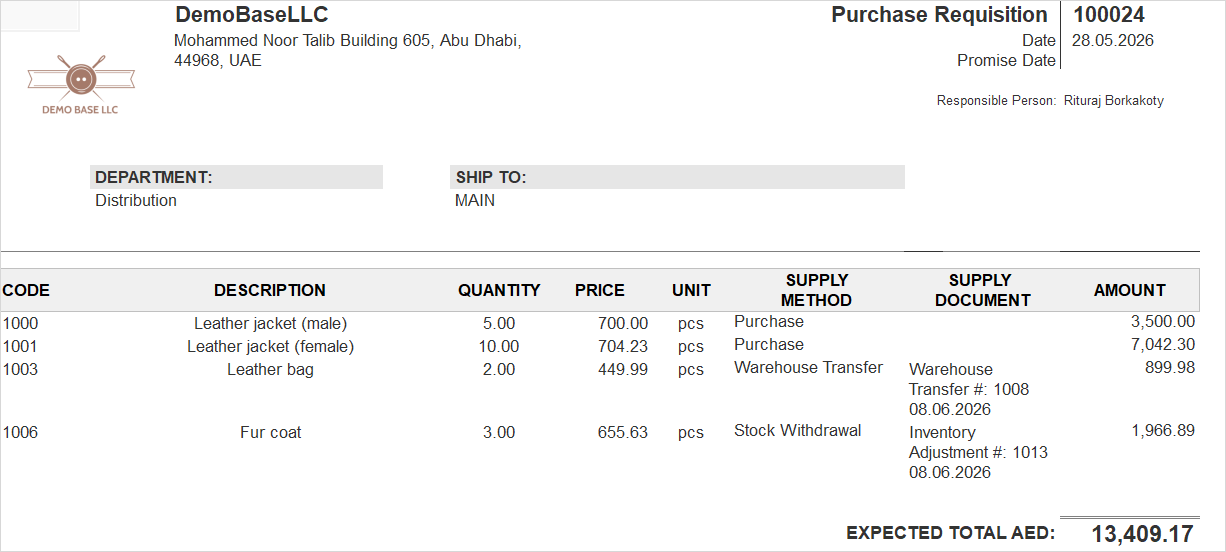
The Purchase Requisition document is used as a management tool for organizing the mass procurement process. Within this document, there are two print forms, each with a specific purpose in different phases of the procurement process. Both print forms contain the following data: Company details, Document number, Date of creation, Department, Ship to.
When a preliminary list of Items for procurement has been defined, the print form of the Purchase Requisition document itself is used. The purpose of this form is to enable the procurement list to be sent via email for internal alignment and approval (before proceeding to Vendor selection). The Purchase Requisition print form contains the following data:
- Code – Item code
- Description – Item name
- Quantity
- Price
- Supply method – The method by which the product is procured – Purchase, Stock Withdrawal, Warehouse Transfer
- Supply document – Displays the document created by the Generate – Supply Requirements Document process. Depending on the selected Supply Method, this can be:
- Purchase Order (for the Purchase method)
- Inventory Adjustment document (for the Stock Withdrawal method)
- Warehouse Transfer document (for the Warehouse Transfer method)
- Amount
Once the item list has been internally approved, the Vendor solicitation process begins. The Canvassing Sheet print form is then used, which contains a comparative overview of Quotes from different Vendors. This form serves to obtain approval on Vendor selection and pricing after the procurement list itself has been agreed upon. Based on the selected Quotes (the Selected field), the final choice is defined. The Canvassing Sheet print form is populated with data taken from the Canvassing Sheet Details. This form contains the following data:
- Code – Item code
- Description – Item name
- Vendor – Name of the Vendor from whom the Items will be purchased
- Quoted Qty – The quantity quoted by the Vendor
- Quoted Price
- Quoted Amount
- Selected – Indicates that the Vendor has been selected to purchase the respective product. If a green checkmark is placed next to the Vendor in the Canvassing Sheet Details, this column displays Y (Yes). If no checkmark is placed, the field remains empty.
- Expected – Expected value
- To Supply – Value to be supplied
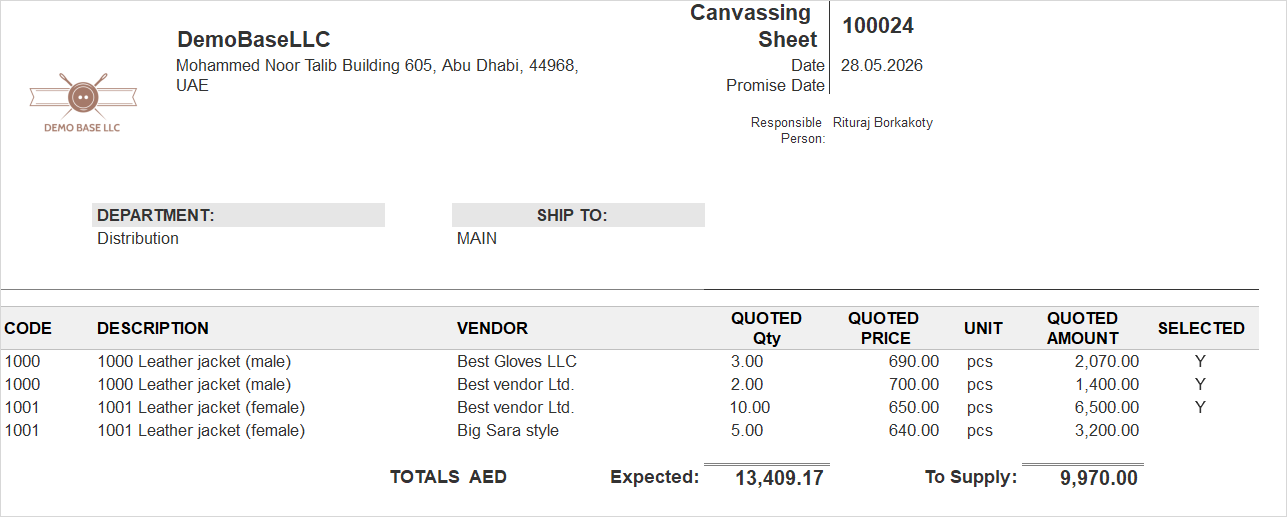
Thus, the two print forms address two key stages of the mass procurement process: (1) internal alignment regarding which items are to be procured, and (2) alignment regarding the selected vendors and the corresponding prices.