The bank import feature significantly streamlines the transfer of bank transaction data into AccountingSuite, improving accuracy while reducing the time required. Users have the flexibility to upload bank statements directly through the Import Bank Transaction tool or to input data manually via the Bank Reconciliation document.
If your Bank provides an import file, then you can only import data without additional bank reconciliation for this bank, since the fact of import guarantees a match with the bank’s data.
You can combine both methods – import and bank reconciliation, if the other bank does not issue a file for import, but can only provide a final report for bank reconciliation.

Formats that are currently accepted for import are: .txt, .xls(x) and .csv.
AccountingSuite development plans include implementing support for importing data fully compliant with the ISO 20022 standard. This will involve processing XML files structured according to ISO 20022 specifications, ensuring seamless and standardized data exchange.
Let’s have a look at the main workplace for importing bank statements.
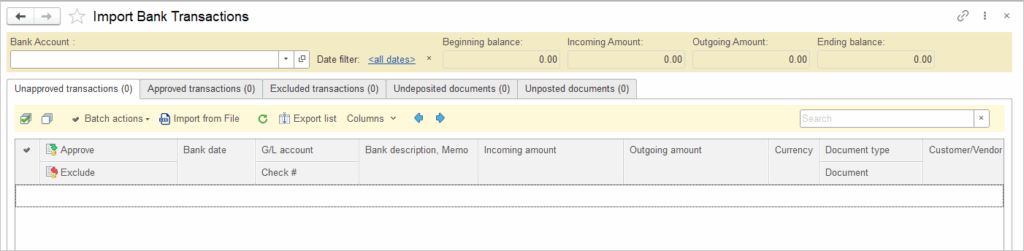
- Bank Account – select the bank account for which the import will be performed.
- Date filter – set the period for showing and checking in Tabs.
- Beginning/Ending balance and Incoming/Outgoing amount – balance and turnover indicators for the selected Bank Account for the period.
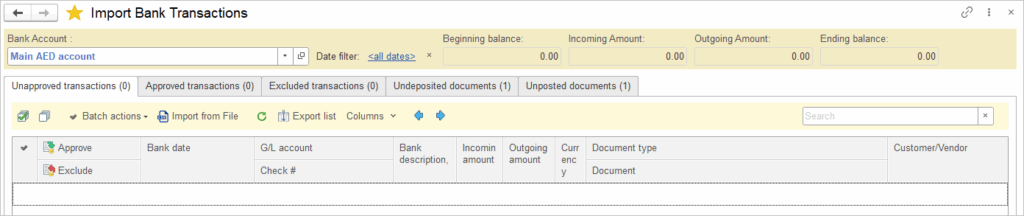
- Unapproved transactions – a list of uploaded but not yet processed lines in the bank statement file. It must be empty. If there is something there, you need to approve it or mark it as exclusion.
- Approved transactions – the processed lines of the bank’s file for which the system payment documents were created.
- Excluded transactions – exceptions to processing, for some reason (you decided so) no payment documents will be created for these lines, although there was such a line in the bank’s file.
- Undeposited documents – an information list of all open paper check received (Cash Receipt) and issued (Bill payment) (G/L accounts Undeposited Funds and Post Dated Checks as a money in transit) that need to be closed. It is in your best interest that this tab is empty and all the money goes to your bank account. In the case of issued checks, they will be withdrawn from your account when the vendor uses the Post Dated Check from your bank. See Handling Post-Dated Checks for more information.
- Unposted documents – at the time of import from the bank file, all documents that you entered manually or created with the Generate button in the date from-to of the file will be unposted to the Draft status. Some of them will be automatically matched with lines on the Unapproved transactions tab according to the identification algorithm by amount, date, company. There should be no documents on this tab. Check carefully the remaining documents that were not in the bank statement. They were made by mistake, or these payments did not go through the bank. This is a very useful tab for such an analysis. If a payment is needed, but it was not made, make it today and move the date in the document so that it will be confirmed with a bank statement when you import it tomorrow.
If you manually create payment documents but do not import bank statements, then there will be no such documents until the moment of import at this workplace. The payment document must be imported and identified. The manual document will be on the Undeposited documents tab after import. If there is no file from the bank, then the Bank Reconciliation is used to confirm the documents without importing the bank.
From a high-level perspective, the bank import process can be summarized as follows:
- Upload the file for the selected period (day, week, month).
- All manually created documents for the selected bank account get unposted, as they need to be verified against bank records.
- All uploaded transaction appear in the Unapproved transactions tab.
- Automatically recognize and process documents wherever possible (using the tools Merchant Company Mapping and Categorization Rules).
- For documents that have not been recognized, fill in the document type and counterparty information.
- Upon approval, the system generates the payment documents with appropriate General Ledger entries, which then appear in the Approved transactions tab.
- Documents that should not be posted to the General Ledger are marked as Exceptions under the Excluded transactions tab.
- Review all extra documents listed as Undeposited documents tab – these were manually processed but didn’t pass bank verification. Analyze why they failed: incorrect dates or missing payment orders (both critical issues). Clean up by deleting unnecessary items or updating dates accordingly.
- On the Undeposited documents tab, check what remains outstanding from this bank, including checks, and determine when actual funds will be received or issued. Draw conclusions and coordinate with the bank to resolve any pending issues.
Required Settings #
- Create Bank accounts.
- Create Categorization Rules and Company Mapping Rules.
- Complete the Feed settings in the Bank Accounts.
- In the Bank Settings, select the allocation option.
When the box is ticked: The system will create and post Cash Receipt / Bill payment documents directly from imported bank transactions. These documents can then be allocated (matched to invoices or other documents) later using the Apply Customer/Vendor Credit documents.
When the box is unticked: Imported bank transactions are saved as drafts after import, so users can review and edit them later by selecting matching to invoices in them before posting.


Import Transactions #
For easy and successful import, create Categorization Rules and Company Mapping Rules first, and complete the Feed settings in the Bank Account.
- Navigate to Bank → Import Bank Transactions
- Select the Bank Account (1)
- Click Import from File (2) and Open Import Wizard (3)

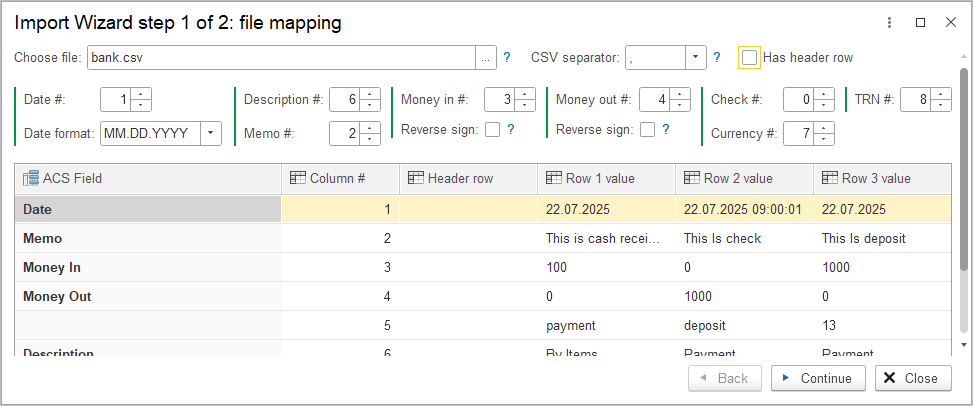
4. In the Import Wizard window, select the bank file. Column numbers and attributes CSV separator, Date format, Has header row will be filled according to the Feed settings in the Bank account. These setting can be changed here if needed. Click Continue.
5. The next Import Wizard step shows the summary of transactions for upload, incorrect transactions and all transactions derived from the file.
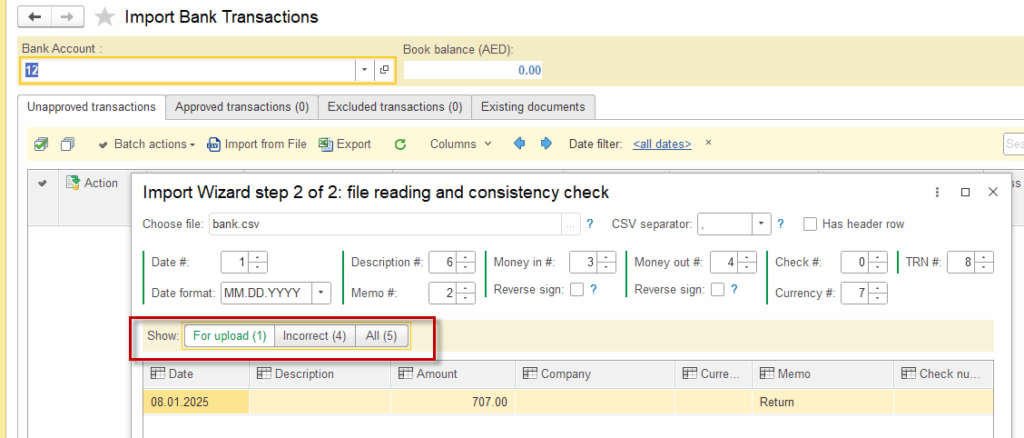
6. The import tool will check the transaction from the For upload tab with any extisting transactions in the system.
Following tabs are available:
- Uanapproved transactions: uploaded from the bank file
- Approved transactions: imported transactions ticked as approved
- Excluded transactions: imported transactions ticked as declined
- Unposted documents: bank documents that have been created for the selected bank account and for the selected time frame earlier, but not matched with any transaction in the uploaded file
- Undeposited documents: documents that are not linked to a particular bank account and have Undeposited funds subcategory and documents linked to the selected bank account and accounted for as Post Dated Checks
Frequently Asked Questions about Bank Import #
What types of files does AccountingSuite accept for bank transaction import?
AccountingSuite accepts .txt, .xls(x), and .csv files for importing bank transactions.
What types of CSV separators are accepted in the import file?
The import file accepts CSV separators of the following types: comma (,), semicolon (;), or tab. These are the commonly supported delimiters that ensure compatibility with most data import processes and spreadsheet software.