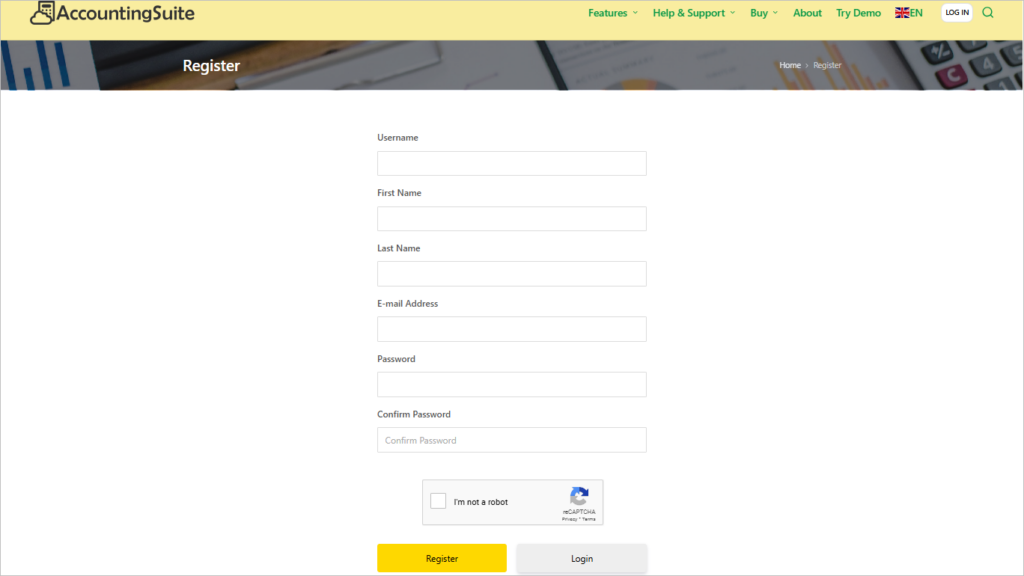
To start using our AccountingSuite, you need to register on our website.
There you can get a trial version in the Cloud version and start working immediately with your company data. The entire configured database can later be transferred to the On-premises version or the subscription can be extended for permanent use. On-premises users receive updates to their AccountingSuite version in their AccountingSuite Portal and can check their subscription status.
Try Demo link allows you to work with AccountingSuite demo base without registration to check the capabilities of the system and understand how well it covers your accounting needs.
Registration on AccountingSuite Portal #
To access AccountingSuite Portal, you need to click on the LOG IN button located in the upper right corner of the main page of the Accounting Suite website. After that, the next screen will open.
You can use Google or X authorization.

If you are accessing AccountingSuite Portal for the first time, you need to click on the Register button to sign up and gain access to your account. After successful registration, you will be able to use AccountingSuite Portal.
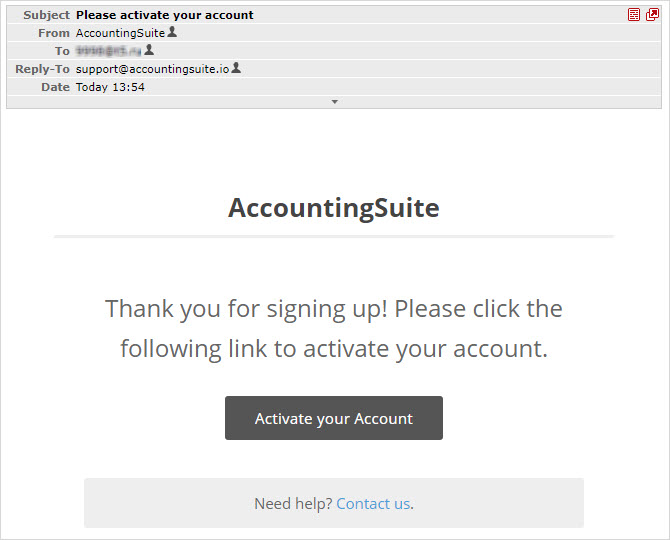
After registration, you need check your email box provided during registration. Please check SPAM / Junk folder if you could not find the email.
To activate your account click Activate your Account link in the sent email.
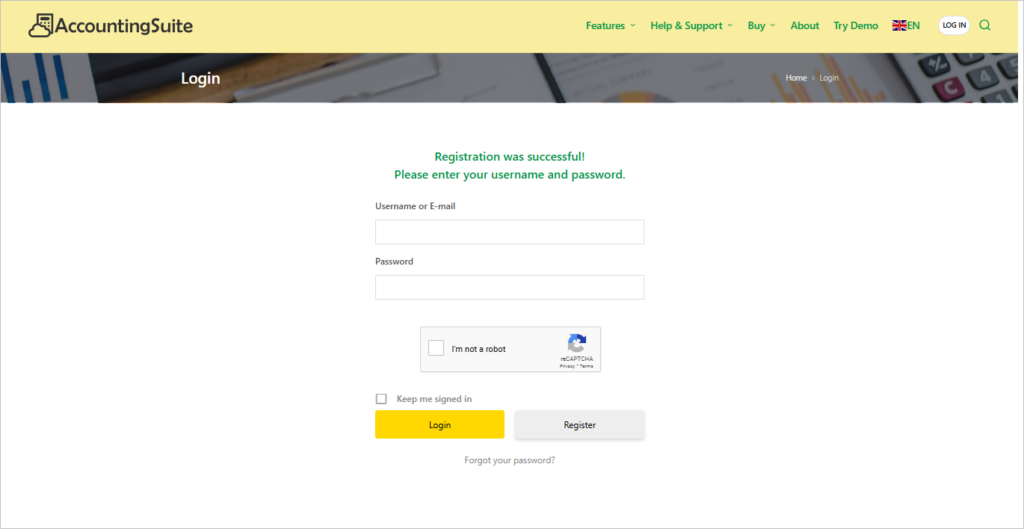
After activation, a notification appears on the screen confirming that the registration has been successfully completed, and you can now Log In to AccountingSuite Portal.
Log into AccountingSuite Portal #
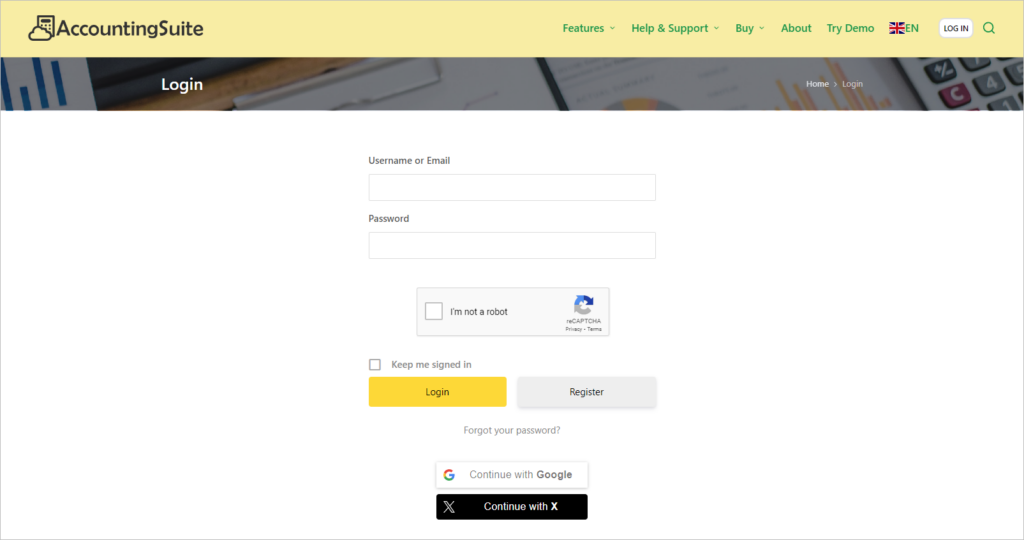
To Log in to AccountingSuite Portal, please enter the email and password that you provided during registration.
You can use Google or X authorization.
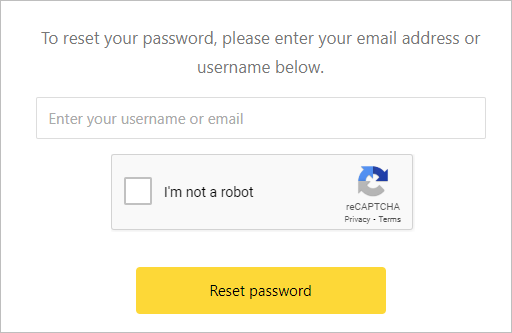
How to restore forgotten password #
Use hyperlink Forgot your password? on login page to reset your password.
Subscription owner or Subscription administrator can change user password for users who were created by them.
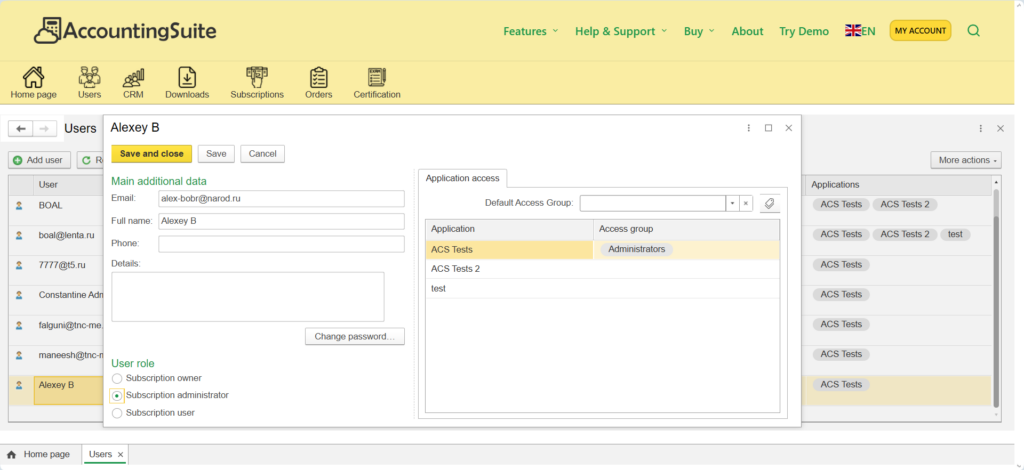

Please note: It is not possible to change the password for users who have registered on their own, they may be subscription owners in other databases. Changing the password applies to all databases and the AccountingSuite Portal. Therefore, the Change password button is not available for such users. Please ask them to use hyperlink Forgot your password? on login page to reset their passwords.
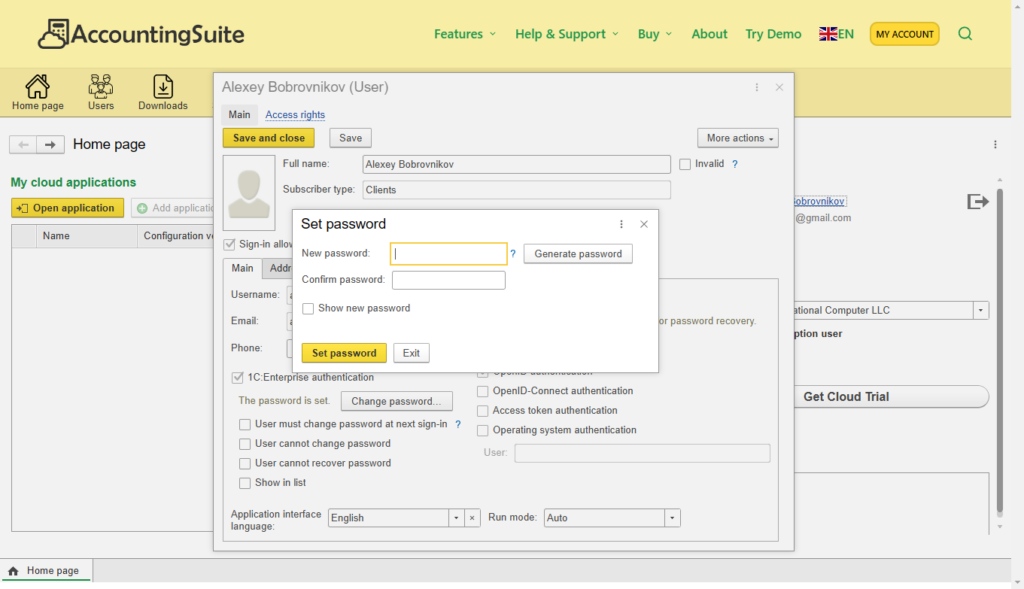
Change password after Google/X authorization #
After login via Google/X, you do not have a password to log in using your username. And this may be necessary to log in via a 1C Web Client or a Mobile Application.
You can always set a new password in your profile.
Get Cloud Trial AccountingSuite #
After completing the registration and logging in, you will have access to AccountingSuite Portal.
There will be Trial subscription with AccountingSuite Premium Edition database to start work. If you need Lite or Standard Edition to start work then ask you Partner for this.
The Trial subscription includes a Premium edition of AccountingSuite with 2 databases (Live Data and for Testing) and 2 simultaneously working users. You can add your colleagues from your company and get started work together. If you need more databases or users to get started, you can always expand your subscription or upgrade to the on-premises version.
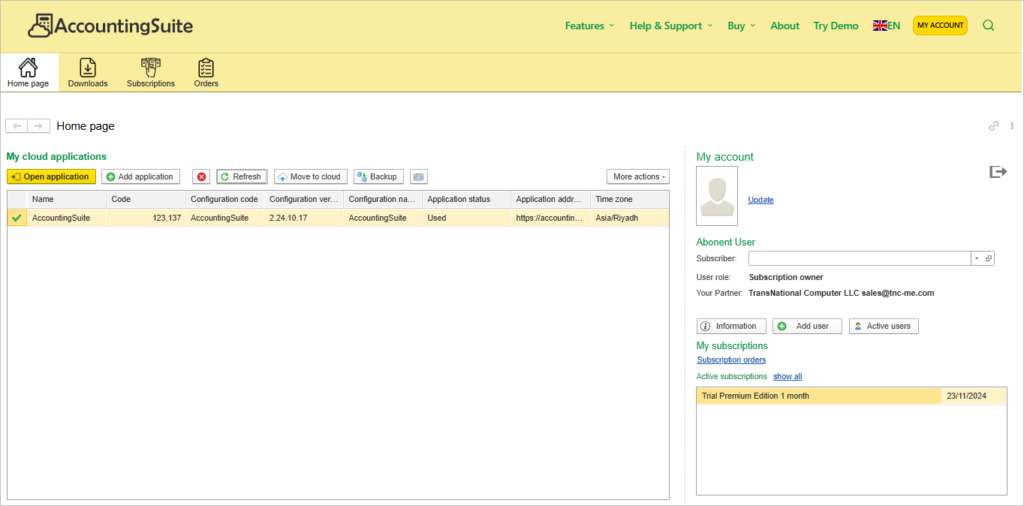
Wait a while your base become ready and change Application status from Draft to Used. Press Refresh button to refresh application list.
Press Open application to open your new AccountingSuite database for work.
What is next? Please see Getting started steps article.
Add new user to your Cloud AccountingSuite #
You can edit the application access rights for users. To grant a user access rights to work with the database, please follow these steps:
- Sign in to AccountingSuite Portal.
- Open Users tab and click on the Add user button.
- Select the Application to which the user should have access and chose Access group from a user rights group list.
- Chose User role for subscription in AccountingSuite Portal.
- Click on the Save and close button.
By following these steps, you can ensure that each user is granted the appropriate level of access, improving both data management efficiency and security.
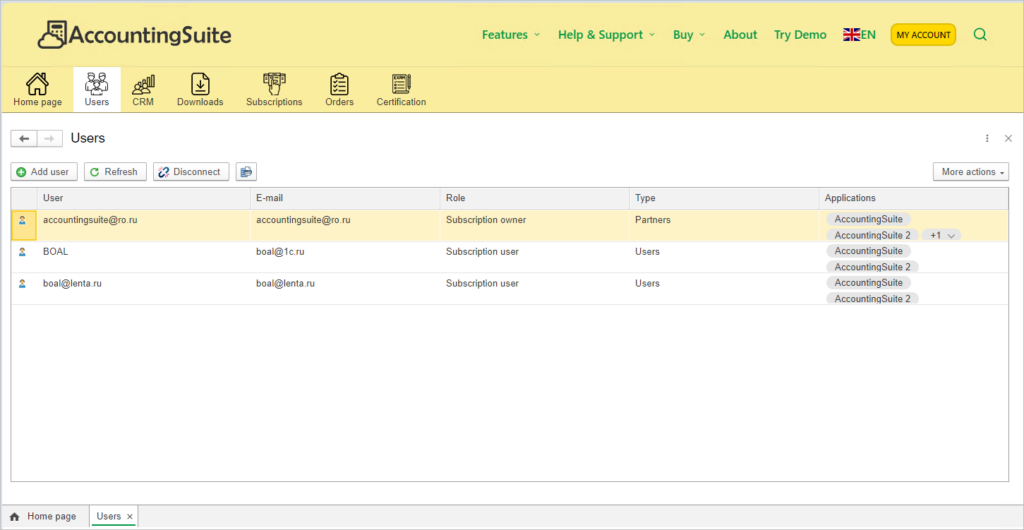
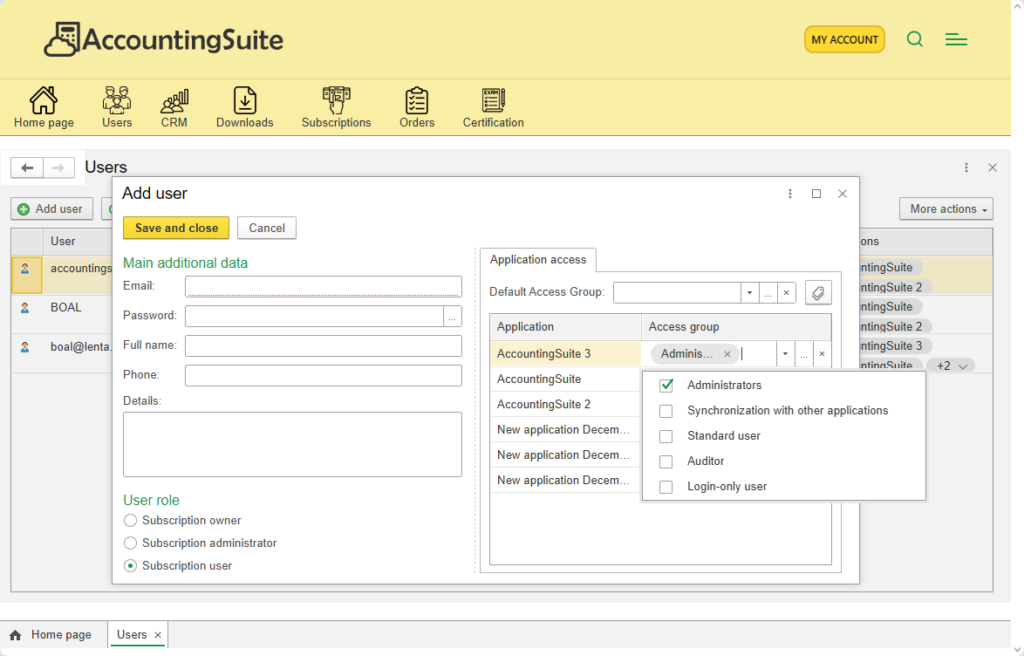
If you add an existing user on our site who is himself a subscriber in other databases, then the name and password editing fields will be hidden. You just give him access to your databases.
You can select several Access groups different for different databases. The list of Access group is the AccountingSuite databases rights list. Please see Security settings for more information.
The User role is the subscription rights:
- Subscription owner – maximum of the right, full control over Subscription in AccountingSuite Portal. This role can create and delete databases and users.
- Subscription administrator – can create and edit users for databases.
- Subscription user – only work with databases where this role has user rights to work.
To limit user rights in the AccountingSuite database please check user rights for new user in the database. Use Admin Panel – Security Settings for change and check user rights.
How to check and close active users sessions #
There is a setting to prohibit simultaneous launching of multiple sessions for one user. This is a requirement for certification of an accounting program in some countries. By default, it is prohibited, and you can configure it in User settings.
You can check the suspended sessions on the Portal. And close sessions that were closed incorrectly. Managing the list of active sessions requires the rights of the subscription owner or subscription admin and is not available to ordinary users.
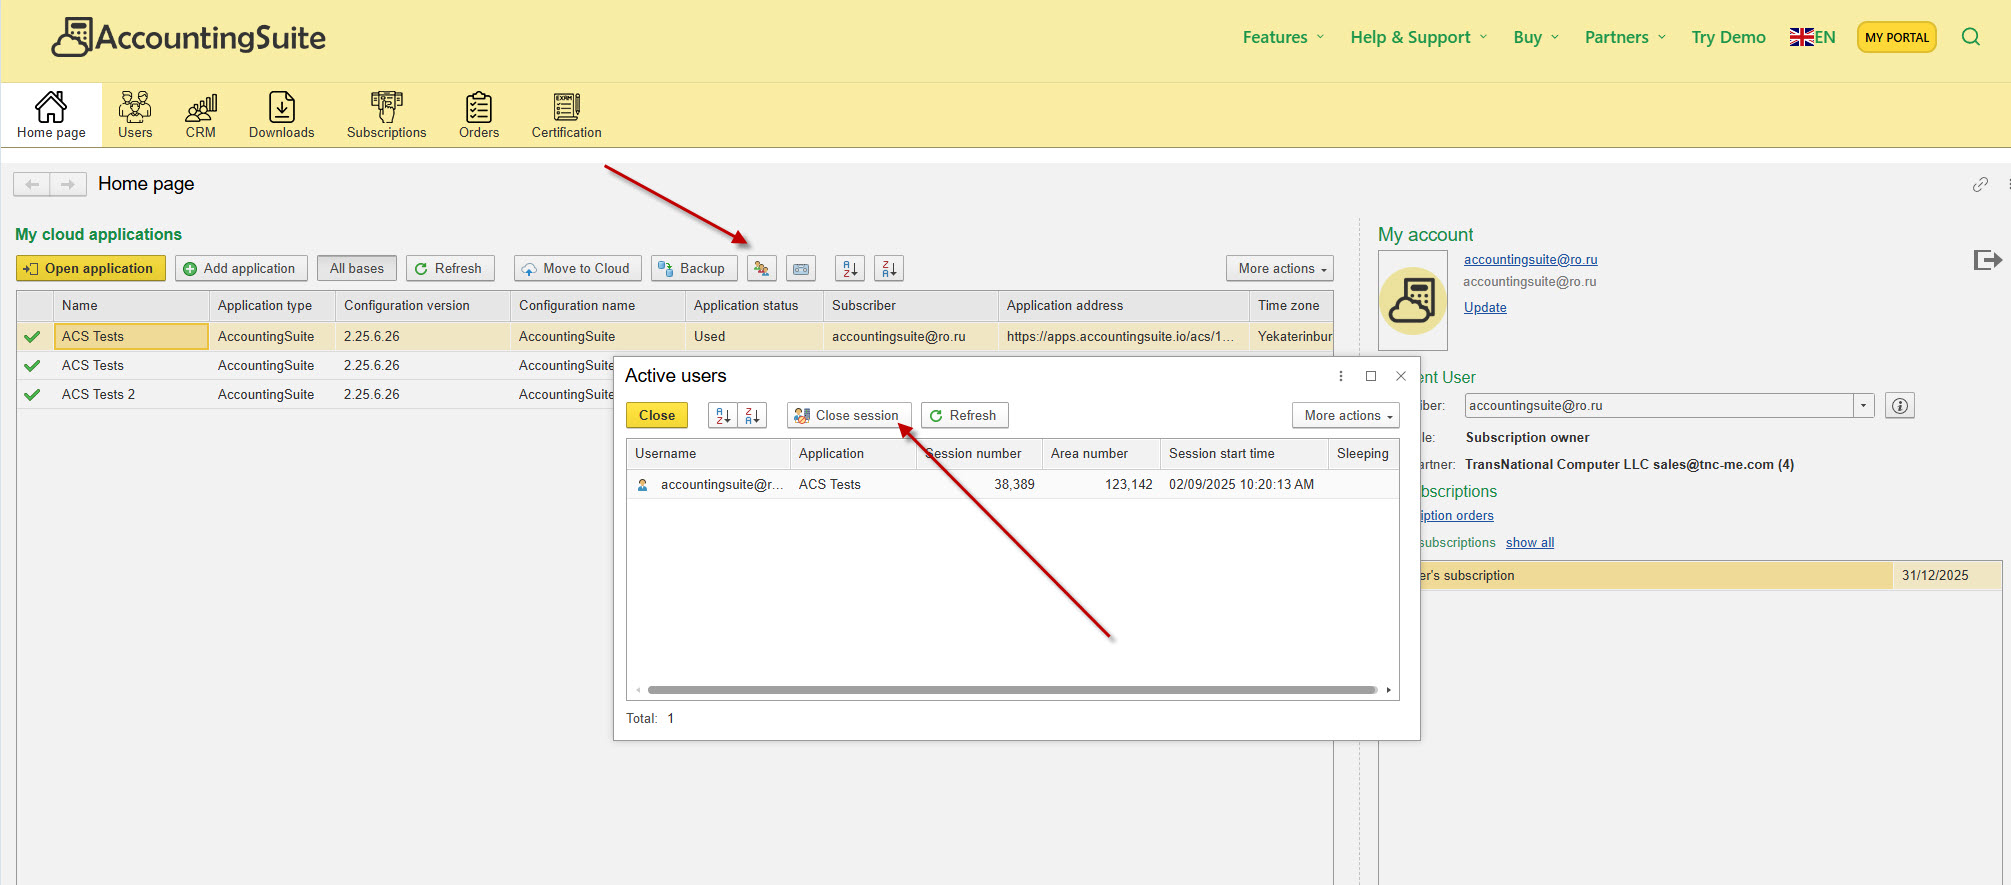
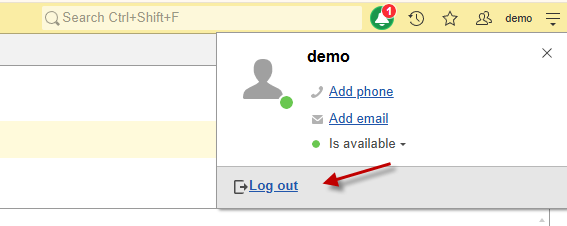
Please teach your users to exit the program with Log out, and not just drop the browser window or close it with a cross button. This will avoid hung sessions. Hung sessions will be closed automatically after some time. But not immediately (~5 min. to auto-close hung session).
Get address link to direct access with MobApp or Web Client #
After creating the user you have to find the Application address and send it to your employee. Your new user can enter this database with a direct link (add it to your browser’s favorites).

This Application address will be used in MobApp as address of your database.
This Application address will be used in Web Client for Cloud version as address of your database.
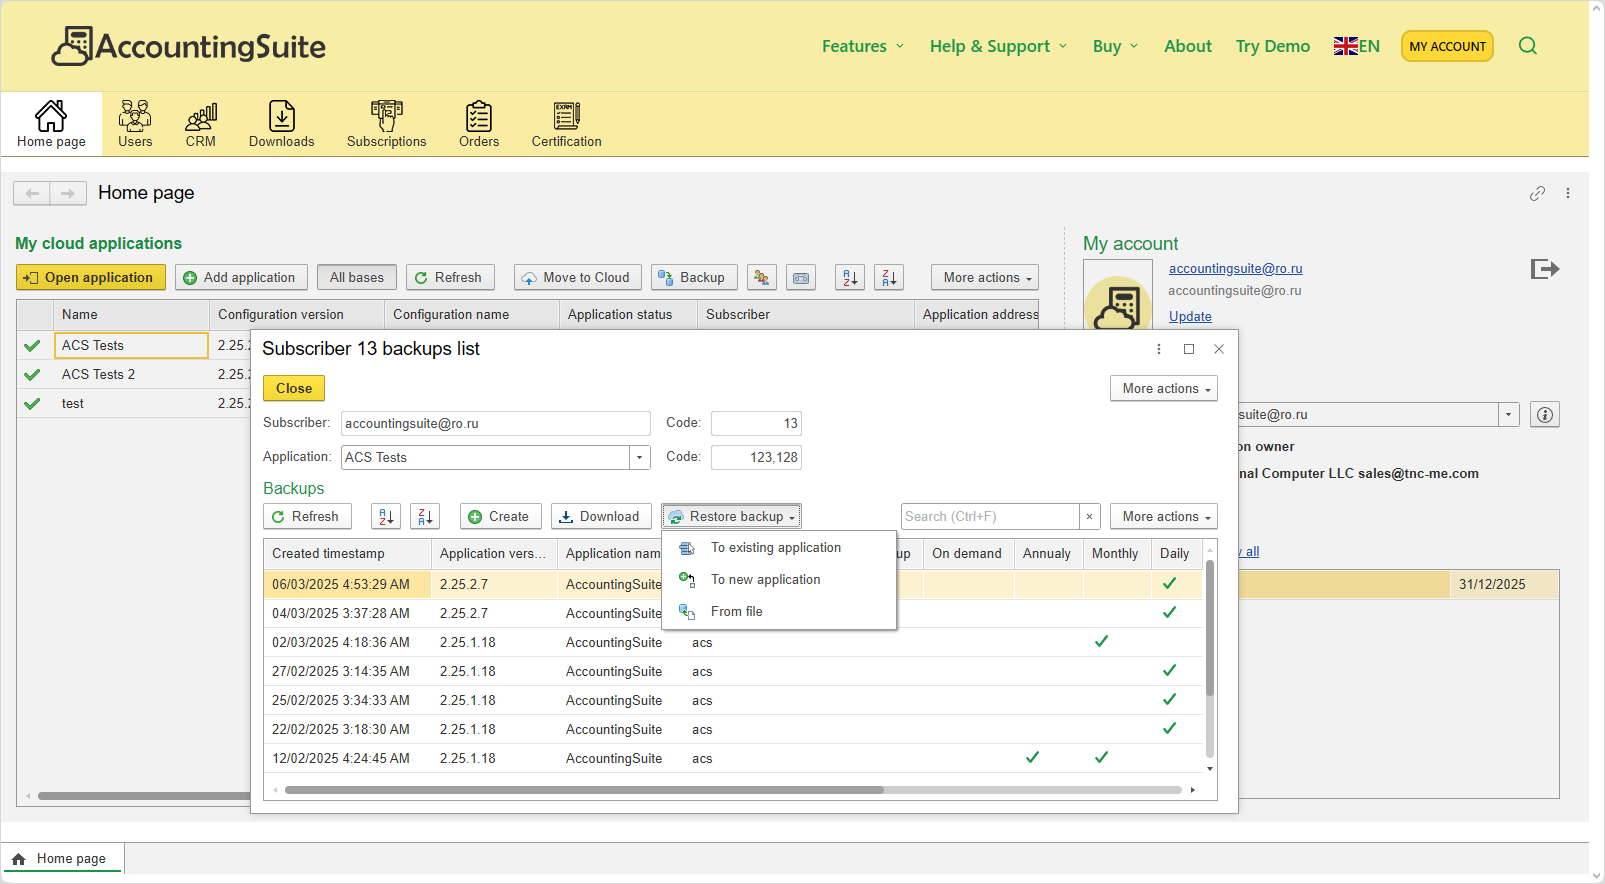
Create backup #
Backups of the cloud version are created automatically on a periodic basis and are stored in the list of created backups using the Backup button.
You can create a manual Backup of the database for download. Backup involves creating a copy of all important information that allows you to quickly create a copy of the database for test needs or make a copy to the archive to fix the state of the database on a specific date. Backups of the cloud database can be uploaded to the desktop on-premises version or transferred from the on-premises version to the cloud. To create a database backup, please follow these steps:
- On the Home page, click on the Application for which you want to create a Backup from the list of applications.
- The next step is to click on the Backup button in command line.
- A new screen will appear with information about the Application which you are creating the Backup. You need to press the Create backup button. After a few minutes, your security copy will be created.
- You can press Download to save it as a ZIP file.
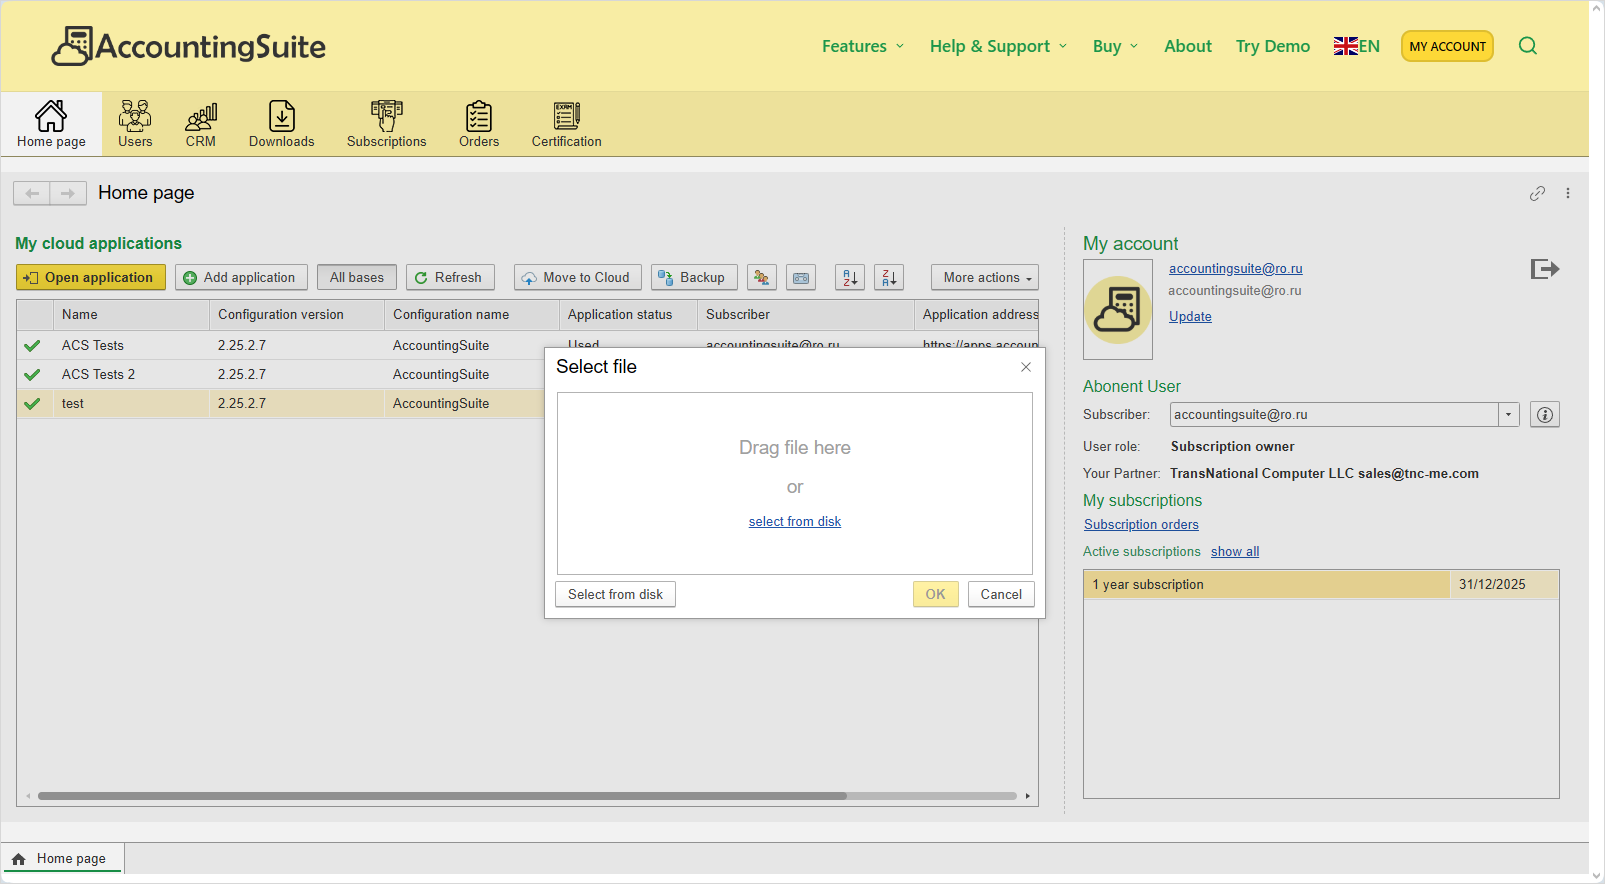
- If you need additional database with copy data for checking/testing please create new base with Restore backup – To new application. It will restore saved state of database to new database slot.
- Use Restore backup – To existing application and Restore backup – From file to restore database into current application slot.
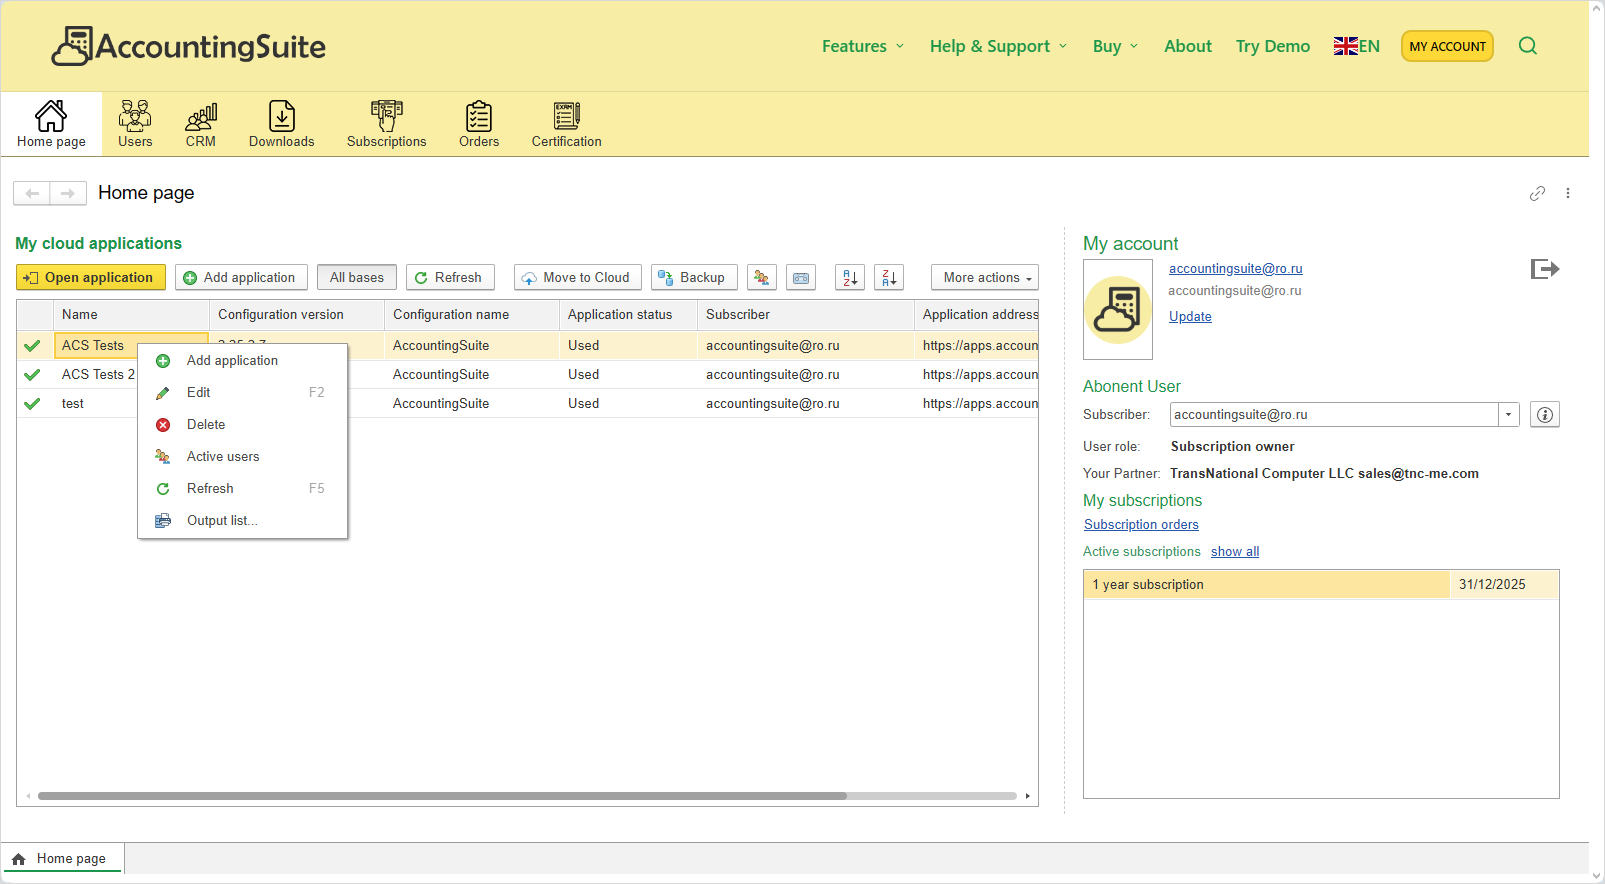
If you have no free slot for new database please delete one of your databases first. Use ![]() Delete for it in right click mouse context menu.
Delete for it in right click mouse context menu.
Move On-premises to Cloud #
If you want to create copy of your database and transfer your on-premises database to the Cloud use follow steps:
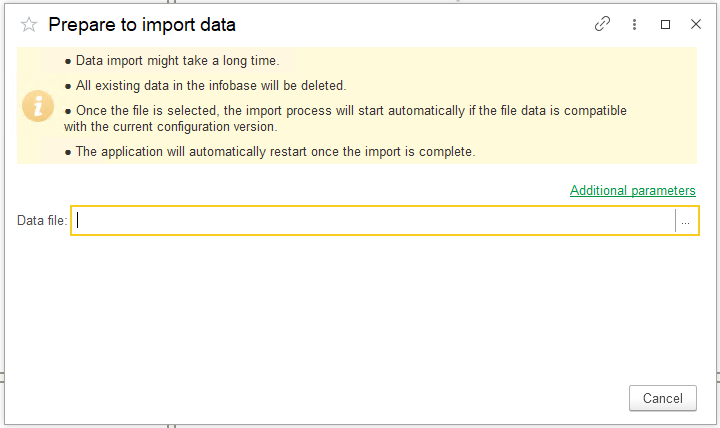
- Export your database from the on-premises you use on your computer in ZIP format.
- Click on the Move to cloud button in AccountingSuite Portal.
- Select the desired database ZIP file from your computer and upload it.
- If you have no free slot for new database please delete one of your databases first. Use
 button for it.
Please note: Migration can only be between the same versions with the same set of extensions.
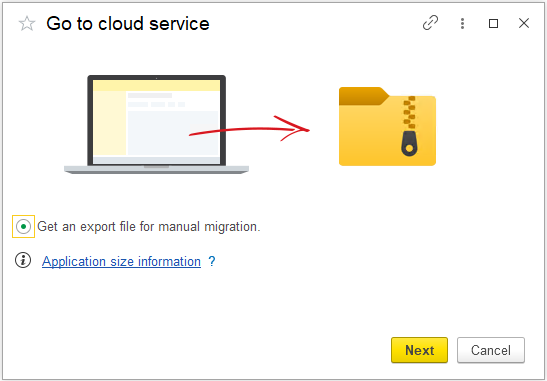
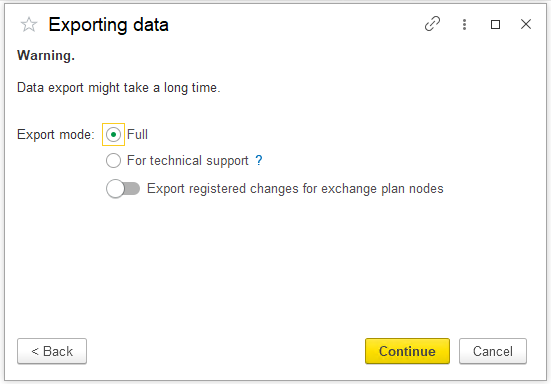
In on-premises AccountingSuite click Admin Panel – Go to Cloud Service and steps there to get backup. Use Export mode Full.
You will get a file with a name like data_dump_AccountingSuite_2.24.12.1.zip.
Then click on the Move to cloud button in AccountingSuite Portal and upload this ZIP file.
Once the upload is successful, the database will be available in My cloud applications list, providing you with easy and secure access from any location.
Move Cloud to On-premises #
If you want to create copy of your database and transfer your Cloud infobase to On-premises database use follow steps:
- Create backup from your Cloud database and save file in ZIP format.
- Open your On-premises AccountingSuite.
- Use Admin Panel – Load Data from Cloud Service
- Select the desired database ZIP file from your computer and upload it.
Please note: Migration can only be between the same versions with the same set of extensions.
You need to have Admin user rights to use backup and restore database options.
Important Notice:
Restoring from this backup will overwrite all existing data in the database. A new Administrator account will be created with a blank password for initial access. Immediately set a strong password after logging in to secure the database.
How to change Server Location of your database? #
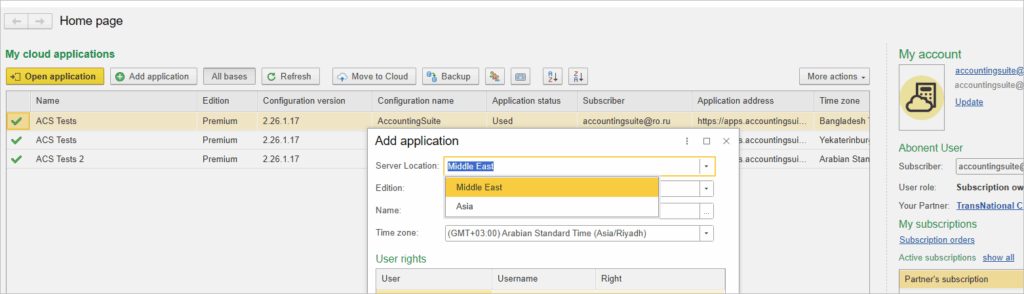
Your first AccountingSuite database will be created at the default Server Location, which is associated with your Time Zone. AccountingSuite Cloud has locations in the Middle East and Asia.
Test the speed of operation and select a server where the Ping time is minimal. Check out the actual work at the bases in different locations.
Click Add application button and chose Server Location to use.
You can move your base to another Server Location. Make the backup from the database, create a new database in new Server Location and restore a backup copy there.
Troubleshooting Cloud AccountingSuite Disconnections on a Laptop Battery #
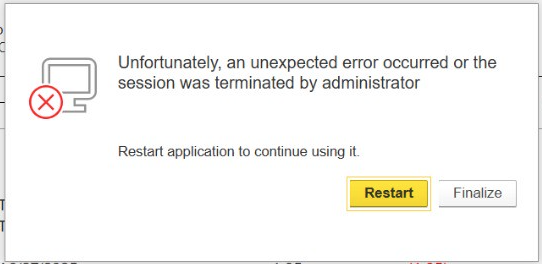
Problem: AccountinSuite Cloud version (or web-browser mode of work with on-premises) becomes unresponsive or logs you out when you switch tabs or leave it inactive on a battery-powered laptop, likely because the browser is suspending the inactive tab to save power. The message: “Unfortunately, an unexpected error occurred or the session was terminated by administrator“.
This is a classic symptom of modern browser “eco” or “power-saving” modes. These features aggressively freeze or discard tabs you aren’t actively viewing to extend battery life, which can disrupt background processes in web apps.
Or the reason for turning off your WiFi to save energy while the screen saver is running.
It can be problem with your Internet connection too. In this case, check the stability of the connection with your Internet provider or change the service provider to a more stable channel.
The choice of the Cloud version or the On-premises depends on the technical capability of the Internet in your country and your provider.
A comfortable ping latency for operation should be below 280-400 ms. Anything above 400 ms. will cause noticeable delays when pressing buttons in the system.
Check your network latency with Speed Test to our web site. You should check the Demobase for the speed of work on your equipment and network. If Cloud AccountingSuite is running slowly, then consider the desktop On-premises AccountingSuite version.
Confirm the power-saving modes hypothesis
Before making changes, ensure this is the actual issue.
- Plug your laptop into power.
- Open AccountinSuite in one tab and work as normal. Switch to other tabs or minimize the browser for a 10 minutes.
- Switch back to the AccountinSuite tab. Does it remain connected and responsive?
- Now, unplug the power cord to run on battery.
- Repeat the process. If the app only freezes/disconnects while on battery, you’ve confirmed the issue is related to Google Chrome’s battery-saving behavior (or some eco-mode for your other browser).
The Immediate Fix (Keep Tab Active)
This is the simplest solution if you need AccountinSuite to run in the background.
- Pin the Tab: Right-click on the AccountinSuite tab in Chrome and select “Pin”. This prevents Chrome from discarding it and keeps it much smaller in your tab bar.
- Open a New Window: Move the AccountinSuite tab to its own separate browser window. Browsers are less likely to suspend the only tab in a window.
Disable Chrome’s Built-in Battery Saver (The Direct Approach)
This is likely the primary culprit.
- In your Chrome address bar, type
chrome://settings/performanceand press Enter.- Alternatively, go to Settings > Performance.
- You will see the option “Memory Saver” and “Battery Saver”.
- Toggle off “Memory Saver”. This feature frees up memory from inactive tabs, which often breaks cloud apps.
- Toggle off “Battery Saver”. When on, Chrome limits background activity and visual effects when your device is unplugged.
Test the Solution
- Unplug your laptop to run on battery.
- Open AccountinSuite and let it sit inactive for a few minutes while you use other applications.
- Return to the tab. It should now remain loaded and connected without having to fully refresh.
System-Wide Check (If the problem persists)
Ensure your operating system isn’t overriding everything.
- On Windows:
- Go to Settings > System > Power & battery.
- For best performance, set your “Power mode” to “Best performance” while working.
- You can also add Chrome to a high-performance list in your Graphics settings (Settings > System > Display > Graphics) by setting its power preference to “High performance”.
- On macOS:
- Open System Settings > Battery.
- Ensure “Low Power Mode” is unchecked.
Using a thin client instead of a browser will reduce the likelihood of losing the connection after 10 minutes, but it won’t remove it if the laptop is in power-saving mode and turns off WiFi during downtime or freezes inactive programs.