The Bank Accounts List is the central hub for managing all the banking information connected to your company. It provides a consolidated view of every bank account, credit card account, and other electronic payment accounts you have set up, allowing for efficient tracking and management of your cash flow. This list is the starting point for critical tasks such as Bank reconciliation, transaction downloads, and cash position reporting.

Create Bank Account #
You can use Data Import Tool to import mulitple Bank Accounts.
- Navigate to Bank → Bank Accounts
- Click Create.
- In the Description field, enter a brief name or description for the bank account (or leave the field blank and Description will be generated automatically upon saving).
- Enter the bank account number in the Account number field.
- If the account uses IBAN format, check the box labeled Check IBAN Format to validate it.
- From the Bank dropdown, select the Bank where this account is held.
- Select the Currency for the account from the Currency dropdown list.
- If payments are made through a correspondent account in another bank, choose the correspondent bank from the Correspondent bank dropdown (from the Banks list).
- Select the appropriate G/L Account (general ledger account) to link this account. G/L accounts that are available for selection have Banking accounts Subcategory and the Currency specified in Step 7.
- Bank account can be assigned a Class to apply the selected Class to transactions imported from this bank and to restrict access using RLS.
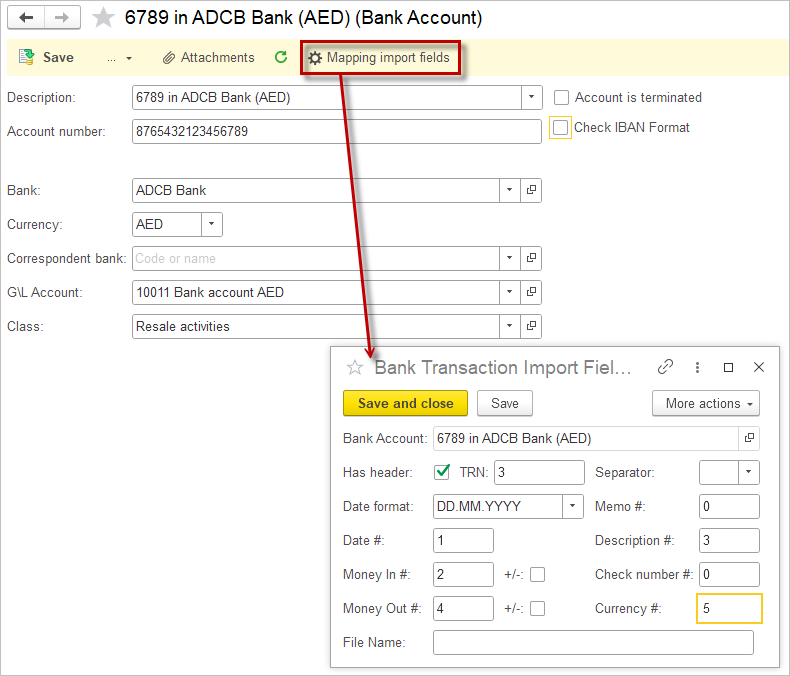
- The Mapping import fields tab contains options to configure how CSV files are imported and interpreted for this bank account. These settings control how the bank statement data from CSV files is parsed and imported into the system (see Bank Import), ensuring that each piece of transaction information goes to the correct field within the software.
- Has header row: Check this box if the CSV file includes a header row with column names. Leave unchecked if the CSV contains only data rows.
- TRN column #: Column number for Tax Registation Number or Company name that can be used in Mapping.
- Date format: Select the date format used in the CSV file. For example, “M/D/Y (flex)” means the month/day/year format can be flexibly parsed.
- Date column #: Enter the column number in the CSV that contains the transaction dates.
- Money in column #: Enter the column number for amounts of money received (incoming transactions). The box next to it (+/-) can be checked if negative values need handling.
- Money out column #: Enter the column number for amounts of money spent (outgoing transactions). The box (+/-) is similar, for handling positive or negative values.
- Separator: Define the character used to separate columns in the CSV.
- Memo column #: Column number for memos or notes attached to transactions.
- Description column #: Specify the column number where transaction descriptions are found.
- Check number column #: Specify the column number where check numbers are recorded (if applicable).
- Currency column #: Specify the column that indicates the currency for each transaction, if present.
- Click Save and Close.
Filters Applied in the Payment documents #
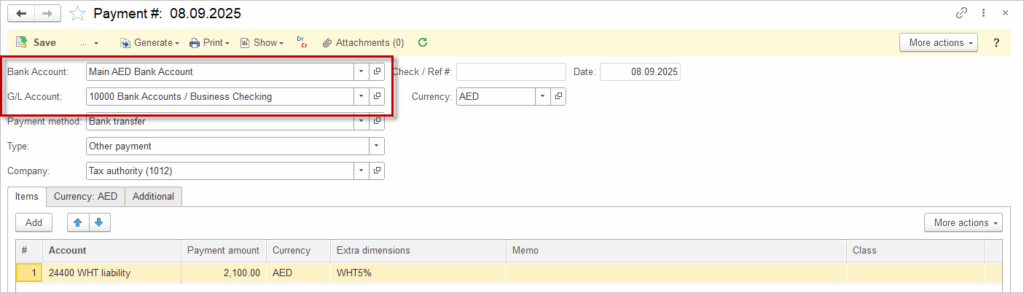
Each Bank Account should be assigned a specific G/L account for accounting entries. Additionally, the Currency used in both the Bank Account and the corresponding G/L account must be the same to ensure consistency and accuracy in financial reporting. The following filters are applied to Payment documents (such as Cash Receipts and Bill Payments) to maintain data integrity and prevent errors:
Bank Accounts’ and Petty Cash Locations’ Treatment in CoA #
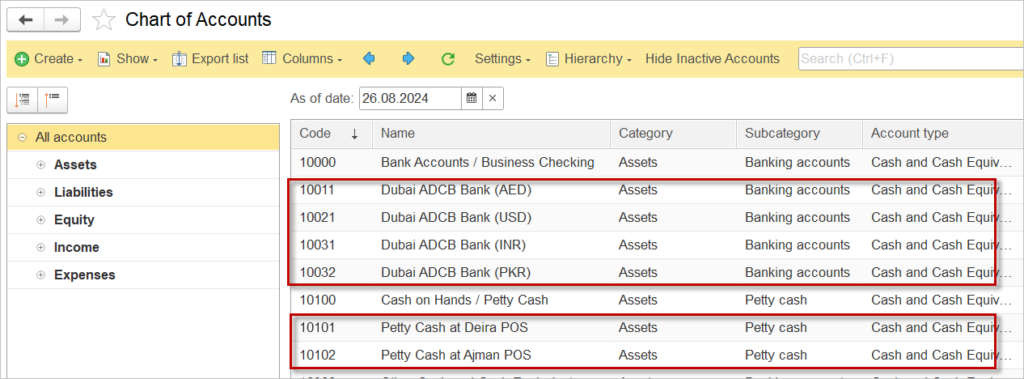
In AccountingSuite, bank accounts and petty cash are components of the Chart of accounts, enabling businesses to track their cash flow effectively and maintain accurate records of transactions. This separation facilitates better budgeting and financial analysis, as users can monitor the inflow and outflow of funds in real-time. Additionally, it helps to streamline reconciliations.
When setting up your Chart of Accounts, you have two primary methods for managing bank accounts.

For petty cash locations where is a single option (Option 2 Separate G/L accounts).
Option 1: G/L account with Extra Dimensions #
This method utilizes the power of Extra Dimensions (as detailed in our Extra Dimensions documentation) to track individual accounts separately without cluttering your main Chart of Accounts.
How to Implement This Option:
- Create one general ledger account for all bank accounts with the same currency
- Create a new record for every physical bank account in the Bank Accounts list.
- When recording a bank transaction (Deposit, Payment, or other), select the main G/L account and then assign the specific bank account from the Bank Accounts list.
Advantages of Option 1:
- Simplified Chart of Accounts: CoA remains clean and manageable with fewer accounts.
- Centralized Reporting: Run a report on the main G/L account to see the consolidated balance of all bank accounts.
- Scalability: Adding a new bank account is done in the Bank List, not the CoA, making it quick and easy.
Considerations:
Requires users to understand and consistently apply the Extra Dimension during data entry.
Option 2: Separate G/L accounts #
For each bank account or each petty cash location, create a new account. You can upload multiple accounts using the Data import tool for the Chart of accounts.
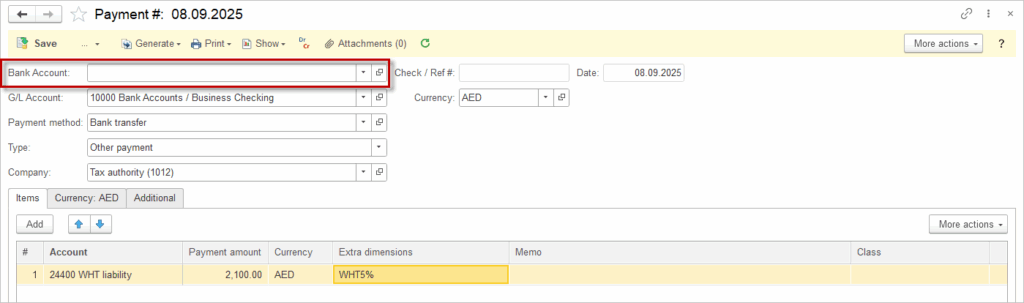
In the payment documents, ignore the field Bank account and leave it blank.
Advantages of Option 2:
- Simplicity in Entry: Transactions are posted directly to the specific account, which can be intuitive for new users.
- Immediate Visibility: The balance for each account is directly visible on the main Chart of Accounts and standard financial reports without filtering.
Considerations:
- Chart of Accounts Bloat: Can lead to a long and unwieldy CoA as your business adds more bank accounts over time.
- Less Flexible Reporting: While you can see each account’s balance easily, consolidating the total “Cash & Cash Equivalents” for reporting may require adding up multiple accounts.