Transitioning to a new accounting and management software like AccountingSuite requires careful planning to ensure data integrity, user adoption, and minimal business disruption. Below is a structured 9-step methodology for a smooth migration.
Key Success Factors
- Executive buy-in – Ensure leadership supports the transition.
- Data accuracy – Clean data pre-migration reduces errors.
- Change management – Train users to minimize resistance.
Phase 0: Fit-Gap Analysis #
Before the formal pre-implementation planning begins, Start with Fit-Gap Analysis as the very first approach to engaging with the client. The goal is to collect high-level requirements to understand the client’s core needs and evaluate how well AccountingSuite can meet them.
- Use a structured questionnaire designed to gather information about key business processes, desired features, and compliance requirements. An AI chatbot on our website can assist in this phase by dynamically conducting the questionnaire, providing an interactive way to assess the client’s situation and identify potential fit-gap areas.
- Once the high-level requirements are gathered, the next action is to explore the demo database of AccountingSuite. This exploration helps to verify and test the system’s existing functions against the client’s stated needs. Crucially, any references or links in the questionnaire to local laws or regulatory requirements must be checked to ensure that AccountingSuite’s current features cover these compliance aspects.
- Where there are discrepancies or missing functionalities—these gaps represent opportunities for customization. All identified gaps are documented, forming the basis for required customizations to tailor the system for the client’s specific legal, operational, or reporting needs. This sets a strong foundation by aligning client expectations and system capabilities early in the implementation journey.
More detail about Fit-gap analysis
More detail about Fit-gap analysis #
Let’s consider in more detail the issues of analysis of convergence (Fit) and gaps (Gap) of the suitability of the AccountingSuite for the company according to its requirements. How to conduct such an analysis (by the contractor/partner) according to the received specification of functional requirements and how to interpret these results (by the customer)?
If the performers are not external specialists, but a team of employees on the company’s staff, then the approach is the same. From here on, the “performer” is the specialist responsible for automation and well aware of the AccountingSuite in question, and the “customer” is the party interested in the project, even within the same company.
In fit-gap analysis, the list of requirements from the customer is taken as a basis, it is transferred as part of the RFP (Request for proposal), divided into sections (modules) of the system: Sales, Purchases, Accounting and Tax accounting, Production, Bank, etc. This list is converted into a table, if it was not originally in the form of a table, and columns for analysis assessments are added to it.
A typical table template for performing fit-gap analysis contains the following columns:
- Requirement – a brief description of the criterion for evaluation
- Priority – importance and order for automation: 1 – highest priority, 10 – lowest
- Mandatory – criticality of implementation at the first stage for launching into operation (the so-called must have — must be immediately)
- Support – supported out of the box
- Setup – supported by system setup (does not require programming)
- Modification – supported by customization (requires programming)
- 3rd party – support for third party solutions
- Will be in the next versions – support is announced in the next versions of the solution
- Not supported – cannot be done, technical and functional limitations
- Commentary on the requirement – explanations of the requirement, links to other documents with a detailed description
- Commentary on the fit-gap assessment – explanation of the selected mark during the analysis
The options for formatting the table for analysis are different, depending on the methodology used (they can be included as ready-made templates in the appendix to the methodology). The template can be required by the customer himself, which is logical: then everything will be reduced to a single form.
The Modification and Setting columns , considering them as modifications, but there is a difference between them. Whether you need to involve a developer or not, then such modifications in the code need to be carefully checked for compatibility when updating the system to new versions. There may also be different labor intensity of work on modification of the system or settings of options, access rights, appearance of forms, etc.
A difference between Supported and Customization , although it can be argued that if something is configured without modifications, then it is already supported. But in practice, these can be different labor costs: there is one by default or you need to configure it, describe the rules of operation, model the options.
The allocation of support through third-party solutions is also interesting – these places will require integration and additional costs for the acquisition of the solutions themselves.
In any case, the list of evaluation criteria can be shorter if the division is not critical. In special cases, this can be two columns in the table: fit (supported) and gap (not supported). Actually, that is why the fit-gap analysis . But the nuances are significant. They will then have to be described in the comment. For example, “not supported” — yes, but it can be improved. Or vice versa — “supported” — yes, but not out of the box, but after modifications or installation of third-party solutions.
Another version of this table: one column ” fit-gap “, in which a numerical assessment of convergence or gap is entered. For example, on a scale from 10 to 0, where 10 is ideal, 1 is not suitable, 0 is impossible to improve. Then the intermediate assessments show the degree and complexity of improvements.
How, in fact, to fill out this file on the performer’s side?
All experts (colleagues from the contractor company) are involved in the system:
- Do study the system and its documentation, and model accounting situations in it.
- By sending out an email to each person to evaluate their block and to get an initial overview of the requirements.
- In the form of a brainstorming session in a meeting room, where everyone gets together and discusses what is meant by each requirement point, how it relates to the capabilities of the system, and whether we can improve and customize it.
If something is unclear, these points are clarified with the customer: another iteration of additional estimates or clarifications will be required immediately by phone/messenger with the person responsible on that side. An estimate is given based on the understanding, and a comment is written on the estimate, what was meant by this, if ambiguity of interpretation is possible.
At this stage, it is difficult to understand in detail the need for revision or how exactly everything needs to be set up based on the requirement name and a few phrases in the comment. Rather, it is a quick analysis: is there such a possibility in the AccountingSuite system as stated in the specification for the software product or is this a limitation that is known (unknown) how to overcome. Here, the real expert experience of the project team and good intuition are needed so that the marks are as accurate as possible.
For the contractor/partner, such a quick analysis will show areas that will need to be worked out in more detail for a better understanding and clarification of the implementation budget estimates already during the full-fledged project, in the analysis and design phase.
The customer, collecting such fit-gap tables according to their requirements, can compare them with other 1C Enterprise solutions, this will allow determining the applicability of a particular AccountingSuite or 1C:ERP World Edition system if there is a choice between different 1C Platform ERP-system. Therefore, it is advisable to add columns for fit-gap analysis immediately on the customer’s side, so that all participants solutions work with one RFP template and then it will be possible to compare the results.
If the table is large and visual comparison is difficult, an additional column is introduced with scores for each mark, where points are entered: support “out of the box” – maximum, “not supported” – zero. Then the winner is determined by the sum of points.
It may turn out that in some sections one system is better than another, and in other sections everything is the other way around. The choice is not easy when there is no clear leader. It is necessary to look at the systems live at the next stage and take into account the factors of non-functional requirements (cost, performance, etc.).
But if the system is not suitable at all, then this will be immediately visible from the continuous “gaps” in the analysis.
In practice, fit-gap analysis is rather rare or its detailing is rather superficial, not hundreds of lines in the table, but dozens. This is due to the fact that it is difficult for the customer to independently collect detailed functional requirements at the initial stage – this is a task for specialists for project inspection. And this is an independent mini-project, the purpose of which is to obtain a document containing the requirements and immediately the result of the analysis in relation to the AccountingSuite system.
Phase 1: Pre-Implementation Planning #
Step 1: Define Objectives & Requirements
- Identify key pain points in the current system (e.g., lack of automation, reporting inefficiencies).
- List must-have features (e.g., multi-currency support, inventory tracking, tax compliance).
- Assign a project team (accountants, IT, department heads).
- Study the AccountingSuite demo database and select an edition for your needs.
- Prototype your processes in the demo database.
- Get a Trial period in the cloud AccountingSuite and set up your database from scratch. You can transfer all settings to the on-premises version AccountingSuite later.
- Chose your Partner to help you with onboarding process.
Step 2: Data Audit & Cleanup
- Review existing data (GL, vendors, customers, inventory) for accuracy.
- Remove duplicates, outdated entries, and reconcile discrepancies.
- Decide which historical data to migrate.
Step 3: Choose Deployment Model
- Cloud (SaaS): Quick setup, automatic updates (recommended for most businesses).
- On-Premises: For companies with strict data control needs or lack of Internet.
Phase 2: System Setup & Data Migration #
Step 4: Configure AccountingSuite
- Pass though Setup Wizard first steps.
- Set up:
- Chart of Accounts (align with existing structure).
- Tax rates (VAT, Withholding tax, etc.).
- User roles & permissions (admin, accountant, approver).
- Integrations (prepare customizations for your specific Banks, Front-Office, eCommerce platforms).
Step 5: Test Migration (Pilot Run)
- Migrate a subset of data (e.g., opening balance on some date).
- Verify:
- Balances match (trial balance pre/post-migration).
- Reports (P&L, balance sheet) generate correctly.
- Fix your accounting errors before full migration.
Step 6: Full Data Migration
- Use AccountingSuite’s import tools (CSV/Excel).
- Migrate:
- Customers/Vendors
- Inventory items
- Open invoices & bills
- GL history (if needed)
Phase 3: Training & Go-Live #
Step 7: User Training
- Provide cheat sheets and access to AccountingSuite’s knowledge base and Video Tutorials.
- Conduct role-based training in your company:
- Accountants: Advanced reporting, reconciliation.
- Managers: Dashboards financial reports,
- Sales/Inventory: CRM, Sales and Purchase, order processing.
Step 8: Parallel Run (Optional but Recommended)
- Run AccountingSuite alongside the old system for 1 billing cycle.
- Compare outputs (e.g., cash flow statements) to ensure accuracy.
Step 9: Go-Live & Post-Launch Support
- Cut-over date: Disable old system, fully switch to AccountingSuite.
- Monitor closely for first 30 days:
- Reconcile daily transactions.
- Address user questions promptly.
- Schedule a post-implementation review after 60–90 days.
Useful Tips for Partners: How to Start Implementation #
How to Create a Prototype Database for the Client? #
Situation: You need to start the implementation quickly without complex client-side preparation.
Solution: If your client has purchased the On-premises version, begin by using the Cloud version of AccountingSuite to build a prototype.
- Why it works: In the cloud, you can instantly create a database and invite both your consultants and the client’s users via email. There’s no need for immediate involvement from the client’s IT administrator to access their internal network. and on-pemises installation
- Key Benefits:
- Fast Start: You can begin configuration and demonstrate results on day one.
- Gain Time: This approach gives you additional time to study the specifics of on-premises administration at the client’s site.
- Seamless Transfer: Once the prototype is ready, you simply create a backup in the cloud and restore it on the client’s on-premises server. The Cloud and On-premises versions are fully compatible.
How to Replicate a Configured Database for Multiple Companies? #
Situation: You need to perform mass implementations (e.g., for different countries or for multiple branches within a corporation).
Solution: Create and reuse a standardized “template” database.
- Process:
- Set up a master database with all the necessary default settings for a specific region or company type. This typically includes:
- Country-specific Chart of Accounts
- General Ledger Settings
- Address Classifiers
- Tax Rates and Tax Agent configurations
- Payroll Settings
- Print Form Templates
- Localized Reporting Variants
- Save this fully configured database as a backup file.
- For each new client or branch in that region, deploy a fresh instance from this template backup.
- Finally, import the client’s specific operational data (like items, contractors, balances) using the standard Data Import Tool.
- Set up a master database with all the necessary default settings for a specific region or company type. This typically includes:
How to Demonstrate the Correct Subscription Edition to a Client? #
Situation: The 30-day Trial always provides access to the Premium edition. For a client who may only need the Lite or Standard edition, this can create unrealistic expectations due to the higher cost and feature set.
Solution: Use your partner cloud subscription to show the exact edition the client will purchase.
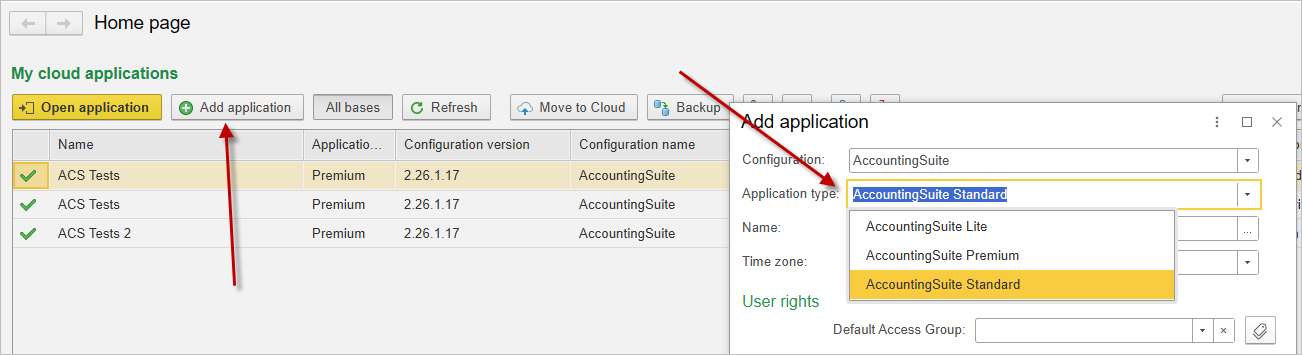
- Why it’s important: If a client uses Premium-specific features during the Trial and then subscribes to a lower edition, those features will be disabled, potentially disrupting their configured processes.
- Recommended Process:
- Create a Demo Database: In your partner cloud account, create a new database in the specific edition (Lite/Standard) you plan to sell.
- Invite the Client: Invite the client’s users to this database for a realistic demonstration and configuration pilot.
- Seamless Handover: Once the client purchases their subscription, you have two options:
- Request an Owner Transfer: Contact AccountingSuite service administrators to officially transfer the ownership of this database to the client. This is the cleanest method.
- Backup and Restore: Create a backup of your demo database and restore it into the client’s new subscription.
This ensures the client starts working immediately in the correct edition without any feature loss after the Trial period.
How to Develop a Customization for a Client with a Cloud Database? #
Situation: Your client using the cloud version of AccountingSuite requires specific functionality not covered by the standard edition. You need to develop and deploy a secure and supported customization that also remains functional after system updates.
Solution: Follow the official customization and extension deployment process to ensure compatibility, security, and long-term supportability across all AccountingSuite updates.
Process Overview:
- Understand the Process: Familiarize yourself with the formal stages of customization, from requirements gathering to final delivery, as described in our documentation [Customization Process].
- Prepare Your Team: Development requires specific expertise. Ensure your developers have completed our official training course to understand the AccountingSuite architecture and development standards: [Developer Course].
- Develop in a Controlled Environment:
- Always develop on-premises. Use your own on-premises (local) installation of AccountingSuite as the primary development and testing sandbox.
- This allows for safe iteration, debugging, and version control without affecting any client data or the cloud infrastructure.
- Deploy to Cloud for Testing & Production:
- Once the Extension is finalized and tested locally, it can be submitted for installation in cloud databases.
- The process for installing extensions to on-premises AccountingSuite is detailed here: [Extension Installation Guide].
- Important: To install any extension into a cloud database (test or client), you must submit a request to the AccountingSuite service administrators.
- Key Technical & Policy Requirements:
- Security & Performance: The extension must not compromise cloud security or create excessive load on the shared infrastructure. All extensions undergo a mandatory review by our specialists before being published and deployed.
- Resource-Intensive Customizations: If a customization requires high-frequency data processing (e.g., exchanging large volumes of data every few seconds), the cloud environment is not suitable.
- Recommendation: For such cases, advise the client to use the On-premises version of AccountingSuite. Extensions causing significant load will not be approved for the standard cloud. Implementation in the cloud would require a separate agreement and a special service tariff to account for the dedicated resources needed.
Critical Consideration: Maintaining Compatibility After Updates
- Proactive Review: Prior to every major AccountingSuite platform update, all published extensions are checked for compatibility.
- Partner Notification: If an extension is found to be incompatible or non-functional after an update, its author (you, the partner) will be notified promptly. It is crucial to provide an updated, compatible version of the extension as soon as possible.
- Risk of Deactivation: Extensions with unresolved compatibility issues will be disabled in client databases after the update. This will lead to a loss of functionality for your client, causing inconvenience and potential disruption to their business processes.
- Your Responsibility: Please account for the necessity of ongoing maintenance. All your custom developments must be updated in a timely manner to align with new platform releases.
Summary of the Correct Path:Development (On-premise) -> Review & Approval -> Installation in Cloud (by Admins) -> Ongoing Maintenance for Compatibility
Following this structured approach guarantees that customizations are reliable, maintainable, and do not jeopardize the stability of your client’s cloud environment or their business continuity after system upgrades.
How to Plan the Project Timeline Realistically? #
Situation: Clients often expect a rapid “out-of-the-box” implementation, underestimating the time needed for data preparation, configuration, and user training.
Solution: Structure the project into clear, phased milestones with buffer time.
- Phased Approach is Key: Divide the project into distinct phases, for example:
- Stage 1: Prototyping & Core Configuration (Chart of Accounts, taxes, basic directories).
- Stage 2: Data Migration (Historical balances, open documents).
- Stage 3: User Acceptance Testing (UAT) and adjustment of settings based on feedback.
- Stage 4: Go-Live & Parallel Run (if necessary).
- Stage 5: Post-Launch Support and Optimization.
- Critical Buffer: Always include a time buffer (20-30%) for unforeseen complications during data import, clarification of business processes, and user training. Clearly communicate that data cleansing and preparation on the client’s side is a critical factor for the timeline.
- Manage Expectations Early: Discuss this realistic timeline at the presales stage to align expectations.
How to Effectively Use Data Import Tools? #
Situation: Manual data entry is time-consuming and error-prone. Successful migration of client’s existing data (items, contractors, balances) is crucial for project success.
Solution: Master the standard Data Import Tools and establish a clear data preparation protocol.
- Start with Templates Early: Provide the client with empty import templates (Excel/CSV) at the very beginning of the project.
- Cleanse Before Import: Emphasize that data quality is the client’s responsibility. Help them identify and remove duplicates, unify naming conventions, and validate tax IDs before import.
- Test on a Copy: Never perform the first import directly into the production prototype. Always use a test database to verify mappings, check for errors, and validate results.
- Import in Stages: First import static directories (Warehouses, Counterparties, Items), then balances and open documents. This allows for intermediate verification.
- Keep a Log: Maintain a detailed log of each import session (file used, date, number of records, errors encountered).
How to Conduct Effective User Training? #
Situation: Without proper training, users will be frustrated, make errors, and resist the new system, jeopardizing the entire implementation.
Solution: Move beyond generic demonstrations to role-based, practical training.
- Role-Based Sessions: Don’t train everyone on everything. Conduct separate sessions for accountants, warehouse managers, sales managers, etc., focusing only on the functions they will use daily.
- “Learning by Doing” Approach: Use the client’s own prototype database for training. Give users practical tasks based on their real-life workflows (create an invoice, post a payment, generate a stock report).
- Create Quick Reference Guides: Develop or use existing one-page cheat sheets with step-by-step instructions for the most common operations (e.g., “How to create an Expense Report”).
- Appoint Internal Champions: Identify 1-2 motivated and tech-savvy users on the client’s side. Train them more deeply so they can provide first-line support to their colleagues after go-live.
How to Structure Post-Launch Support? #
Situation: The project is not finished at go-live. The first 1-3 months are critical for stabilizing processes and addressing user questions.
Solution: Offer a structured post-launch support package and define clear communication channels.
- Dedicated Support Period: Include a fixed number of consulting hours in your implementation package specifically for the first month after go-live.
- Clear Channels: Define how users should ask questions (e.g., a dedicated email, a channel in corporate messenger, a ticketing system). Avoid using personal employee chats for support requests.
- Regular Check-Ins: Schedule brief weekly calls with the client’s project manager during the first month to proactively gather feedback and identify bottlenecks.
- Knowledge Base: Gradually, based on recurring questions, build a client-specific FAQ or knowledge base. This reduces repetitive support requests in the future.
How to Upsell Additional Functionality After Successful Implementation? #
Situation: A satisfied client with a working system is the best candidate for further development.
Solution: Plan for future growth from the start and demonstrate value step-by-step.
- Roadmap Discussion: During the initial implementation, discuss the client’s business growth plans. Mention relevant modules or features they don’t need yet but might in the future (e.g., advanced CRM, asset management, detailed analytics).
- Show, Don’t Just Tell: Once the core accounting is stable, schedule a short demo of a potential next module (e.g., “Here’s how the advanced reporting dashboard could look with your data”).
- Tie Features to Business Goals: Frame upselling in terms of solving business problems: “To automate the approval of these expense reports you mentioned, we could configure the workflow module, which would save your department head 2 hours per week.”
How to Run a Pilot Project to Reduce Risk? #
Situation: The client is hesitant, the requirements are complex, or the data is in poor condition. A full-scale implementation carries high risk for both parties.
Solution: Propose starting with a pilot project for one department, one business process, or one legal entity.
- Define Clear Pilot Goals: Limit the scope. For example: “Fully automate procurement for the Marketing department within 4 weeks” or “Set up management accounting for the main LLC.”
- Set Success Criteria: Agree with the client on measurable indicators of the pilot’s success (e.g., time to generate a report reduced by 70%, error rate in invoices reduced to zero).
- Benefit: A successful pilot minimizes the client’s initial investment, provides tangible results quickly, and builds trust. It serves as a foundation and a detailed specification for scaling to the entire company.
- Important: Treat the pilot as a paid consulting project, not a free demo.
How to Build a Transparent Commercial Offer? #
Situation: A vague offer leads to misunderstandings, scope creep, and conflicts over payments.
Solution: Structure your commercial offer to clearly separate different types of work and responsibilities.
- Break Down into Blocks:
- Block 1: Licensing & Subscriptions (clear cost of AccountingSuite itself).
- Block 2: Implementation Services (broken down by phases: analysis, configuration, data migration, training. Indicate the number of hours or a fixed price for each phase).
- Block 3: Custom Development (separate item, with reference to the customization process and the need for a separate technical specification and estimate).
- Block 4: Post-Launch Support (clearly state the cost and terms of the support package after go-live).
- Explicitly State What’s Not Included: For example: “The offer does not include data cleansing on the client’s side,” or “The price is based on the volume of data described in the annex; migration of additional historical archives is paid separately.”
- Benefit: Transparency builds trust from the start, simplifies budget approval for the client, and protects you from unreasonable demands.
How to Leverage the AccountingSuite Partner Network? #
Situation: You are faced with a task that requires specific expertise (e.g., integration with a rare equipment, development in a narrow industry) or resources that you lack.
Solution: Don’t try to do everything yourself. Use the community of certified partners.
- Find an Expert: Contact AccountingSuite to find a partner with proven experience in the required area (e.g., integration with warehouse robots, development for the hospitality industry).
- Collaboration Models:
- Subcontracting: Engage a specialized partner to perform a specific block of work under your project management.
- Joint Project: Form a consortium to execute a large, complex project, dividing roles and responsibilities.
- Benefit: You can take on larger and more complex projects without expanding your team, maintain a high level of expertise, and fulfill your obligations to the client on time. This strengthens your reputation as a reliable integrator.
How to Work with the Client’s “Legacy” Data? #
Situation: The client insists on migrating all historical data from the previous system (5-10+ years), which complicates the project, increases costs, and can overload the new system.
Solution: Advocate for a smart data migration strategy focused on operational needs, not archiving.
- The “Fresh Start” Principle: Recommend migrating only data necessary for current operations:
- Balances: Opening balances for all accounting accounts as of the go-live date.
- Open Documents: All unpaid invoices, unfulfilled orders, current warehouse balances.
- Reference Data: Active contractors, items, employees.
- Archive the Past Separately: Offer to convert the old database into a read-only archive (a separate simple application or even structured PDF/XLS reports) for regulatory reference. This is much cheaper than full migration.
- Benefit: This approach drastically reduces implementation time and cost, minimizes risks during data import, and improves the performance of the new system. It requires a business conversation with the client to justify the approach.
How to Preserve Customized Reports During System Updates? #
Situation: You have invested time in configuring and saving custom report variants. During a system update to a new release, you find that these customized reports have been overwritten or become incompatible, requiring you to reconfigure them from scratch.
Solution: Understand that as the product evolves, reports modified during development may cause saved variants to become incompatible. There are two main approaches to handle this:
Approach 1: Plan for Post-Update Review
Check the Release Notes section to identify which reports have been modified. After updating, plan time to review affected reports and reconfigure them, taking advantage of any new features introduced. This ensures your configurations align with the latest report structure.
Approach 2: Isolate Your Customizations
For critical custom reports that must remain unchanged, create a copy of the report in the code as a new report. This can be done through:
- Extensions: Create an extension that adds your customized report
- External Reports: Develop the report as an external report outside the core system
These isolated copies will not be altered during standard system updates. However, when adding new ACS system features, such reports may also require updating.
Benefit: By understanding that system evolution may impact customizations and planning accordingly – either through post-update review or isolating your custom reports – you minimize disruption to your operations. You maintain working reports while still benefiting from platform improvements, ensuring business continuity through each update cycle.