Data initialization, migration, and integration are critical stages in the implementation and operation of any enterprise resource planning (ERP) and accounting system. For organizations utilizing AccountingSuite on the 1C:Enterprise Platform, efficiently and accurately populating the database with master data, opening balances, and transactional records presents a significant importance. Manual data entry is not only time-consuming and prone to error but often impractical when dealing with large volumes of legacy information from disparate sources.
To address this fundamental need, the Data Import Tool for AccountingSuite emerges as a comprehensive suite of solutions and specialized instruments. It is designed to streamline and automate the process of data integration, offering a structured approach for both initial system setup and ongoing data exchange. This integrated toolkit provides a graduated spectrum of capabilities, ranging from standardized import wizards to sophisticated, developer-driven integration channels.
At its core, the tool includes dedicated solutions for foundational tasks, such as Importing Lists and Importing Opening Balances, which are essential for the initial configuration of the database. For more specific and recurring data import needs directly into document line items, the Data Import Customization module allows administrators to configure imports from arbitrary, user-defined data formats.
Furthermore, the toolkit simplifies data extraction through a Universal Report, enabling straightforward export of all lists entries, documents, G/L and register records into common formats like Excel or CSV for BI and AI analysis or external processing. For advanced, automated interoperability, the tool outlines robust Integration capabilities based on the technical API of the 1C:Enterprise Platform, enabling bespoke development of data exchange mechanisms with external third-party systems.
A key enhancement within this suite is the OData Exchange solution. As an integral option within the Data Import Tool, it leverages the standardized OData protocol to provide powerful, platform-level integration capabilities. This solution facilitates scheduled, fully automated import and export processes, operating without manual intervention, thereby ensuring timely and consistent data synchronization.
AccountingSuite’s Data Import module allows you to import various Lists like Customers, Vendors, Items, Chart of accounts and the Journal entries. This reduces manual errors and allows a quick start in AccountingSuite.
The built-in Data Import Tool works if your file matches the system’s exact column layout – but what if your data comes in a different format, or you need to automatically create products, lots, or customers during import? Please see the Data Import Customization article in this case.
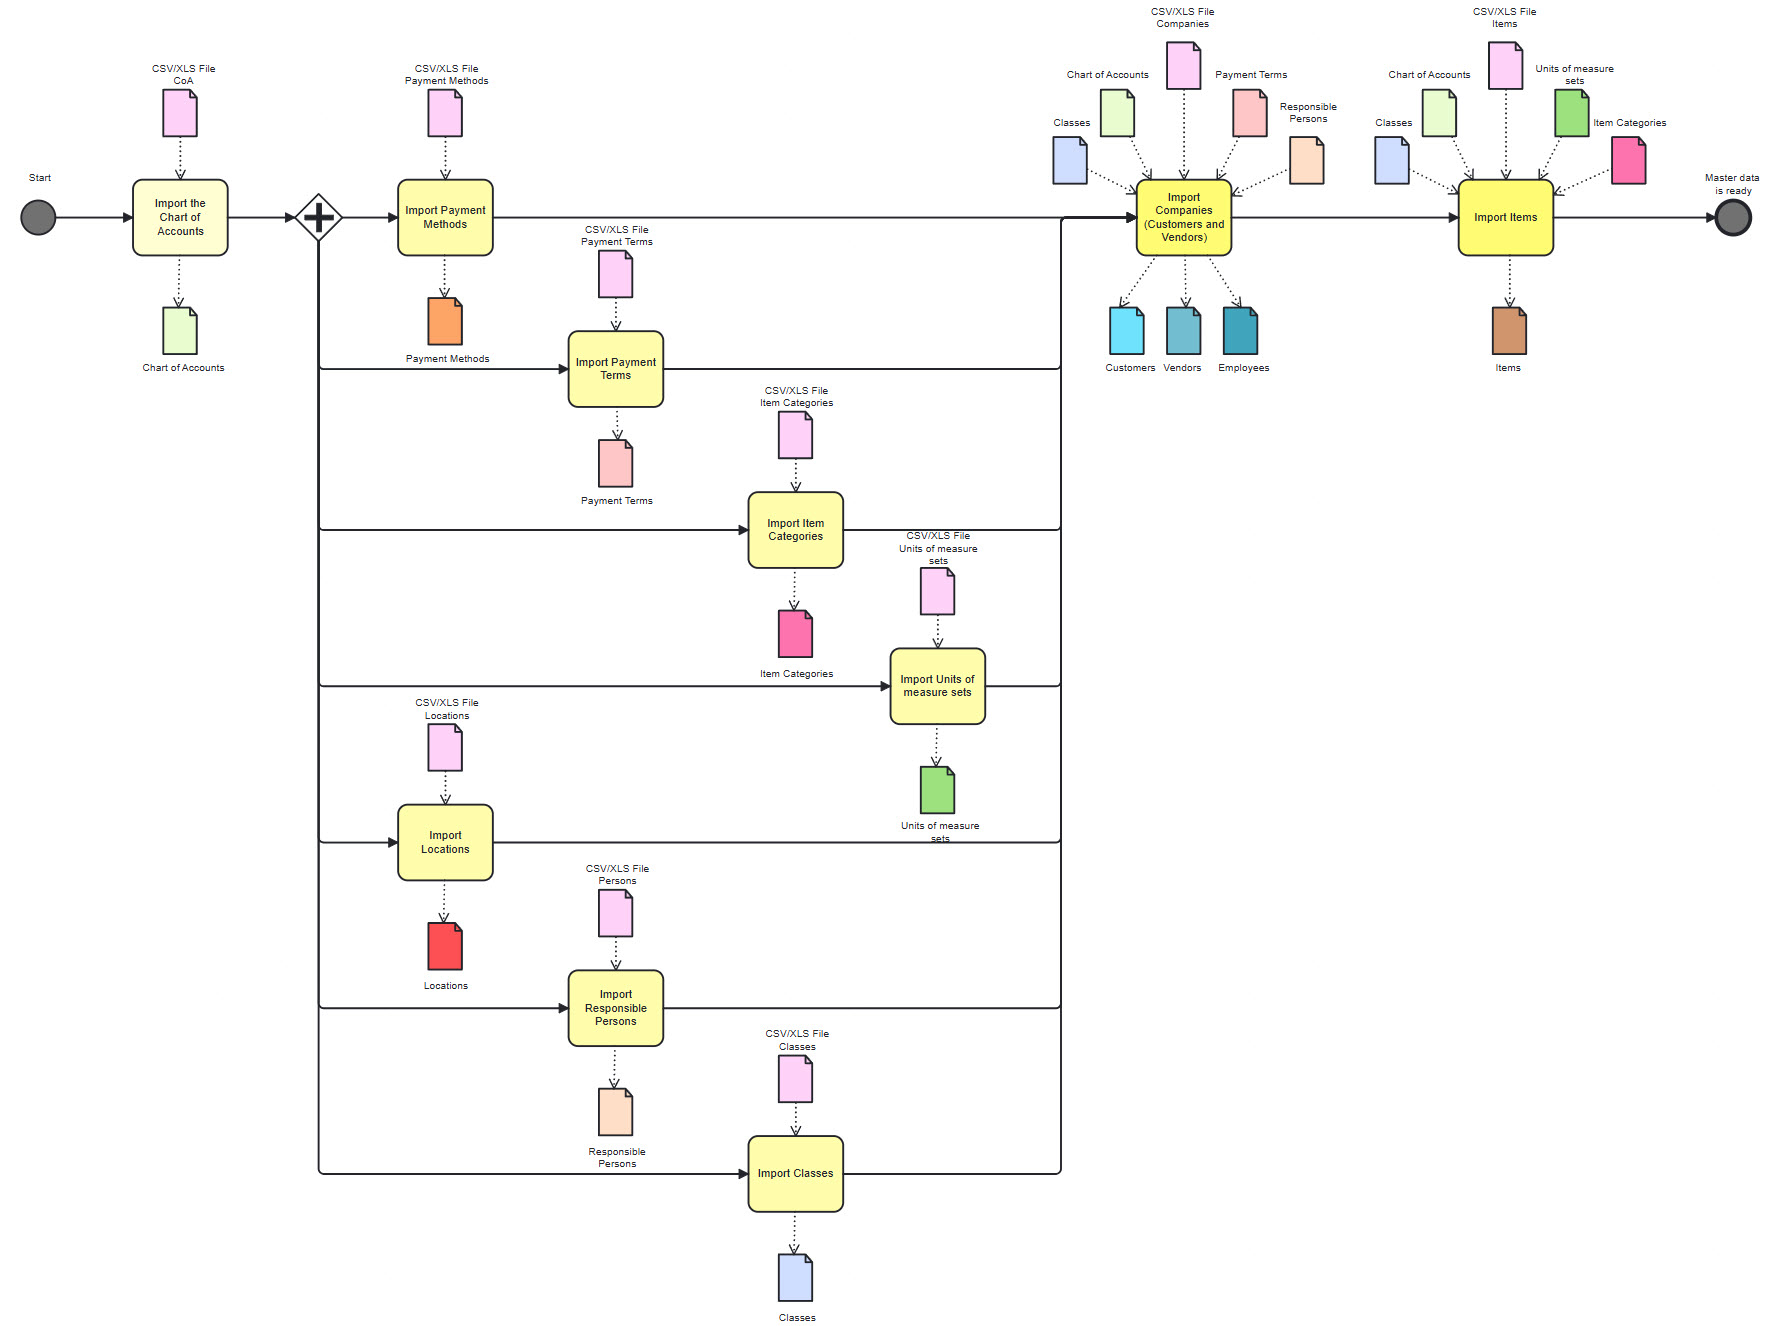
The order that you import your data is very important. Many things are dependent on other data being in the software before being imported. Here is a general order of operations when importing data.
1. Prepare data in the previous system: complete the monthly closing process for all periods up to the migration date. The more clear and consistent the data in the old system is, the easier the migration process.
- Import the Chart of Accounts
- Import Lists: Payment Methods, Payment Terms
- Import Locations, Item Categories, Units of measure sets
- Import Classes, Responsible Persons
- Import Companies (Customers, Vendors and Employees)
- Import Items
3. Import Open Inventory balances (using Inventory Balances Import).
4. Import Open Accounts Receivables (using Import Opening AR).
5. Import Open Accounts Payables (using Import Opening AP).
6. Create VAT Adjustments for all open VAT account balances (Incoming VAT, Outoging VAT, VAT Calculation) – required for opening balance in the VAT Detail report.
7. Journal Entry for the rest of the G/L balances (e.g. all apart from opening balances for inventory, AR/AP, VAT accounts).
8. Journal Entry for Assets remaining balances (fixed assets, intangible asset, prepaid expenses and low-value assets).
9. Verify data integrity (check Trial Balance and “30000 Opening balance equity” G/L account).

It is recommended to use “30000 Opening balance equity” G/L account (from the standard AccountingSuite chart of accounts) for opening balances entry. After completing the import, ensure that the balance is zero. Then, tick the “30000 Opening balance equity” G/L account as inactive so that it will not be used for any other entries. Its only purpose is to assist with posting opening balances; it should not be used for normal daily transactions.
Import Journal Entries for opening balance is the last step because of Extra Dimensions on Chart of Accounts which will be the catalogs imported in the previous steps. The Extra dimensions (AccountingSuite – Extra Dimensions) offered in AccountingSuite are the most common extra information required for standard accounting entries. For example, for the expense accounts the Extra dimension Expense category is offered as the most likely to meet the users expectations. If we post any services acquired, the transaction would be Dr Expense Cr AP. The AP accounts form the standard AccountingSuite Chart of Accounts have the Company as extra dimension, so this is how the Customer may be mapped to the expense.