Sales Invoices track sales of products or services for inventory control and for tax and accounting purposes. Sales Invoices record a customer’s liability to you and record income from the transaction.
- Copying invoices and creating new invoices is simple and quick — happier employees, happier customers.
- Monitor profitability sale-by-sale by seeing gross margin per line item before sending the invoice to your customer.
- Invoice from existing sales orders or create new invoices on the fly with no Sales Order while the customer is on the phone — or even with you in your office.

Create Sales Invoice #
Remember that the Sales invoice can be generated from the preceding document from the Sales workflow: Sales Quote or Sales Order.
- Navigate to Sales → Sales Invoices
- Click Create (or use from the Sales Order command Generate – Sales Invoice).
- Choose a Customer from the drop-down list. The following fields auto-fill if they were entered when creating the customer record: Terms, A/R Account, Due Date*, Ship To, Bill To, Email Address.
- Enter the Customer PO / Ref #.
- Click the More tab and enter the Project, Class and Confirm to fields. (optional)
- Change the Bill to and Ship to if applicable.
- Click the More (2) tab and enter the Carrier, Tracking Number #, FOB and Sales Person. (optional)
- Click the Print Options tab and enter Drop-ship Customer, Ship to,Confirm to and Drop-ship PO / Ref #. (optional). Note: The fields on this tab print on the Drop-ship PO; no other operations are performed.
- Click the Memo tab and enter a Memo, if desired.
- Click Add to add a new line item.
- Choose Item from the drop-down list. The Description, Unit of Measure (UM) and Price auto-fill if these fields were entered when creating the item and an associated Price Matrix record.
- Enter the quantity (qty), Expected Delivery Date, Project, and Class.
- Repeat steps 10-12 for each item.
- Enter the discount % or discount if applicable.
- Enter the Shipping cost, if applicable.
- Click Save to save a draft or Post and Close to finish the Sales Order.

E-mail Sales Invoice #
- From the individual Sales Invoice view, click the Email tab.
- Enter the customer’s email address. If the email address was entered when creating the Customer record, it will auto-fill.
- Enter an email address in the cc field to send a copy to any additional parties.
- Enter any additional text to be printed on the email receipt in the Notes box to the right of the email addresses.
Accounting #
Recording a Sales invoice creates the following transactions in the General Journal:
- Debits: Accounts Receivable
- Debits: Cost of Goods Sold (for inventoried items)
- Credits: Revenue
- Credits: Inventory (for inventories items)
- Credits: VAT (if applicable)

Cost of goods sold is calculated without a breakdown to Warehouse or to Lot (Serial Number). These options will be available in next AccountingSuite releases.
Insufficient inventory #
Situation #
When posting a Sales Invoice, the system returns a message stating that there is insufficient inventory at location.
Background #
In order to post a Sales Invoice, sufficient inventory must exist on the date of the invoice and at the location indicated on the invoice.
Common issues and solutions #
- The date the item was brought into inventory is after the date of the invoice.
The system checks to ensure sufficient inventory exists on the invoice date. Look at the Invoice Date on the Sales Invoice and compare that to the date the inventory was received (the Item Receipt date on the Item Receipt, or if you don’t use Item Receipts, the Bill Date on the Bill for the PO)
- The location of the item on the invoice may not be the same as the one where the item was received.
Look at the location on the line of the item on the Sales Invoice to ensure that it is the same as the one on the line on the Item Receipt (the Bill, if Item Receipts aren’t used)
Discounts #
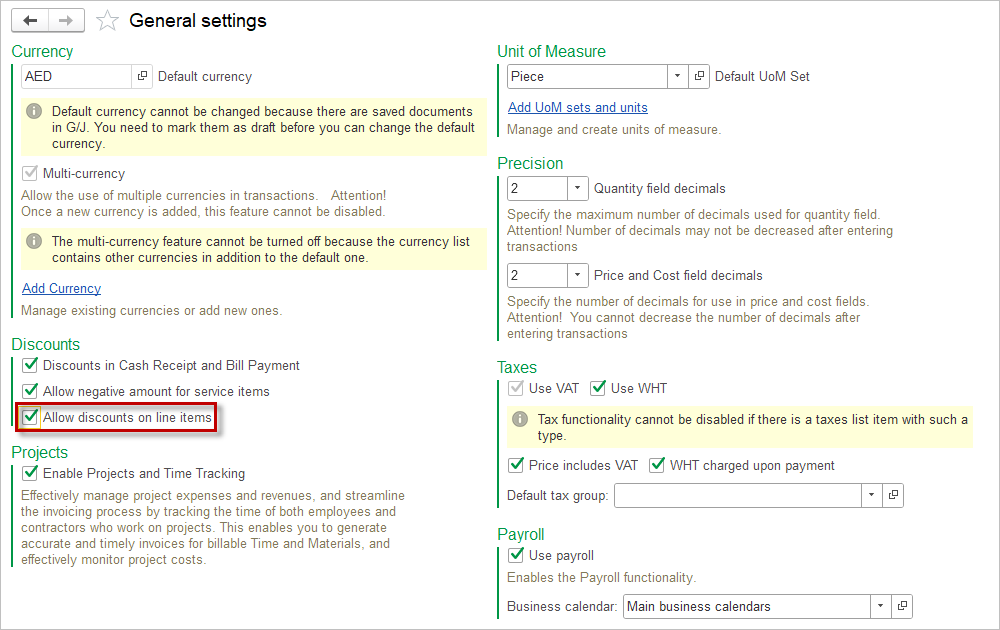
Our application includes the ability to apply discounts to an individual item. For item discounts, make sure that setting has been enabled.
To do this you need to:
Go to Admin Panel – General settings. In the Discounts section, enable Allow discounts on line items

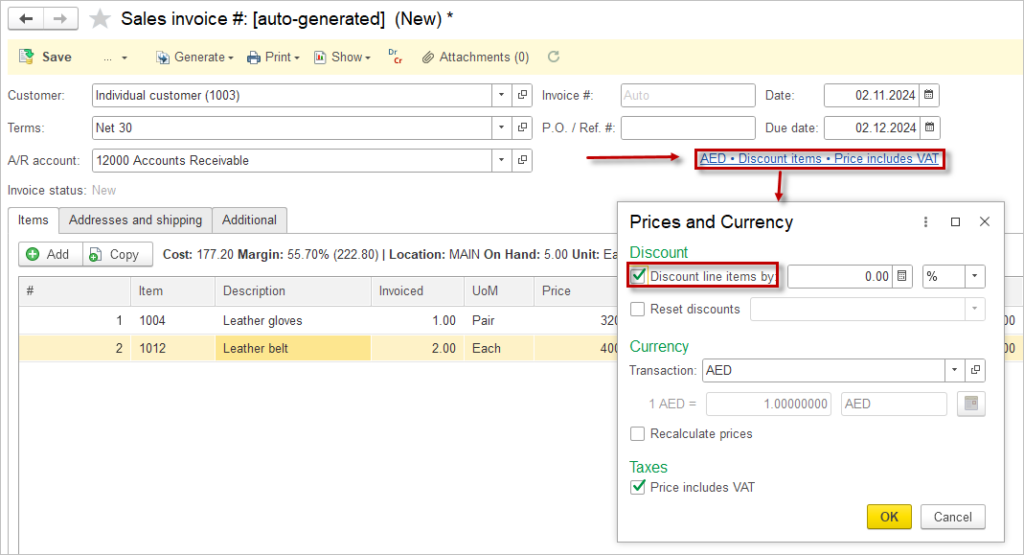
Then, return to your document. Here you will see a link showing currency of Sales Invoice, the discount percentage, and taxes. Click on it and check the discount box.

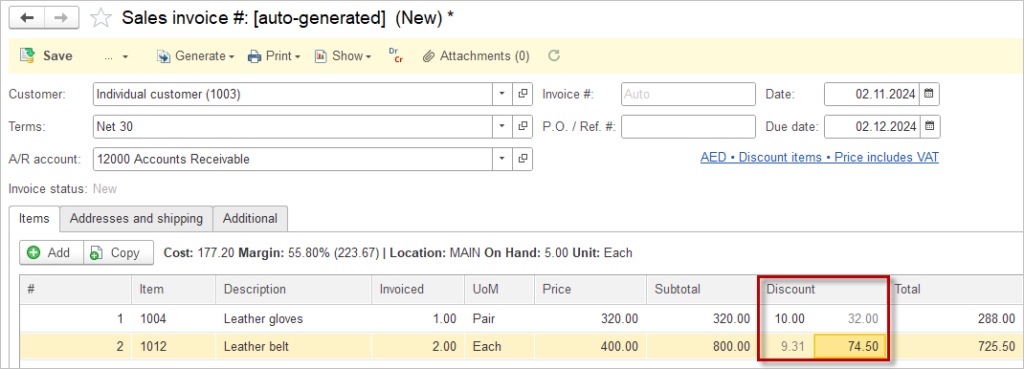
Now, you can apply a discount to each item in the table. The discount can be set as a percentage or a specific amount.

Splitting a Sales Invoice into Two #
To split an invoice into two, remove the items from the first invoice by right clicking the line and selecting Delete. Alternatively, you may also decrease the quantity of the item. Next, open the Sales order and choose Generate / Sales Invoice. A second invoice will be created with the items that were removed from the first invoice.
If you would like to gain further details, please refer to the page Partially Invoicing an Order.
Visual status indicators #
The status indicators in AccountingSuite help users gain a clear overview of the order processing stages within both sales and purchase cycles. By simply glancing at these indicators, users can instantly determine the status of an order without the need to check each one individually. The combination of colors and fill provides a quick and efficient way to understand where each order stands.
In AccountingSuite, there are three distinct colors used to represent status: red, yellow, and green. Each color carries a specific meaning:
- Red indicates that the order is experiencing issues, delays, or is marked as critical.
- Yellow suggests that the order is in progress but might require attention or is awaiting further action
- Green signifies that the order is completed or moving smoothly through the cycle.
The type of indicator depends on the status:
- Empty Circle
- Partially Filled Circle
- Filled Circle
However, the color of the indicator is not solely determined by the status, but rather by the date and whether the document is being completed on time or late. For example, Partially Shipped will always be represented as a partially filled circle, while the color will depend on the deadline:
- Green for on time
- Yellow for approaching the deadline
- Red for overdue
This visual system streamlines monitoring and enhances efficiency by enabling quick decisions and prioritization, ensuring that all orders are managed effectively.
| Icon | Description |
| The sales invoice has been created, but no further actions or approvals have been initiated yet, indicating it is still in its initial stage and awaiting further processing. | |
| Some actions on the sales invoice have been completed, such as partial data entry or initial review, indicating that the invoice is currently in progress but not yet finalized. | |
| The sales invoice has been fully processed, approved, and finalized, with all necessary steps completed and no remaining actions required. | |
| The sales invoice is pending and requires additional action or approval, indicating that it is awaiting a decision, additional information, or further review to continue. | |
| The sales invoice has undergone partial review or approval, but further verification or completion of remaining steps is needed before it can be fully processed. | |
| The sales invoice has been marked as rejected or put on hold, indicating that it requires review, correction, or re-approval before proceeding further. | |
| The sales invoice has critical issues that need urgent attention, suggesting that immediate action is necessary to resolve the identified problems and complete the process. |
