Users groups #
To enable the use of groups in the Users list, check the User Groups box in the Admin Panel – Security settings – Users section.
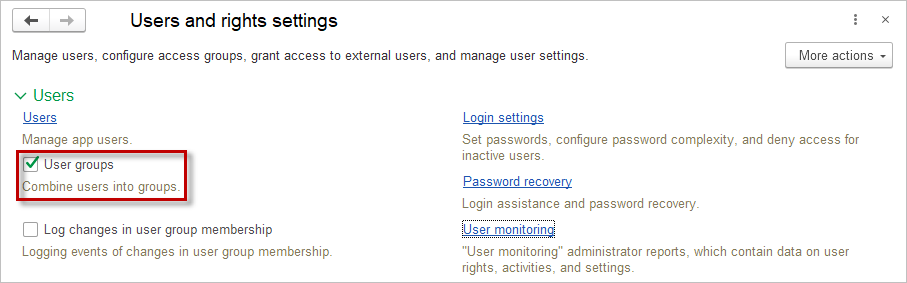
Using groups is convenient when the application has many users:
- To organize a large number of users (e.g., when selecting a user);
- To set access rights for all users in a group at once.
When there are few users or only one, groups are generally not needed.
Users #
To access the Users list, use the link in the Admin Panel – Security settings – Users.
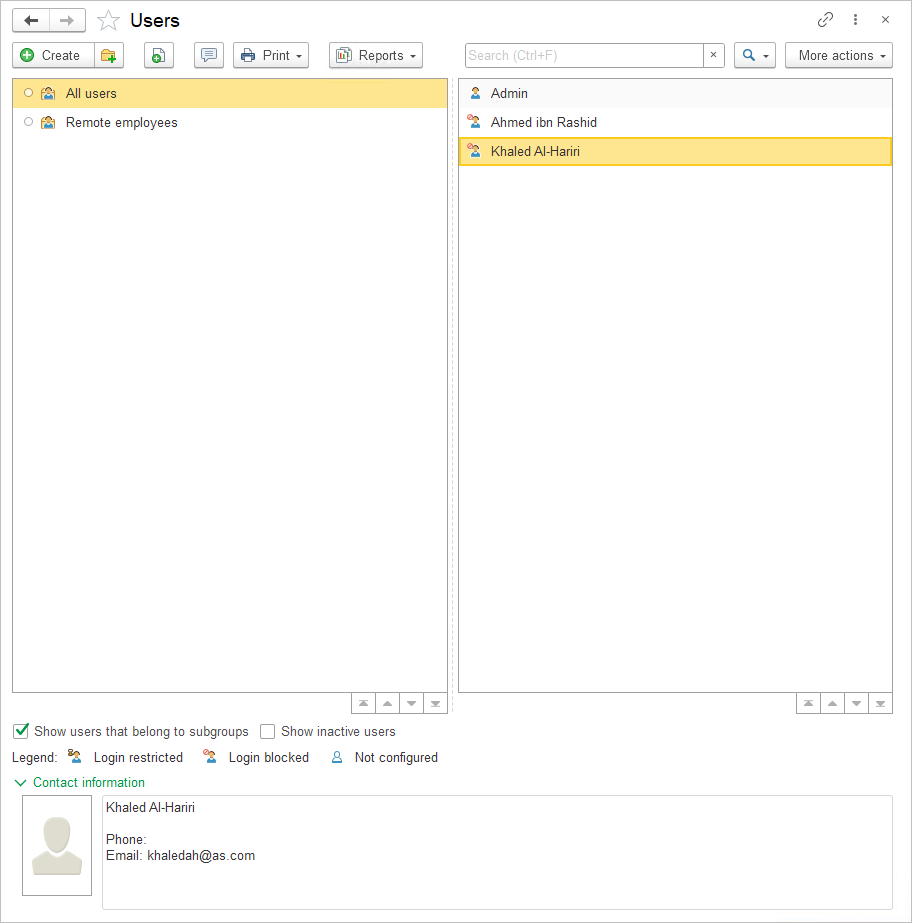
If the User groups box is checked, the list is divided into two parts:
- The left part of the Users list allows you to create the necessary number of groups and add users to them. The user groups list is hierarchical;
- The right part of the list displays the users of the selected group. By default, the current group is All Users, meaning all application users are visible.
To view all users included in subgroups, check the Show users that belong to subgroups box at the bottom of the list.
Check the Show inactive users box at the bottom of the list to display users marked as Inactive, who are not shown in the Users list. For more details.
Next to each user’s name in the list, their status is displayed, with a status description at the bottom:
- Login restricted
 – the user’s login is restricted until a certain date or a maximum inactivity period has been set for the user.
 - Login blocked
 – the user has login permission disabled, has no roles, or does not have the rights to launch the application (e.g., thin client, web client, etc.). Additionally, a warning message will appear in the user’s card if the relevant roles are not assigned.
 - Not configured
 – the user has no login configuration (the login name is empty).
The contact information of the selected user and their photo are displayed at the bottom of the list. If necessary (for example, if part of the users list does not fit on the screen), you can hide the contact information using the ![]() button.
button.
In the list, you can:
- Add new users using the Create button. If there are groups in the list, you can immediately add a user to the desired group. To do this, select the group and then click the Create button;
- Add user groups using the Create Group button.
Adding a New User #

Please note: This process is for On-premise only. For Cloud please use AccountingSuite Portal to add users.
To add a new user, click the Create button in the Users list.
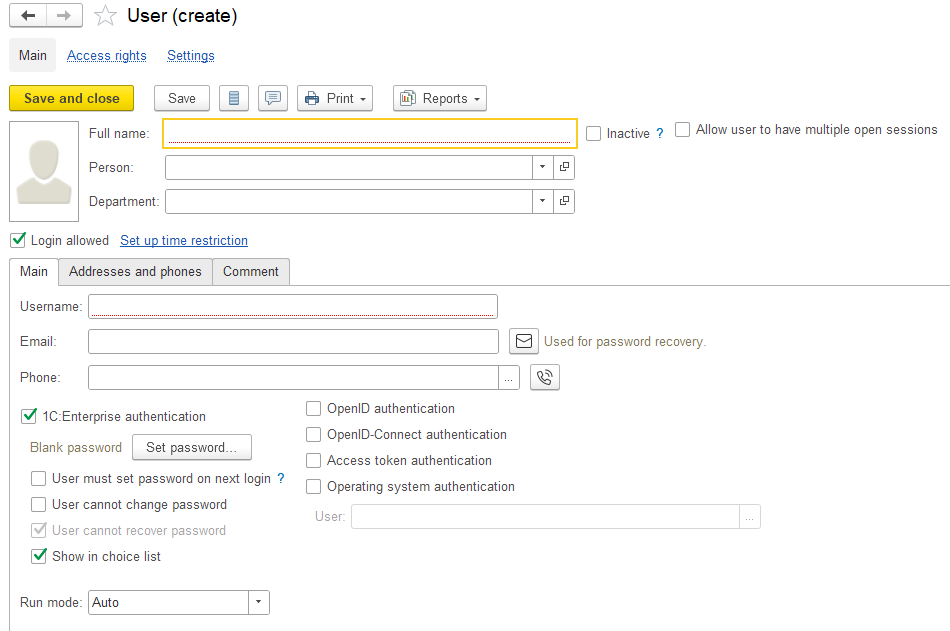
Fill in the user’s basic information:
- Enter the user’s full name, which will be displayed in the application in various fields such as Author, Responsible, etc. (this field is mandatory).
- Person can be assigned to a User to auto-fill in the documents created by this User;
- For new users, the Inactive checkbox should be unchecked by default. For existing users, this checkbox may be checked when the user no longer works with the application for various reasons (e.g., if they were terminated, created by mistake, etc.). However, it is not recommended to delete the user because they may be referenced in the application (e.g., as the author of documents, executor of tasks, responsible for record keeping, etc.). This checkbox allows you to hide an inactive user from selection lists while still keeping them in previously entered documents or lists. The Inactive checkbox can only be toggled by an administrator; other users can only view the status of the checkbox. To Show inactive users, you can use the checkbox at the bottom of the Users list.
Please note: Pay attention to Show in list checkbox. For security reasons you can hide users from users list on login screen.
The Cloud version has it always Off. You need to know creditance (login and password) to enter database after backup restore, you cannot choose user from user list for Cloud database.
The application allows you to insert a user’s photo. To do this, click the photo area with the left mouse button and specify the path to the file on your computer.
To grant access to the application, enable the Login Allowed checkbox. This checkbox can be disabled later at any time, for example, when an employee leaves or for other reasons. It is not recommended to delete inactive users because they may be referenced in documents and lists. In such cases, the Inactive checkbox should be enabled (see above), which automatically disables the Login Allowed checkbox.
Login Restriction #
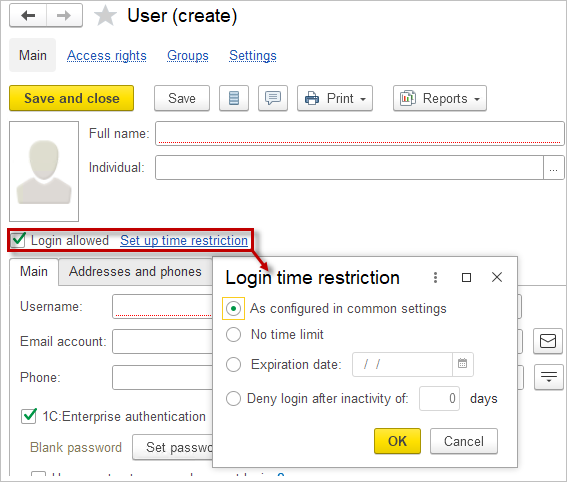
Using the toggle, you can set a login restriction for this user only:
- As configured in common settings – as specified for all users (by default) in the setting User inactivity timeout.
- No Time Limit – unlimited access, only for this user.
- Expiration date (set the date manually or select it from the calendar using the button). This is useful if the employee temporarily uses the application. To protect against unauthorized access, any user can have an expiration date that automatically disables them after the specified date.
- Deny login after inactivity of [n] days – if the user does not log into the application for more than the specified number of days, they will be unable to log in. In this case, the user will need to contact the administrator to resume using the application. This is also convenient for temporary workers.
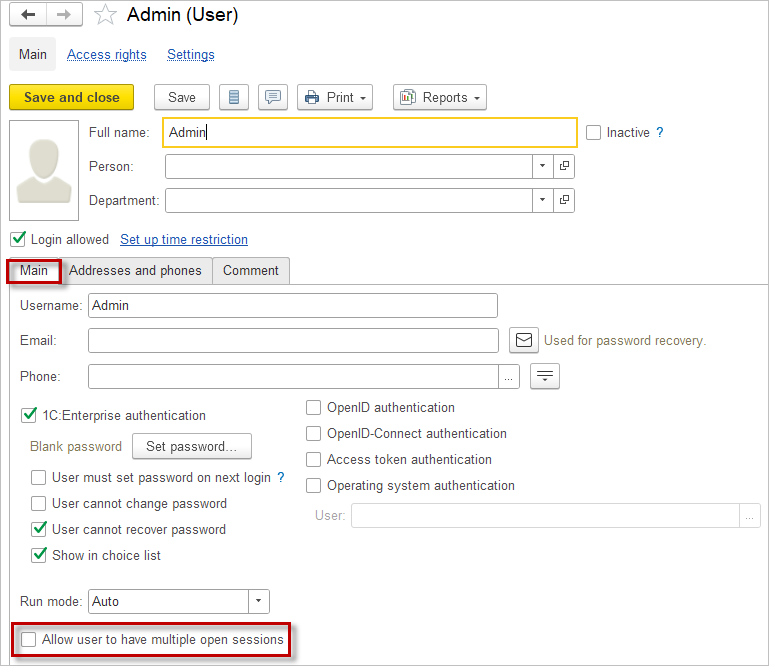
Main information #
Next, fill in the fields on the Main tab:
- Enter the Username required when launching the application. The application automatically suggests a default login name based on the full name.
- Enter the Email Account. If the application allows users to reset their passwords, the email field is mandatory, as the application will compare the entered email address with the one stored and send the necessary information for password recovery. For more details, see the Password Recovery section.
- Enter the Phone. The application also allows you to make calls and send SMS messages to phone numbers.
If the user needs to log in to the application with a password verified by the 1C: Enterprize application, enable the 1C: Enterprise authentication checkbox on the Main tab (this is enabled by default along with the Login allowed checkbox). The status of 1C: Enterprize authentication is displayed below the checkbox.
Click the Set password button.
- Enter a New password for logging into the application and re-enter it in the Repeat password field. For information security, it is recommended to set passwords for users and not leave this field blank.
- Click the Set Password button.

Also, you can use Generate password button to create a strong password.
For easier administration and security, all users have a User must set password on next login checkbox, which ensures that the user changes the administrator-assigned password to their own. Enable this checkbox so that the user is required to enter a new password that only they will know.
If necessary, enable the OpenID authentication checkbox. OpenID is an open, decentralized user authentication system that allows users to have a single login-password for various websites. This type of authentication is available in the web client and the thin client running through the web server. For proper application functionality in this case, the 1C: Enterprise authentication checkbox must also be enabled.
OpenID-Connect authentication allows the system to verify the user’s identity based on authentication performed by a third-party provider. As a result, users can use their credentials from other sites supporting OpenID-Connect Authentication to access the 1C: Enterprise application.
Access token authentication uses JWT tokens (RFC 7519 standard). Compared to previously used authentication methods, JWT tokens offer several advantages, such as generating a link that provides the user with temporary interactive access to the application (without entering a username/password).
To simplify the login process, you can enable the Operating system authentication checkbox. In the User field, select the name under which this user works in the operating system. This name will be used to log in to the application.
If no authentication checkbox is enabled, the Login allowed checkbox will automatically be disabled.
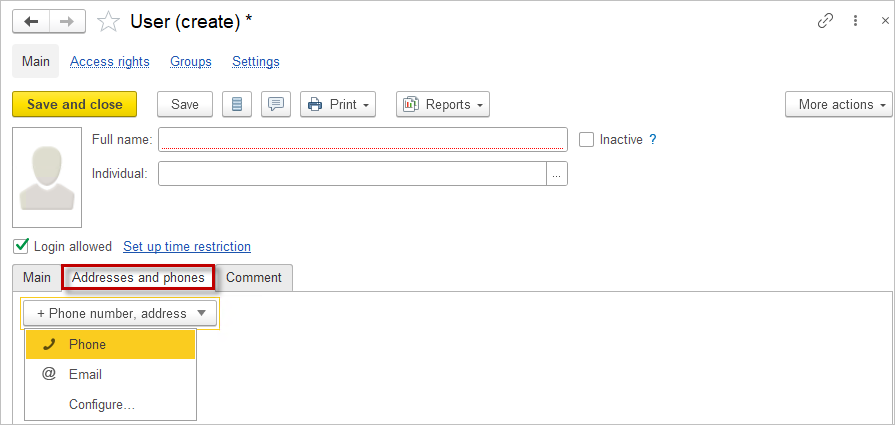
On the Addresses and phones tab, you can enter phone, Email, or create custom contact information type and other available contact information.
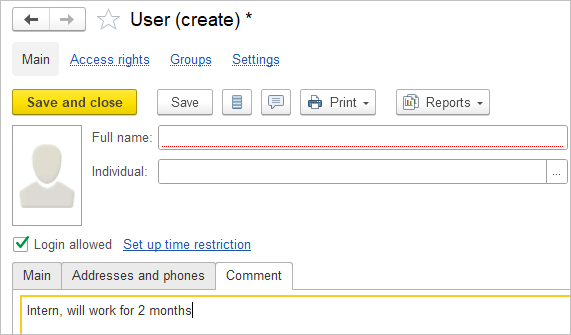
On the Comments tab, if necessary, add additional information about the user.
Password Recovery Setup #
Please note: This process is for On-premise only. For Cloud please use AccountingSuite Portal to restore forgotten password.
The application includes a feature for quick and secure password recovery for users. If a user forgets their password, they can reset it without contacting the administrator.
Enable the checkbox Show the “Need Help?” hyperlink in authentication dialog, and enter a URL for online help. The “Need Help?” button can be used to provide a link to a website with information on what to do when a user cannot log in, has forgotten their username, or is not registered in the database (e.g., where to call, email, or register). You can test the link immediately using the button provided.
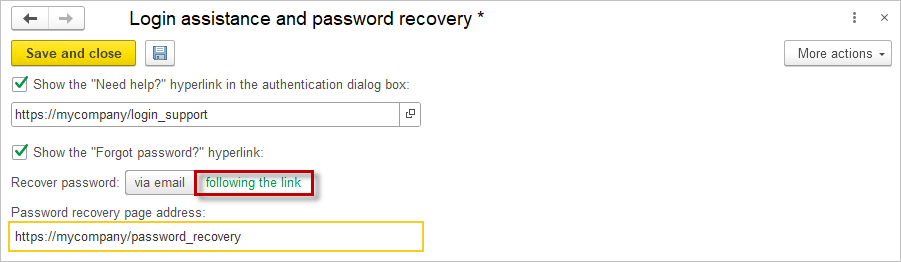
Enable the checkbox Show the “Forgot Password?” hyperlink to allow users to recover a forgotten password during login.
Use the buttons to specify how the password should be recovered:
- Via email
- By following the link (the password can be reset on the website specified in this field).
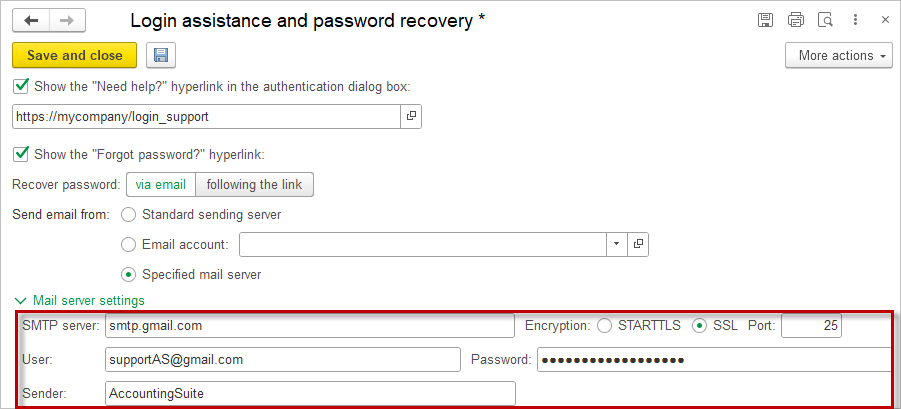
Email Password Recovery Settings #
The application provides three methods for password recovery via email:
- Standard sending service – Uses the standard password recovery service from AccountingSuite.
- Email account – Sends recovery emails using the email settings stored in the application. You will need to select from a list the email address from which the recovery email will be sent, e.g., Support Service (support@mycompany.com).
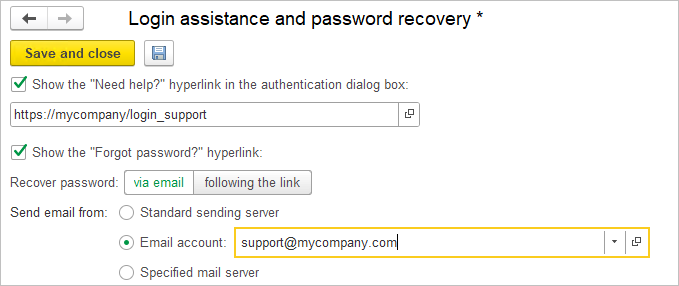
- Specified mail server – Requires entering the server parameters for sending emails. If Configured Email Settings is selected, the mail server data will be filled in automatically by the application.
Mailing account #
To configure the mail service, go to Organizer.
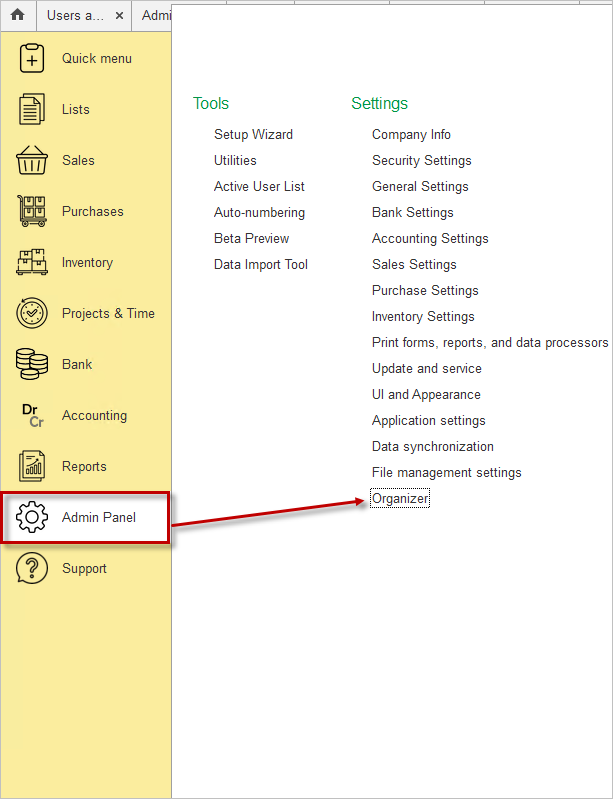
Navigate to the Service Email Account link. Set up the mail service and fill in all necessary fields.
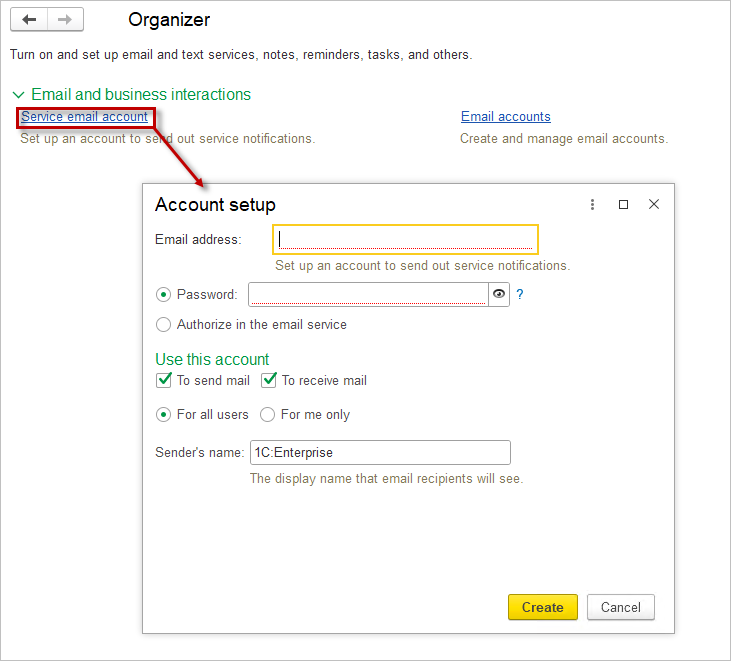
If only sending emails from the application without receiving them or vice versa is required, uncheck the relevant boxes to reduce the number of settings needed. Then click the Create button. The mail settings will be selected automatically.
If the settings are not found automatically, you can enter them manually by clicking Manual Setup and filling in the required fields. You can check the mail connection settings with the mail administrator or through the mail’s web interface.
Message Template #
During password recovery setup, you can create a message template: compose the email text that will be sent to the user with the code for password recovery. The message template can only be used when sending emails via the Email account and Specified mail server options.
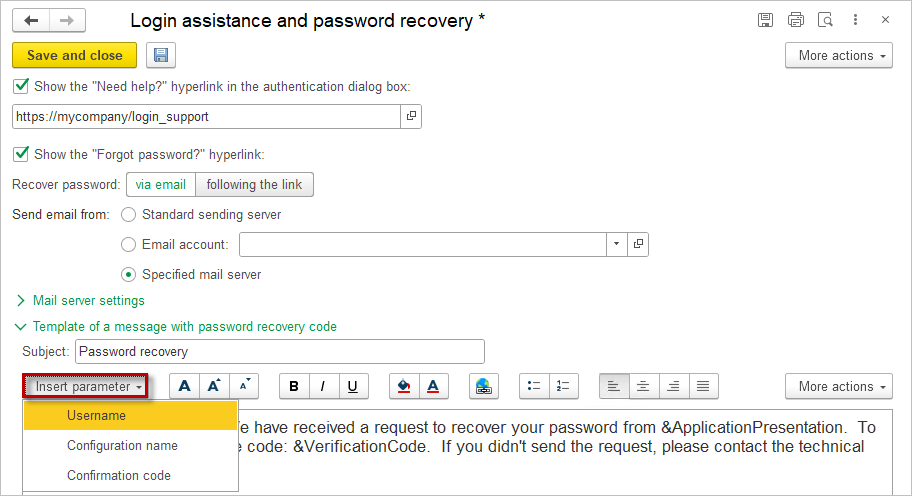
The message text is customizable, but there are essential parameters that must be included for the email to be sent. Use the button to Insert Parameter into the text:
- Verification Code (&VerificationCode) – A required parameter; the application generates this code automatically when sending the message.
- User Name (&UserPresentation)
- Configuration Name (&ApplicationPresentation)
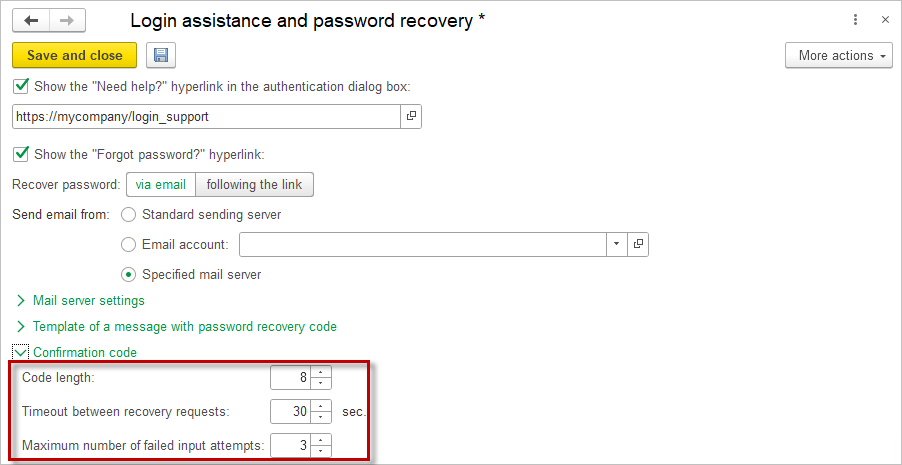
Verification Code Settings #
If necessary, adjust the settings for the verification code length and password recovery attempts:
- Code Length – The length of the verification code for password recovery, an integer between 8 and 50.
- Timeout between recovery requests – The duration of the block on requesting a new verification code (in seconds).
- Maximum number of failed input attempts – The maximum number of attempts to enter the verification code. If this limit is exceeded, the user will need to request a new recovery code.
Login settings #
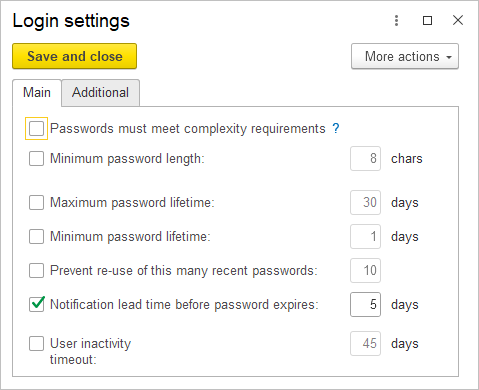
Set the password requirements using checkboxes:
- Password must meet complexity requirements – Ensure that the new password is at least 7 characters long, includes at least 3 of 4 types of characters: uppercase letters, lowercase letters, numbers, special characters, and does not match the username (for login).
- Minimum Password Length – Default is 8 characters.
- Maximum password lifetime – Defalut 30 days
- Minimum password lifetime – Defalut 1 day
- Prevent re-use of this many recent passwords – Default is 10 previous passwords. This ensures control over password reuse.
- Notification lead time before password expires – Default is 5 days before the password expires. A warning window appears at login prompting the user to change their password.
- User inactivity timeout – The period after the last user activity, after which login is prohibited, default is 45 days.
On the Additional tab, you can configure Show in choice list in the user’s card.
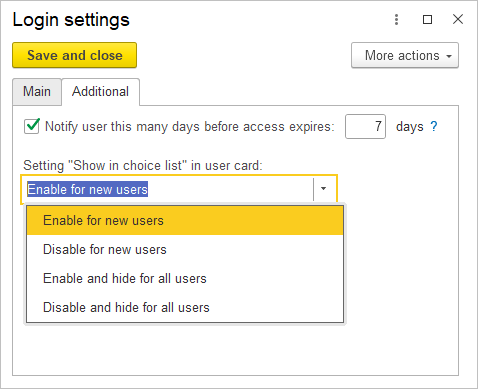
Enabled for new users – This means that in a new user’s profile, the Show in choice lis checkbox will be enabled.
If Disabled for new users is selected, the Show in choice list checkbox in the new user’s profile will be disabled.
If Hidden and enabled for all users is selected, the user selection list will be fully displayed when logging into the application, and the Show in choice lis checkbox in all user profiles will be enabled and hidden.
Hidden and disabled for all users – The user list will be empty when logging into the application, and the Show in choice lis checkbox in all user profiles will be cleared and hidden.
You can also set up a notification for users to let them know that their access to the program will end after a certain number of days. Check the Notify user this many days before access expires box to enable this function.
User monitoring #
Provides the application administrator with reports to monitor the operation of the program.

- The Errors and Warnings report shows the administrator a list of all errors that occurred during the specified period.
- The Scheduled job runtime report gives information about scheduled tasks, allowing you to specify the period and see which tasks were completed and at what time.
Simultaneous Sessions #
Restricting simultaneous sessions for a user is necessary to ensure data security and integrity. This is a requirement for software certification in some countries.
When a user accesses their account from multiple sessions at the same time, it increases the risk of conflicting updates, which can lead to errors or corrupted financial data. Limiting users to a single active session prevents such conflicts and helps maintain accurate, reliable records. Additionally, this restriction helps protect sensitive financial information from unauthorized access or sharing, enhancing overall system security.
Simultaneous login to multiple sessions using the same user account is prohibited by default.
If user attempts to open a new session while the other one is not finished, a warning message will appear:
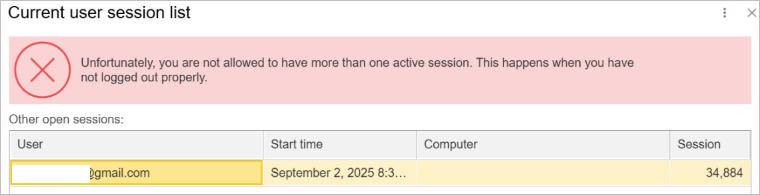
However, for specific users there is an option to allow multiple sessions by ticking Allow user to have multiple open sessions checkbox:
User sessions that are suspended when the browser is closed incorrectly or the Internet connection is lost will be automatically released after a while (30 minutes). Ask your administrator to close your suspended session. Or set up a second login option if you have such a problem with the Internet.
To close hung users sessions, you can use the list Active Users.
If you see a message about closing your session by timer during the inactivity period “Unfortunately, an unexpected error occurred or the session was terminated by administrator“, then see the instructions for laptops and the power saving mode of the browser tabs. Background tabs can be considered inactive and closed automatically.