Users often need to receive a specific report at a particular time. Report distribution automates this process, allowing you to receive a ready report at the desired time in your email or a designated folder as a file, without opening the application.
The ability to create several different distributions simplifies the workflow. Each distribution typically logically groups several reports, multiple recipients, or has a unique delivery schedule.
Before using email sending options, please set up your Email Settings in the AccountingSuite.
To specify which reports should be sent to whom and when, the application features a distribution list. You can access this list in the Administration → Print forms, reports, and data processors via the Report distribution rules link.
The application can save a distribution history, allowing you to track when, to whom, and with what result the reports were sent. To save the history, check the Store history for the last box and set a period measured in days. Outdated history will be automatically deleted.
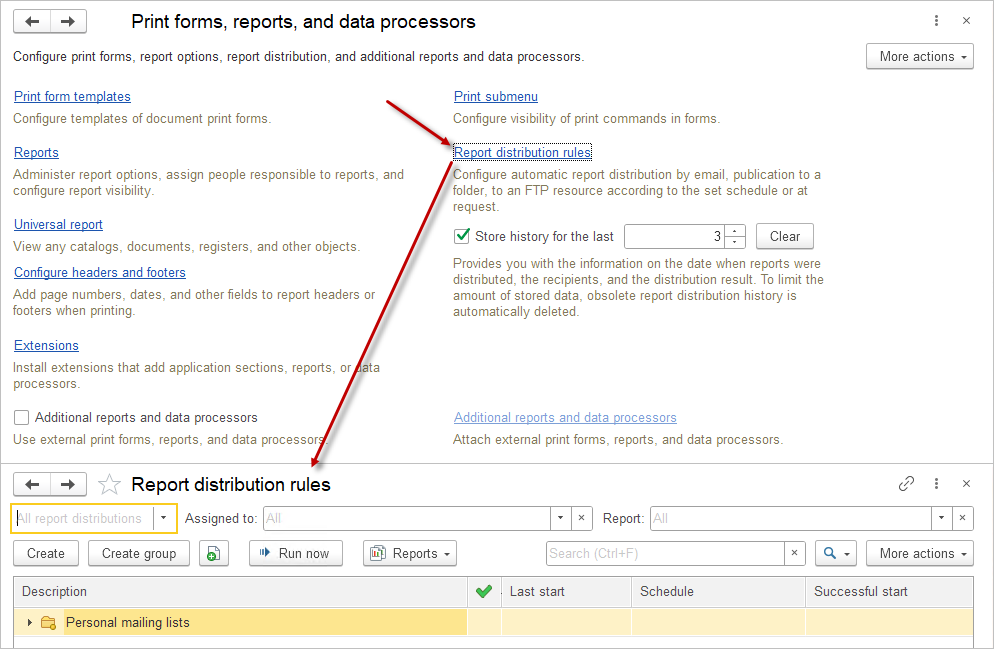
The distribution list consists of following columns:
- Description: the full name of the report distribution;
 Prepared: distributions marked with the “Prepared” flag are ready for use;
- Last start: the date and time of the last distribution run, with a
 symbol indicating failed distributions;
 - Schedule: shows how often the distribution occurs, e.g., Weekly.
- Successful start: the date of the last successful distribution.
In the list, you can:
- Add a new distribution using the Create button (see more in the Report Distribution Setup section);
- Add groups using the Create Group button and organize distributions into groups using drag-and-drop;
- Manually start a report distribution with the Run now button;
- Investigate errors that occurred during distribution using the Show events button in the Reports menu, which shows log events filtered by this distribution. More details on the application log can be found in the Application Settings documentation section.
To add a new distribution, enter the distribution name. Select a group from the list if necessary. If the needed group is not listed, you can add it. Choose the type of distribution that defines the general interaction scheme with recipients.
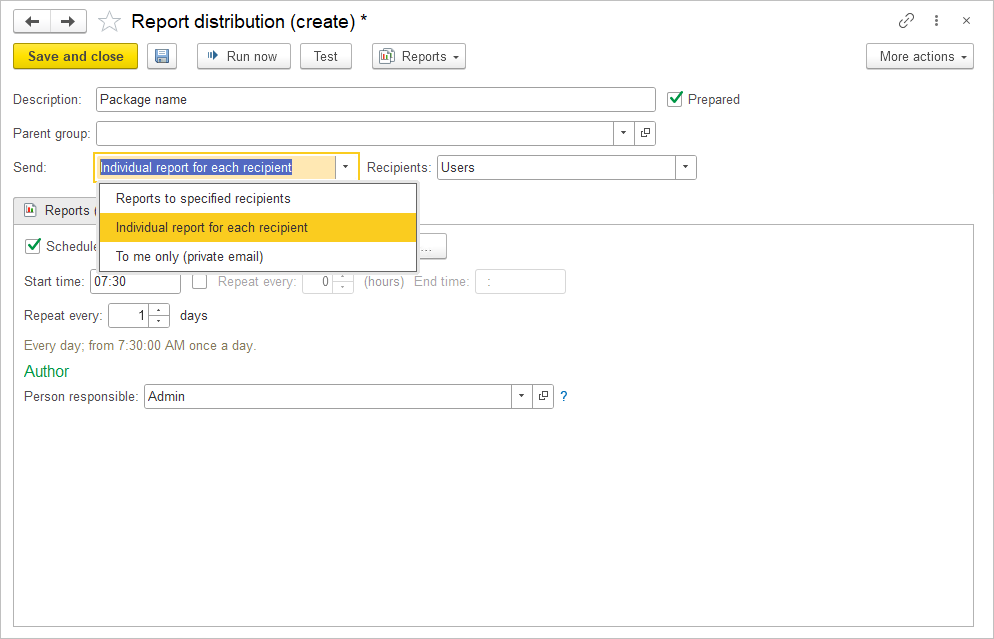
There are three different types of distribution. Each existing distribution belongs to one of these types:
- Reports to specified recipients: identical reports are sent to all recipients simultaneously. This type of report distribution includes not only email delivery but also the ability to publish generated reports in the application’s file folder, a network directory, or an FTP site. For collaborative work or centralized access to generated documents, you can configure email notifications with links to the published documents by checking the “Send notifications only” box.
- Individual report for each recipient: used when the content of the reports needs to be personalized for each recipient. In the report filtering settings, you can specify the distribution recipient. Thus, a separate report with the appropriate filters will be generated for each recipient.
- To me only (private email): only the user who created this distribution (the author) receives the reports via email. Personal distributions are visible only to the author.
For the Reports to specified recipients and Individual report for each recipient distribution types, select the recipient type in the Specify recipients field using the button.
For the To me only (private email) type, specify the email address in the Address type field by selecting from the dropdown list using the button.

Reports #
The report variants to be distributed are selected on the Reports tab using the Pick button.
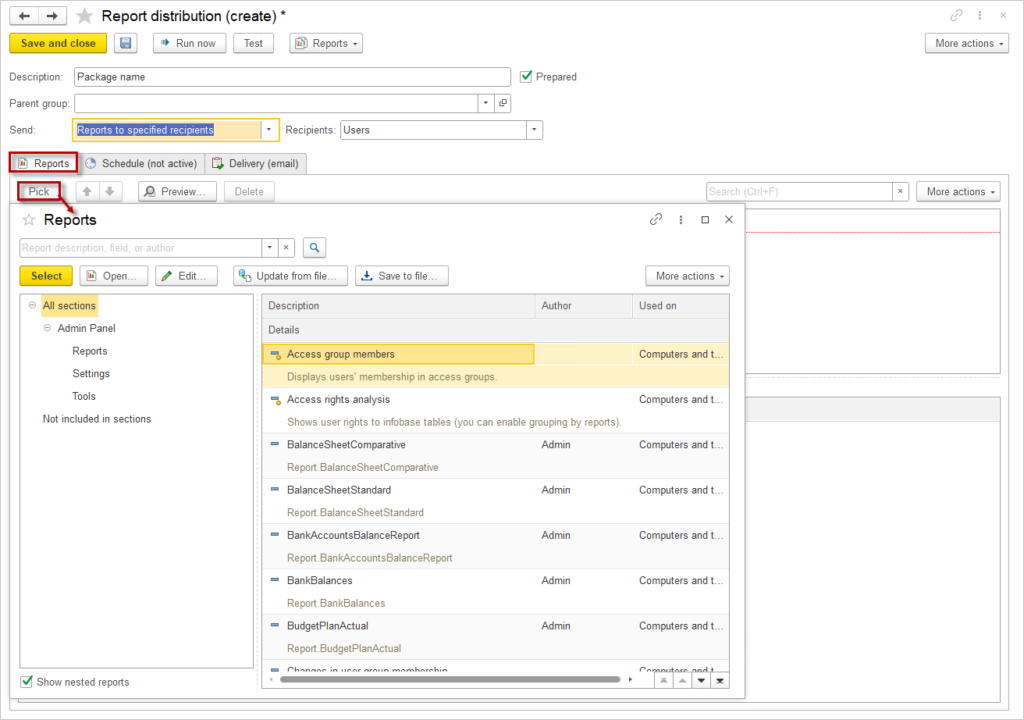
To quickly choose a suitable variant, specify the application section, and then select one or more report variants from that section. By default, All Sections are displayed. Select the necessary report variants and then click the Select button.
Thus, multiple reports from different application sections can be included in one distribution.
If a report variant has its own settings (e.g., report start and end dates), they are specified in the lower part of the Reports tab (Report Settings).
If using the A personalized report for each recipient distribution type, specify a specific user in each report’s settings to generate a report with metrics accessible only to that recipient.
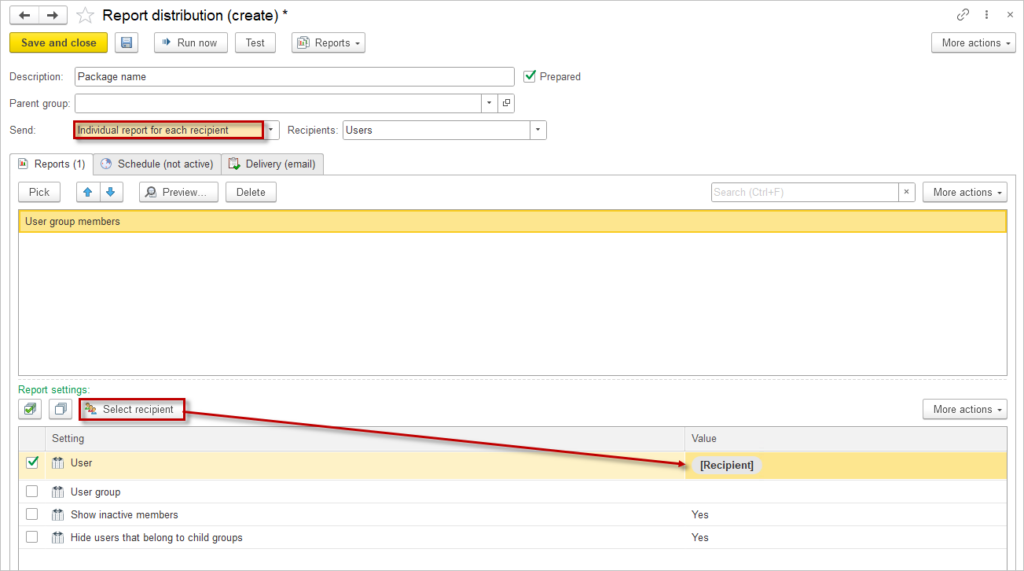
Report settings can be modified if necessary.
Schedule #
For automatic report distribution, the Schedule tab allows you to specify the days and times the application should send this distribution. Depending on the required frequency, you can quickly set up a daily, weekly, or monthly schedule. For more flexible or precise scheduling, select a custom schedule.
The lower part of the tab displays a schedule preview to ensure that the schedule is set correctly.
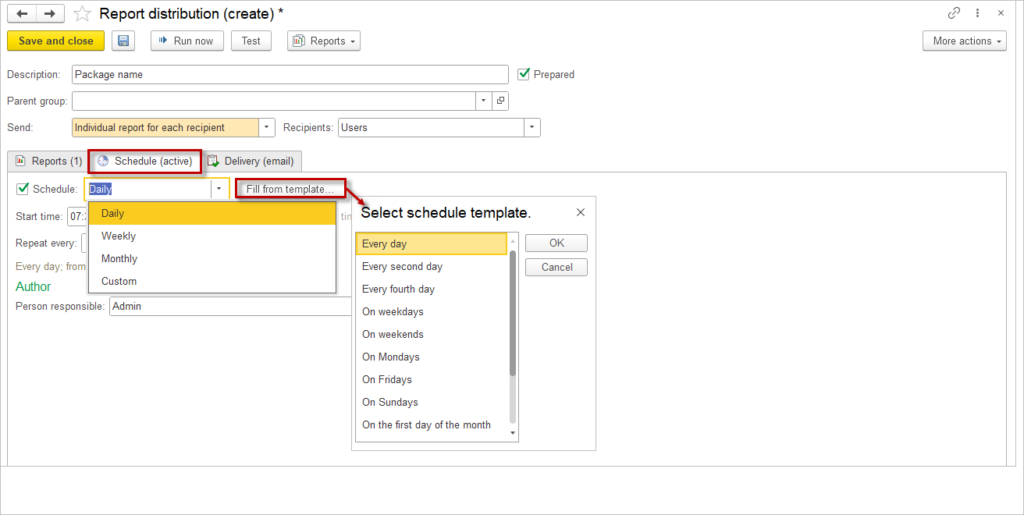
Additionally, to avoid manual scheduling, you can use one of the ready-made templates by clicking the Fill with Template button.
Each report distribution in the application creates a scheduled task named “Report Distribution.” More details can be found in the Scheduled Tasks section of the documentation.
The distribution can be manually started at any time using the Run Now button.
Delivery (email) #
All possible delivery methods for the configured distribution are described on the Delivery tab and indicated in the tab’s name. These methods depend on the selected distribution type. The primary delivery method for distributions is email. The Send by email checkbox is enabled by default.
If the Reports to specified recipients or A personalized report for each recipient distribution type is selected, you need to select the type of distribution recipients in the Recipients field.
Next, follow the Specify Recipients link (this link appears if distribution recipients are not specified). In the opened Report recipients list, use the Select button to choose recipients of the previously specified type, such as application users. When selecting, you can choose not only the recipients themselves but also entire groups.
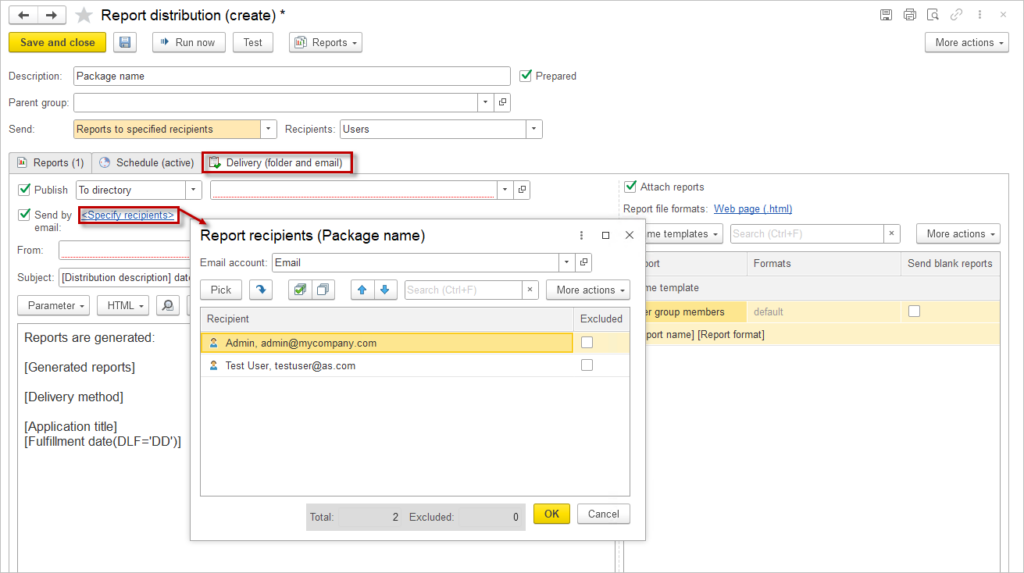
The list consists of columns:
- Recipient: the name of the recipient or recipient group (selected from the list, e.g., Users) and their email address;
- Excluded: use the checkbox to exclude a recipient from the distribution list. For example, if you need to send the report to all group members except a few, select the group and mark the recipients to be excluded. This checkbox can also be used to temporarily disable recipients without removing them from the list. Excluded recipients are highlighted in red.
In the From field, select the email address from which the distribution will be sent using the button ![]() . This field is mandatory. The selection list contains only the elements from the Email list; you cannot manually enter an email address into the field.
. This field is mandatory. The selection list contains only the elements from the Email list; you cannot manually enter an email address into the field.
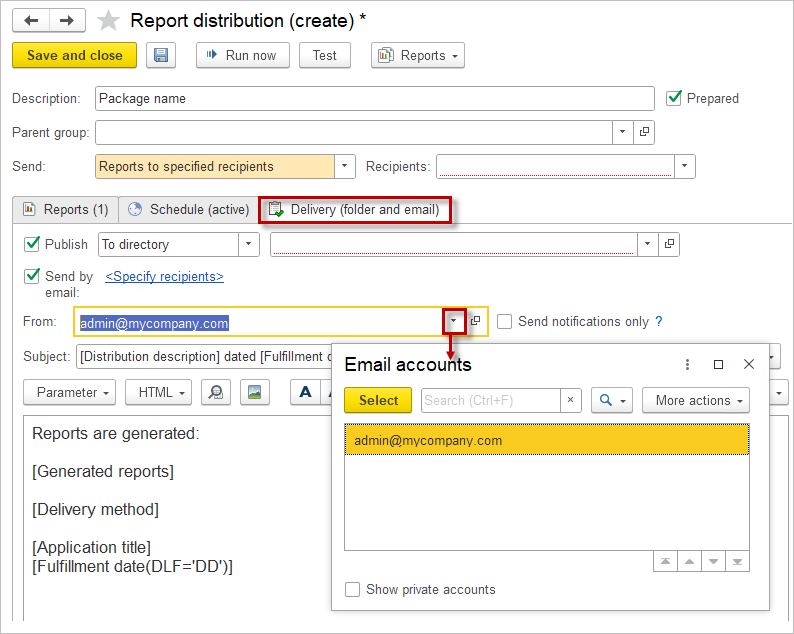
If Reports to specified recipients is selected, in addition to email delivery, the option to save (publish) the reports is available. To do this, check the Publish box and select the destination from the list:
- To directory: in this case, choose one of the application’s file folders. This delivery method can be used to organize regular report archiving in the file folder (while disabling email delivery).
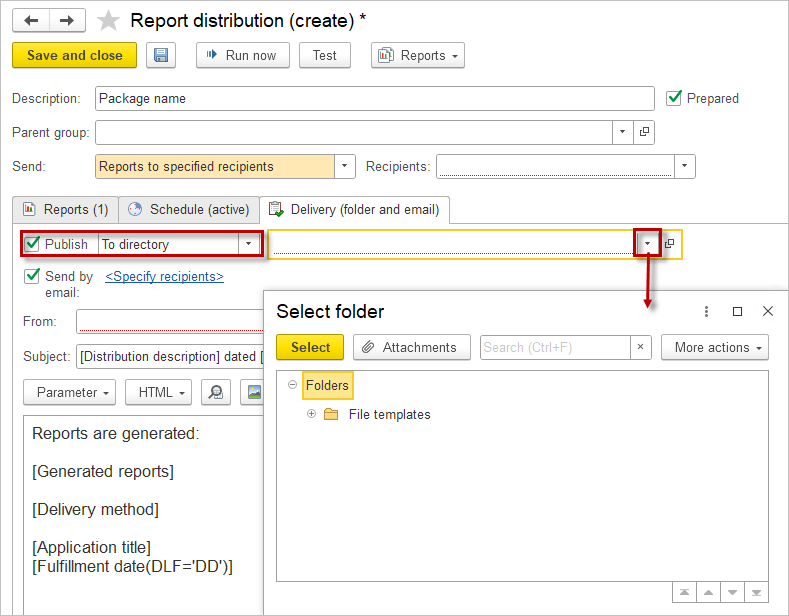
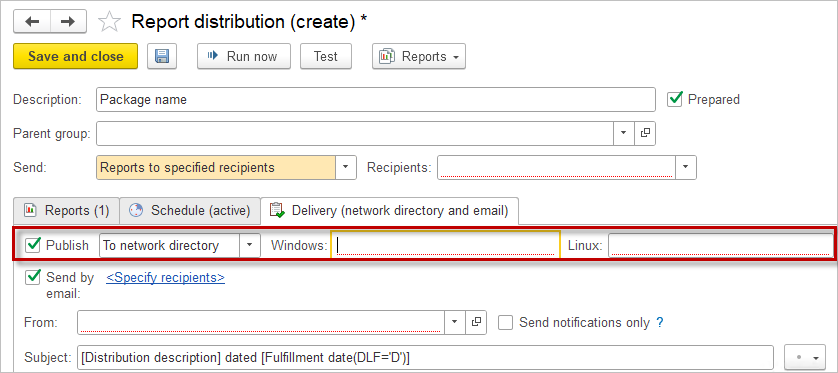
- To network directory: specify the directory address in the Windows field (if working on this operating system) or the Linux field (if working on Linux). Attention! This report delivery method is unavailable in the online application.
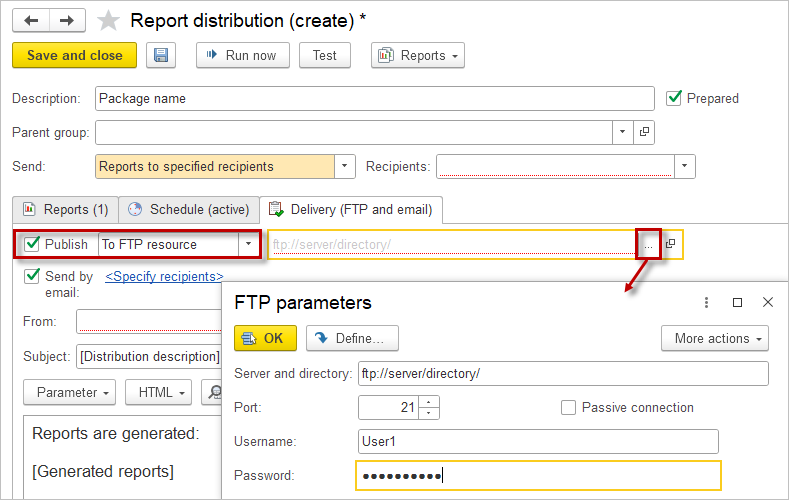
- To FTP resource: click the select button to open the window for entering FTP resource access parameters:
- Server and Directory: the FTP server and directory names;
- Port: the port on which FTP is running. The default port is 21;
- Username and Password: the username and password for accessing the resource;
- Use the Define button to enter all parameters in one line: ftp://Login@Server/Directory/ (note that the user password is included in the string).
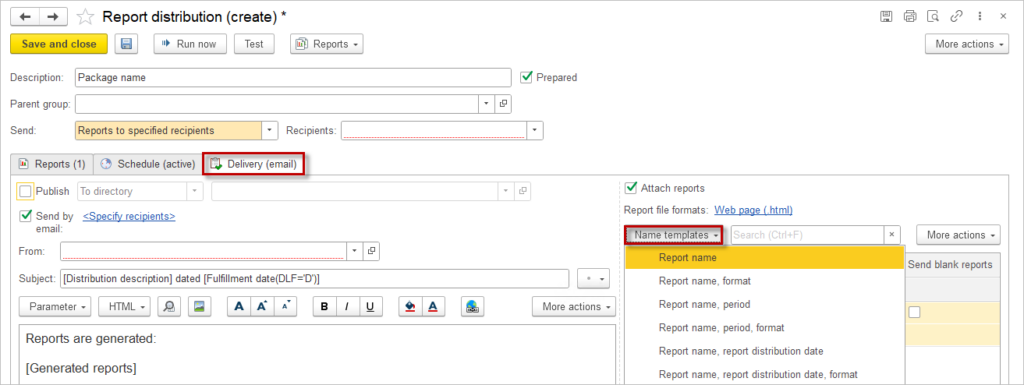
To give the published or sent report a unique name, select a Name Template from the dropdown list. Choose a template that includes format, period, or date parameters. You can select a template with the required distribution date format, and in the Format String Wizard, set the Date Format, e.g., dd.MM.yyyy (17.08.2024).
If multiple reports are attached to the distribution, the Name Template can be used for each report separately.
Additionally, if both delivery methods (publication and email delivery) are used, you can specify that only notifications of report generation should be sent via email. The reports themselves will not be attached to the email but will be placed in the publication directory. In this case, the notification email will contain a link to the generated report’s location.
Moreover, there are additional email delivery settings on the Delivery tab.
Enabling the Attach reports checkbox allows you to send an email with the report attached in any convenient format. However, there are situations where it is necessary to include the report content in the email body, for example, if you plan to discuss the content in correspondence or need to view the email on a mobile device. To display the report in the email body, enable the Insert reports into email body checkbox.
For email delivery and folder placement, various file formats can be selected in which the report will be saved. This can be done in the Formats column.
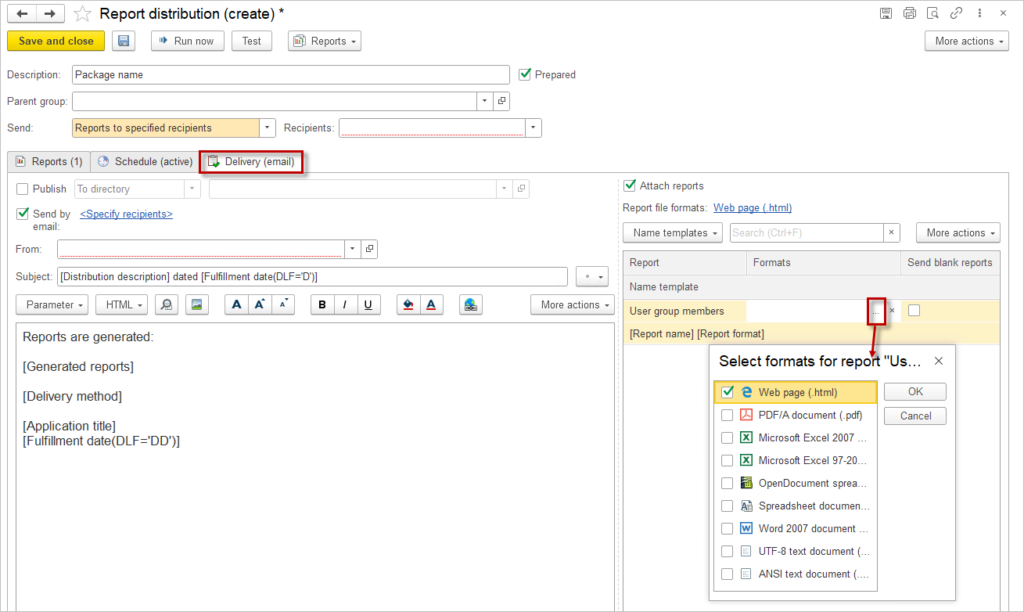
The standard format for saving the report is HTML, but you can choose another format. The format can be the same for all reports or specified individually for each report.
You can enable the Transliterate file names checkbox. In this case, saved files will have names containing only Latin letters and numbers, allowing for easier transfer between different operating systems.
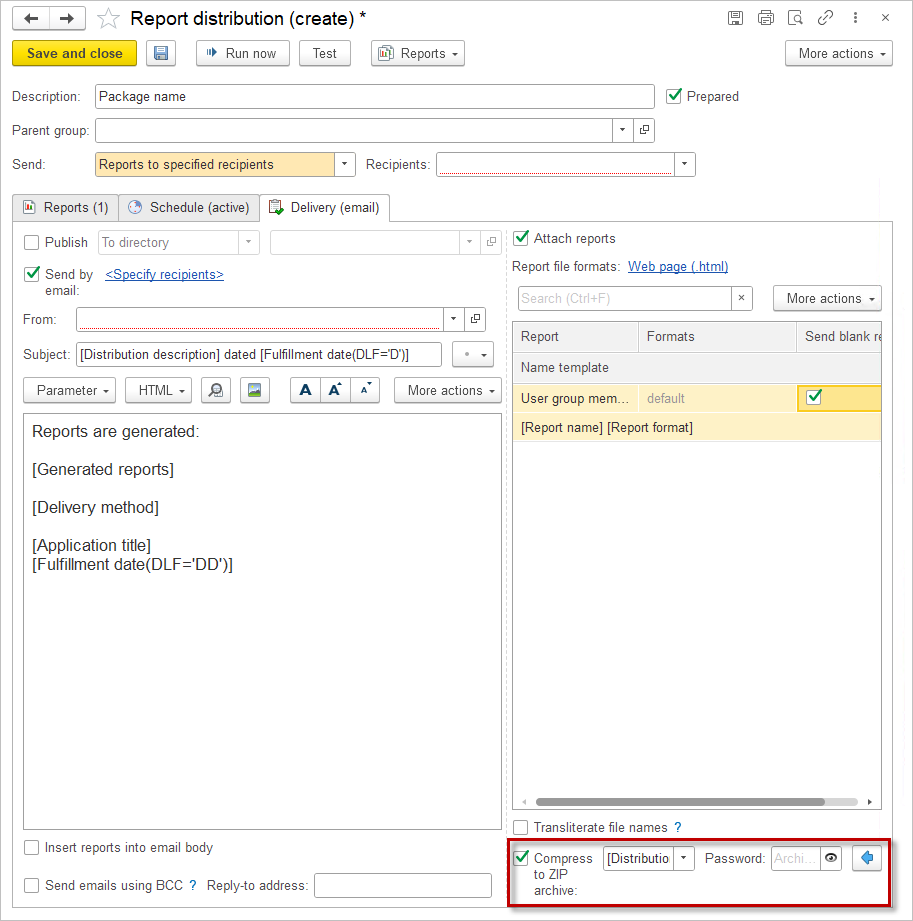
Report Archiving
If reports are large or there are many of them, you can archive reports before saving to save space. The archive name can be automatically generated using a template. You can also specify an encryption password.
Enable the checkbox to allow the report to be sent by email. Once enabled, the subject and body of the email become available for editing. By default, templates are pre-filled in both the subject and body fields.
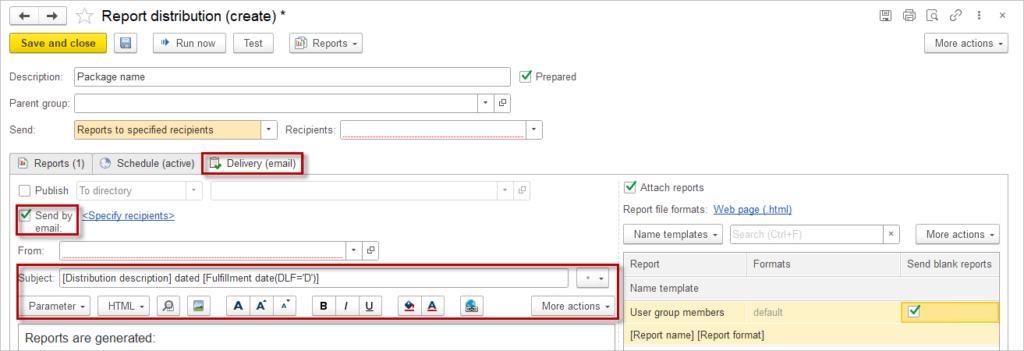
Standard formatting commands are available for text formatting, with some options displayed as buttons above the email body field. Additional commands can be found in the More actions menu.
Using the Template preview ![]() button, you can see how the email with the report distribution will look. If the Insert reports into the email body checkbox is selected when setting up the report distribution, the preview mode will display the schematic order of the reports, which will appear as formatted reports in the email body during actual sending. Additionally, if the Attach reports checkbox is enabled, the preview mode will show the expected list of reports. It’s important to note that the file names will match the selected name templates.
button, you can see how the email with the report distribution will look. If the Insert reports into the email body checkbox is selected when setting up the report distribution, the preview mode will display the schematic order of the reports, which will appear as formatted reports in the email body during actual sending. Additionally, if the Attach reports checkbox is enabled, the preview mode will show the expected list of reports. It’s important to note that the file names will match the selected name templates.
If you want to draw special attention to the email, you can set the distribution to High Importance ![]() . By default, distributions are sent with a Normal
. By default, distributions are sent with a Normal ![]() importance status. If the distribution is sent only to you, you can set it to
importance status. If the distribution is sent only to you, you can set it to ![]() Low Importance.
Low Importance.
