Navigate to Admin Panel – Settings – Print forms, reports and data processors.
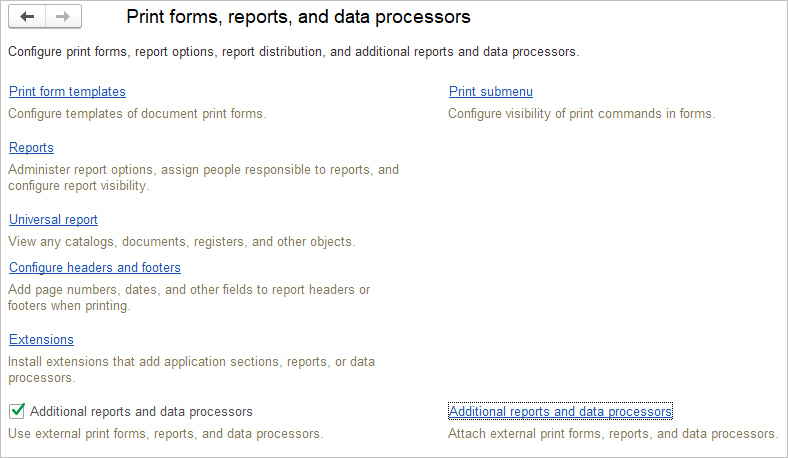
This workplace allows you to:
- configure print form templates for all documents;
- change the visibility of print commands;
- manage report options, assign users to reports, change report visibility to ensure privacy;
- edit default report headers and footers;
- install extensions;
- allow the use of external print forms, reports or data processors.
UI navigation – Reports
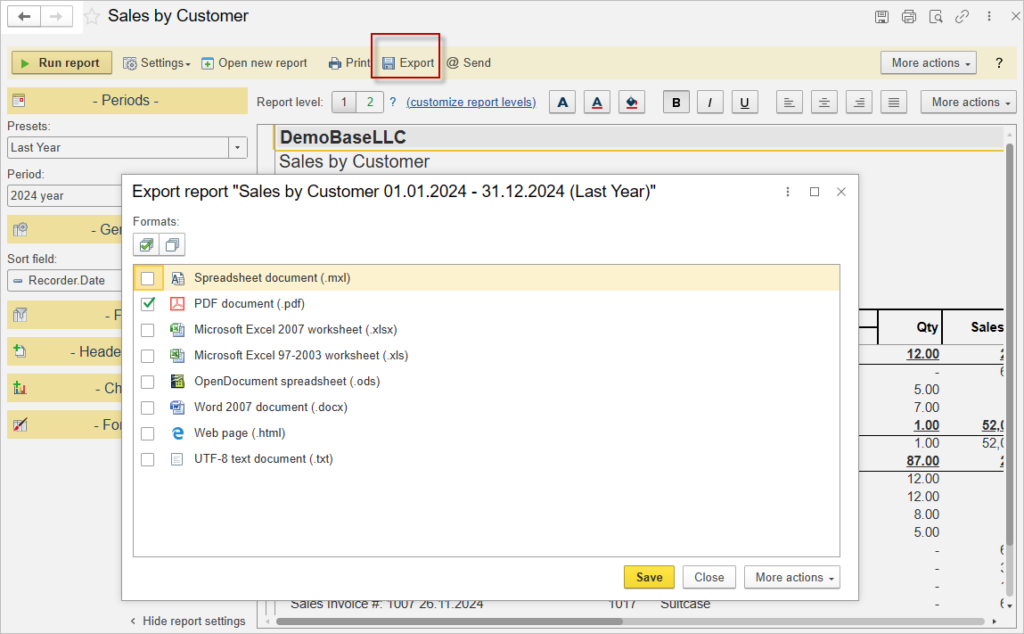
Save reports in Excel and PDF #
Please use Export button to save report in a variety of formats.
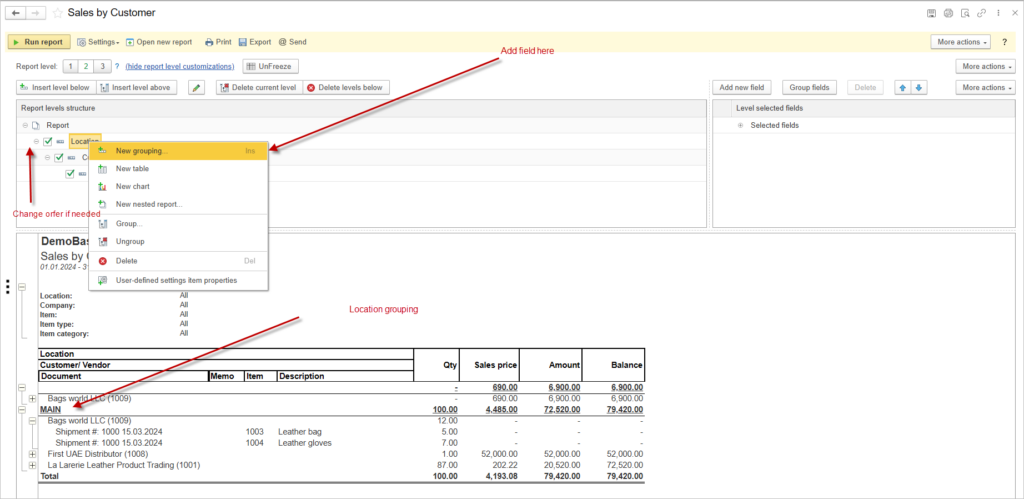
Save report settings as report variant or settings file #
You can flexibly set up filters and groupings in the report and save this variant for later use.

For advanced settings use Customize report level link.

Example of adding Location into report structure.
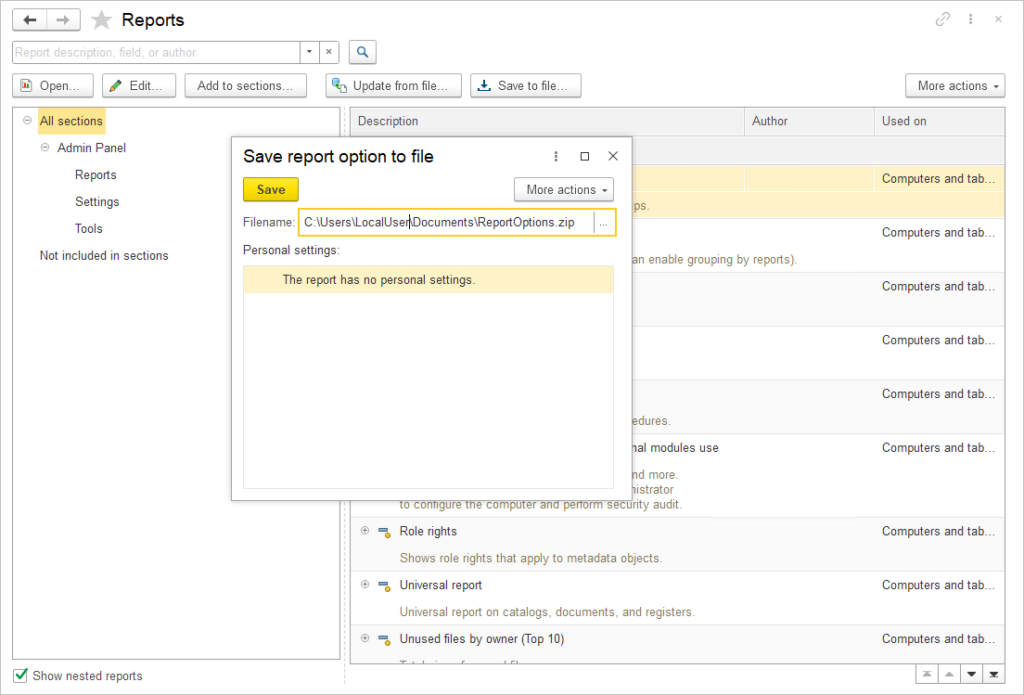
Share report settings #
You can save the report settings to send them by email to your clients and colleagues and upload the settings to other databases. To do this, clcik Settings – Save to file. Choose the destination to save the .zip file.
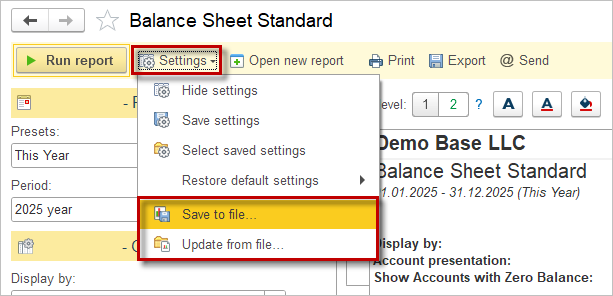
To open a saved setting from a .zip file in your software, first navigate to the “Settings” menu and select “Update from file.” Then choose the .zip file containing the saved settings. After this action, a new saved report variant will appear under Settings – Select saved settings, indicating that the settings from the .zip have been successfully loaded and applied.

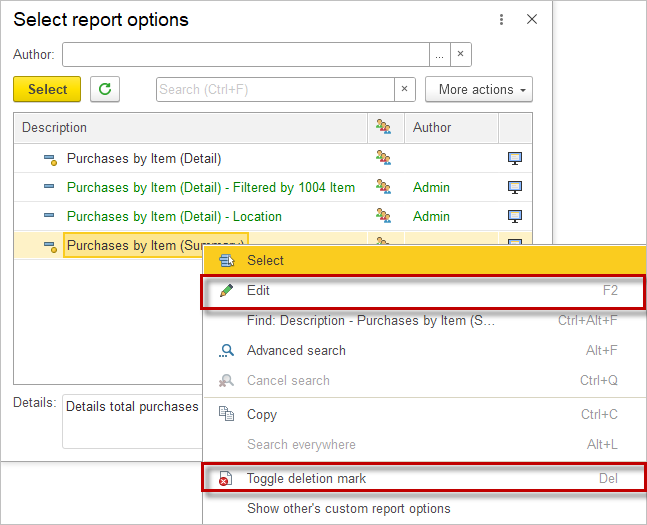
Manage saved settings #
Open the report and navigate to Settings – Select saved settings. In this list, user can delete or edit saved report settings.
Print form templates #
In Print form templates (Admin Panel – Print forms, reports and data processors) menu you can view the full list of templates used in our application. With a double click on a template, you can go to the template editor and change form for your needs and convenience.
For more information, please see the relevant Print form templates article in our documentation.
Print submenu #
The Print submenu link provides the ability to disable individual print forms in the Print submenu of documents and lists within the program. Disabling print forms may be necessary if the Print submenu of a document contains a large number of unused print commands, making it difficult to find the needed commands.
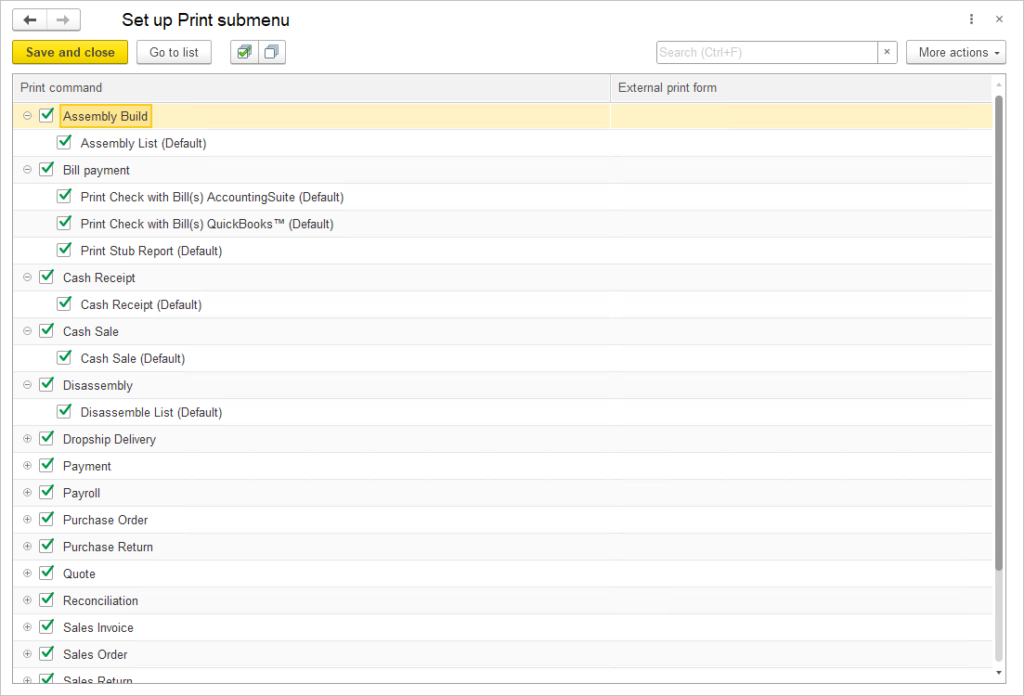
Disabling and enabling print commands are done using checkboxes. You can use the Go to list button fron the action bar to go to the list of the corresponding document to check the configured Print submenu.
Universal report #
The Universal Report is a powerful tool that allows you to create a custom report tailored to your specific needs. This involves modifying the report’s structure, setting the necessary parameters, creating custom fields, and configuring grouping, selection, and sorting for each report element.
For more information, please see the relevant article in our documentation.
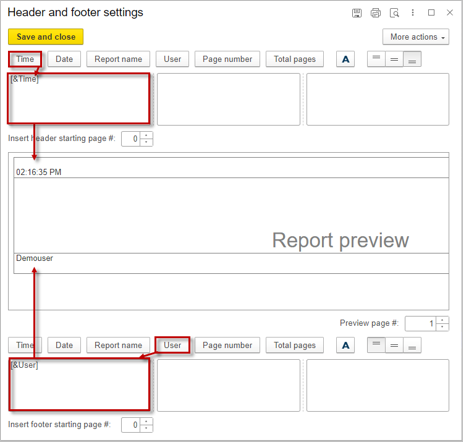
Configure headers and footers #
Headers and footers are a convenient way to make reports more clear and readable, and they are often used for larger reports.
The application allows you to customize the font and size for each header and footer using standard formatting buttons.
Use the navigation bar buttons to position the headers and footers in the desired location (left, right, or center) at the top or bottom of the report. To do this, select the cell you want, for example the top left corner, and click the appropriate navigation bar button. The header or footer designation will appear in the selected cell. For example, [&Time] will display in the selected cell if you choose the Time button. In the middle of the window, you will see a report preview with the headers and footers so you can see the results of your configuration immediately. Once you’re finished setting up the headers and footers, click Save to save your changes.
Reports #
The composition of sections and groups in this list depends on the granted rights and roles. All report options without exception are available only to the administrator.

The list of all reports consists of two parts:
- The left part contains a hierarchical list of sections and groups of the application’s command interface where report panels are located.
- The right part displays the list of reports for the selected section or group of the application interface, which consists of three columns – Description, Author, and Used on.
If the list of report options is large, you can quickly find the needed report option using the Search bar.
Using the Open button on the selected report option, you can proceed to generate the selected report option.
Using the Edit button or by double-clicking on the selected report option, you can customize the report option. Here you can change description, access rights and details.
Using the Update from File button, you can upload a report option saved along with user settings in an archive file on the computer. Specify the path to the report option archive.
Use the Save to file command to save the current report option to a file (with optional inclusion of user settings). Specify the path to the archive file on the computer. By default, user settings are saved with the report option. You can deselect the saving of all or some settings using checkboxes.
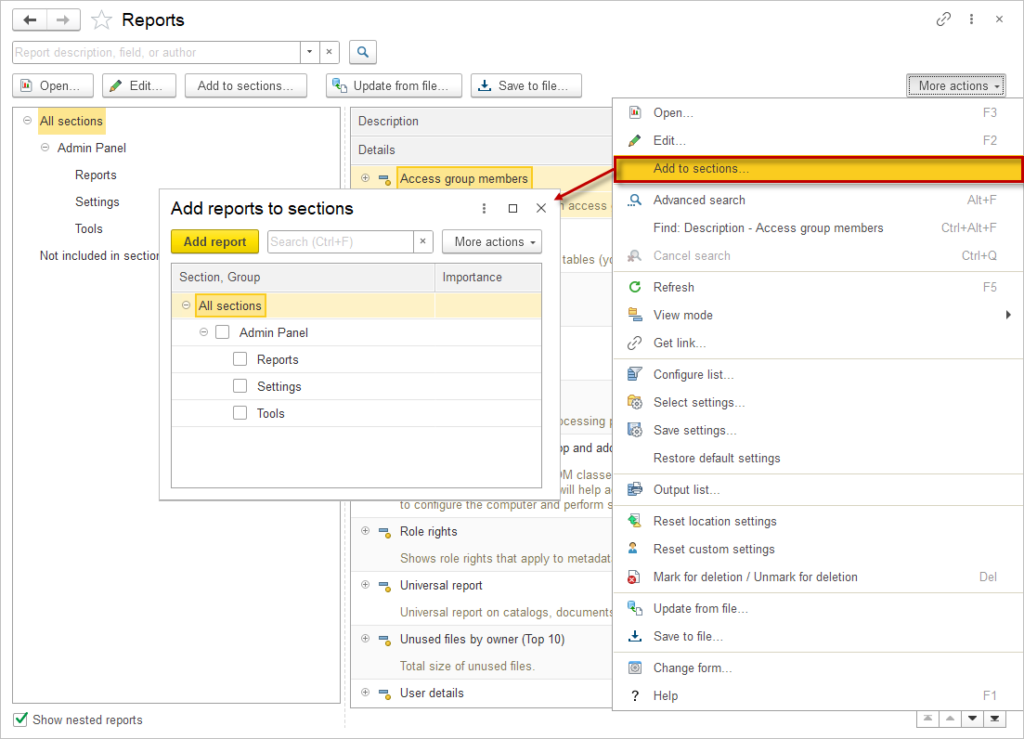
Using the Add to sections command, you can configure the placement for multiple report options at once by specifying in which sections and groups of the application’s command interface they should be placed. By checking and unchecking the boxes, you can add options to sections/groups, remove options from sections/groups, and also define Importance, thereby highlighting the report option in bold or in the See also group. To confirm your selection, click the Add report button.
The More action menu command allows you to Reset location settings of predefined reports. Note that this operation is irreversible.
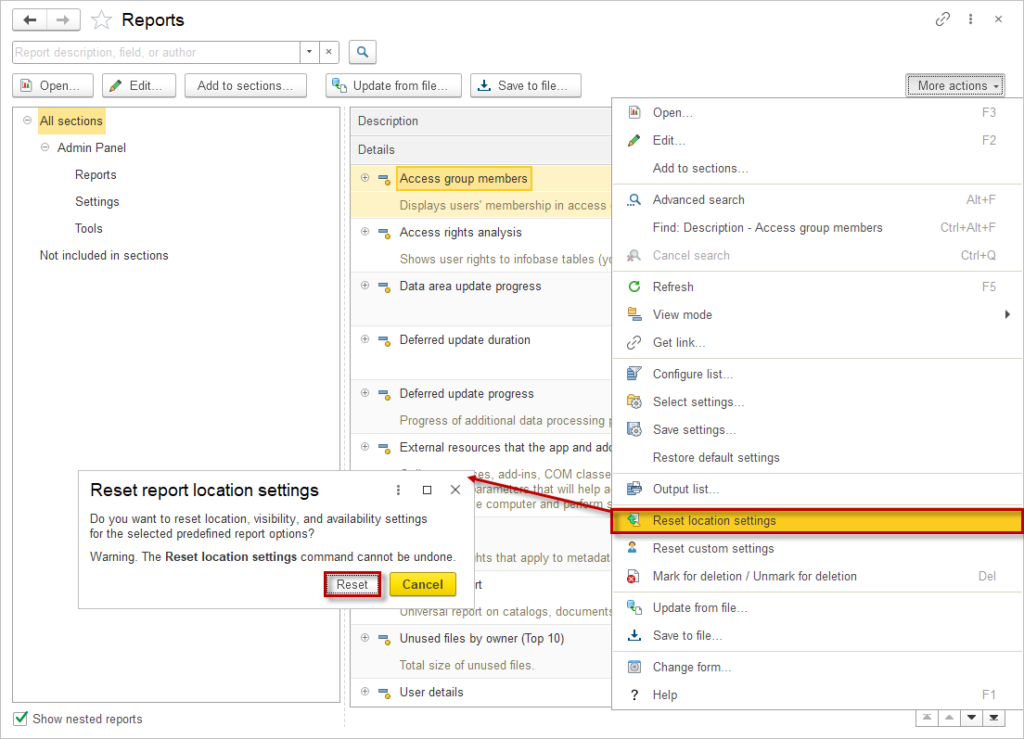
To confirm, click the Reset button. This feature can be used if the placement settings are incorrect and hinder work.
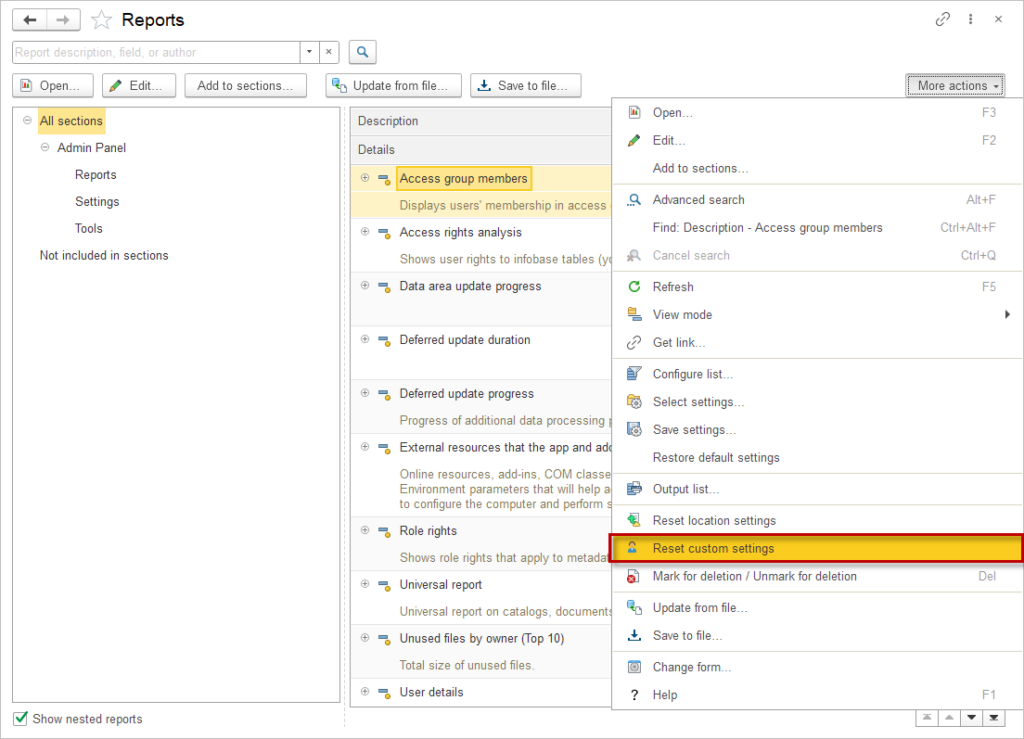
The More actions menu command also allows you to Reset custom settings for the selected report options. This might be necessary if the settings are incorrect and hinder work with the report option.
