Creating a Lead #
A Lead is a potential client who has provided their contact information but has not yet made a final decision to purchase.
When there is a large number of incoming leads, it is essential to ensure their fast and efficient processing by managers. The CRM module enables the automation of lead management, including data collection from various sources, assignment of responsible employees, interaction tracking, and enhancement of the user experience.
Leads play a key role in evaluating the quality of incoming inquiries, as well as in analyzing the effectiveness of marketing channels and customer acquisition costs. It is important to note that not every lead becomes a customer, but every potential client must be recorded in the lead database before making a purchase decision and transitioning to the deal database.
In the Lead directory, click the Create and New button.
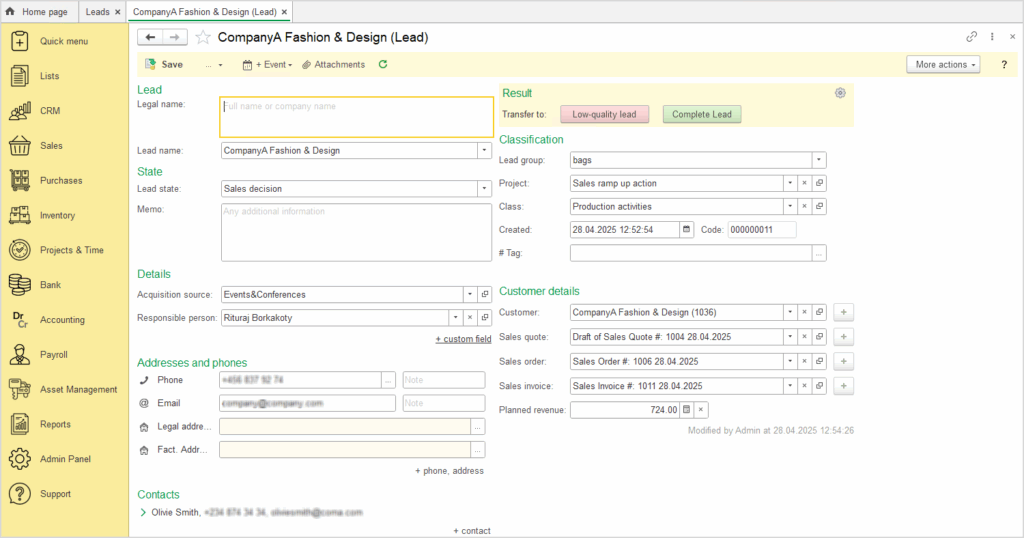
A new screen will appear with fields that need to be filled in to create a lead:
- Lead tab:
- Legal name – full name and company name
- Lead name – used for quick visual identification of the lead while working in the application
- State tab:
- Lead state – lead status
- Memo – any additional notes
- Details tab:
- Acquisition Source – the source through which the lead was acquired
- Responsible Person – the employee assigned to manage and work with the lead on behalf of the company
- Adresses and phones tab:
- Enter the lead’s details, addresses, phone numbers
- Contact tab:
- Contact – enter the full name of the contact person from the lead
- Phone number, email, address – enter the contact details of the lead’s contact person
- In the Classification tab, enter the following details: Lead group, Project, Class, Created date, Tag
- Customer details tab:
- Customer – you can create a new Customer by clicking on

- Sales quote – this document is used to outline the price and terms of the proposed sale to a potential customer.
- Sales order – records a request to sell goods or services
- Sales invoice – record a customer’s liability to you and record income from the transaction
- Planned revenue – is the estimated income expected to be generated within a specific period.
- Customer – you can create a new Customer by clicking on
- Click Save and Close to finalize the creation of the new Leads
Existing customer #
Importing Leads from an external source #
Lead import provides a fast and efficient way to upload a large volume of potential client data into the system from an Excel file. This process significantly reduces time consumption, especially in situations where a large number of records need to be entered at once. Utilizing the import function enables centralized collection and structuring of information, eliminates the need for manual data entry, and minimizes the risk of errors
To import data into the Leads module, follow these steps:
- Go to the Lead repository, click on More actions, and select Import data from an external source
- Before importing, make sure that the values for the Lead state and Acquisition source fields in your external file exactly match the values already defined in the system
- If such values do not exist in the system, you must create them first in the appropriate master data. Otherwise, the import process will fail
- Check the column structure: the names and order of the columns in your external file must match those in the import template
- If needed, you can adjust the template by clicking on the Edit template button
- Once everything is verified and ready, you can either copy the data from your external file and paste it into the import template, or go to the From file tab, click on Import spreadsheet, select the document with Leads, and the data will be imported automatically.
- Click Import data, and finish the process by clicking Finish.
Lead Management #
The Leads directory offers two methods of working: via a List and a Kanban board. These two views allow users to choose the most convenient way to manage and visualize leads – the List is ideal for quick filtering and sorting, while the Kanban board provides a clear picture of the lead flow through different sales stages.
In the leads List, the following key information is displayed: lead Name, State, Responsible person, and customer name.

Working with leads using the Kanban method allows for easy drag-and-drop of contacts across the board, reflecting changes at different stages of lead processing. Each lead is assigned a corresponding status, such as cold interest, first contact, interest, negotiation, sales decision, which makes it easy to track the progress of customer interactions.
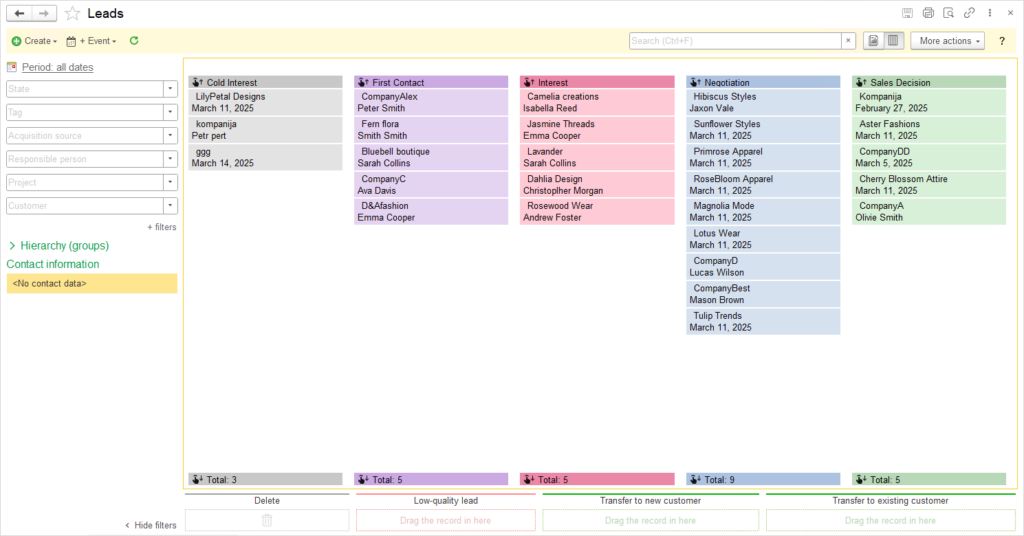
The left menu also provides filters to select leads by State, Tag, Acquisition source, Responsible person, Project, Customer. Since a single customer may have multiple leads, it is possible to filter by customer and type of inquiry.