Custom fields are added to the lists or to the whole document. Not on the rows of the document. The field is end-to-end throughout the object, and if you select the field type with a reference to an existing list, then it can be used on different objects as an end-to-end analysis. Custom field can be seen as tagging a document to some extent.
You can display the custom field in the document list grid and use it for information and data filtering.
Users may create any number of Custom Fields (Additional attributes) that can be used in various areas of the software including the following objects:
Documents where custom fields can be added
- Assembly Build
- Bank Reconciliation
- Bank Transfer
- Bill
- Bill Payment
- Budget
- Cash Receipt
- Cash Sale
- Deposit
- Disassembly
- Dropship Delivery
- Inventory Adjustment
- Item Receipt
- Journal Entry
- Lots Adjustment
- Order Closing
- Payment
- Purchase Order
- Purchase Return
- Payroll
- Personnel orders
- Quote
- Sales Order
- Sales Return
- Serial Number Adjustment
- Shipment
- Statement
- Time Tracking
- Warehouse Transfer
Lists where custom fields can be added
- Company (custom fields may be restricted to Customers only, Vendors only, Employees only or all three)
- Item (custom fields may be restricted to Product Items only or Service Items only or included on both)
- Class
- Project
- Locations
- Lots
- Positions
- Chart of Accounts
- Contact persons
- Deduction types
- Departments
- Expense Report Categories
- Files
- Payment Terms
- Price Levels
- Product Conditions
- Return Reasons
- Persons
- Shipping Carriers
- Users

Create Custom field #
- Navigate to Admin Panel – Application settings – Properties – Additional attributes.
- Highlight the object that you want to place a custom field on in the list on the left.
- Click Create / New. The custom field creation screen will appear.
- Enter a name for the custom field. This will become the label for the custom field in the software.
- Check the Make this a required field if you wish for it to be required.
- Choose a value type.
- Boolean will create a checkbox custom field.
- Date will create a date custom field with a date picker widget.
- String will create a free-form field. The maximum characters and field length may be specified.
- Number will create a field that accepts number characters. Number of characters and precision (decimal places) may be specified.
- Additional value – you can set predefine list of custom field items.
- Use existing list as a custom field values:
- Address / contact will create a drop-down list of addresses/contacts from your addresses/contacts list.
- Company will create a drop-down list of companies from your company list.
- Custom Value will create the custom field as a drop down. If you choose this type, Click the create button and enter the list of values you would like to appear in the dropdown.
- Country will create the custom field as a drop-down list of Countries that have been entered in the Country list.
- Item will create the custom field as a drop-down list of Items in your inventory.
- Sales People will create the custom field as a drop-down list of sales people in the sales people list.
- Shipping Carrier will create the custom field as a drop-down list of shipping carriers from the shipping carriers list.
- User will create a drop-down list of account users in your account.
- And others possible lists (Classes, Projects and etc.)
- Click OK.
- Some value types have additional formatting options. Click the format link to make changes if desired.
- Enter a tooltip to include a user tooltip that will appear when hovering over the field.
- Click Save and Close.
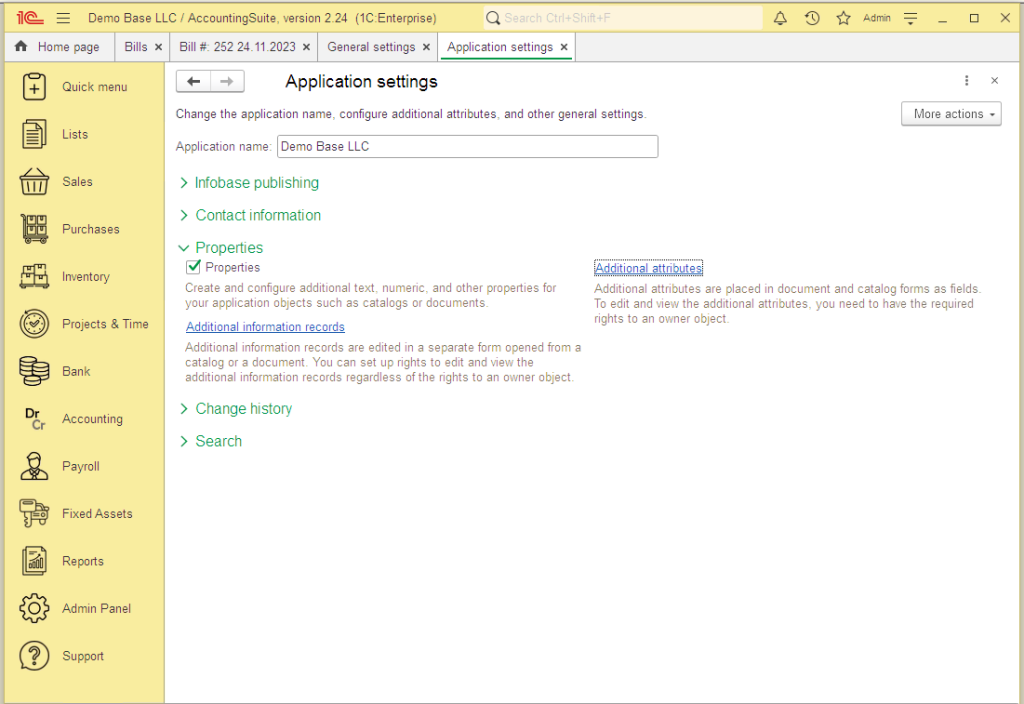


Using Custom field #
You can simply add new custom field into document by using More Actions – Edit additional attributes.

Custom fields will appear in the appropriate document/object in a Additional tab in group called Custom Fields. The name of this group may be renamed by navigating to More Actions – Change form, highlighting the Custom Fields entry on the left and changing the name in the right pane.


You can display the custom field in the document list grid and use it for information and data filtering. Use Columns – Manage columns in a document list.
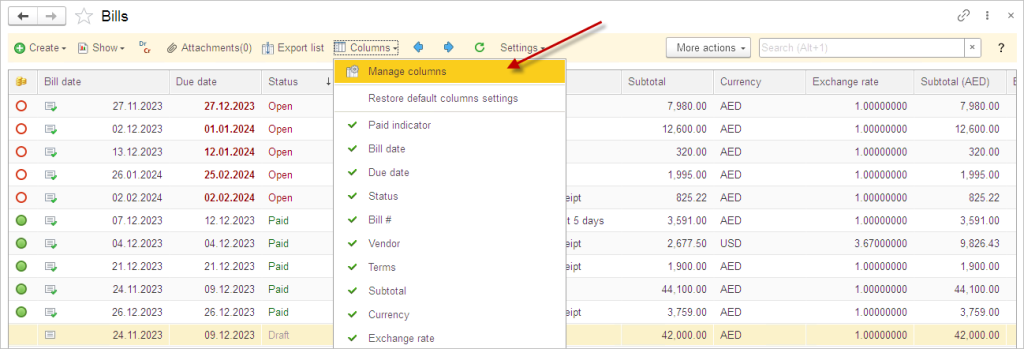
Find there on left side the Reference, and Move to list you custom field.

Use arrows to move your field to position you want and rename it in the Title column if needed. Press Done.

You will have field in the list.

To filter it use right mouse button and Advanced search there or press Alt+F or Ctrl+Alt+F on a field.

Group a list by Custom Field #
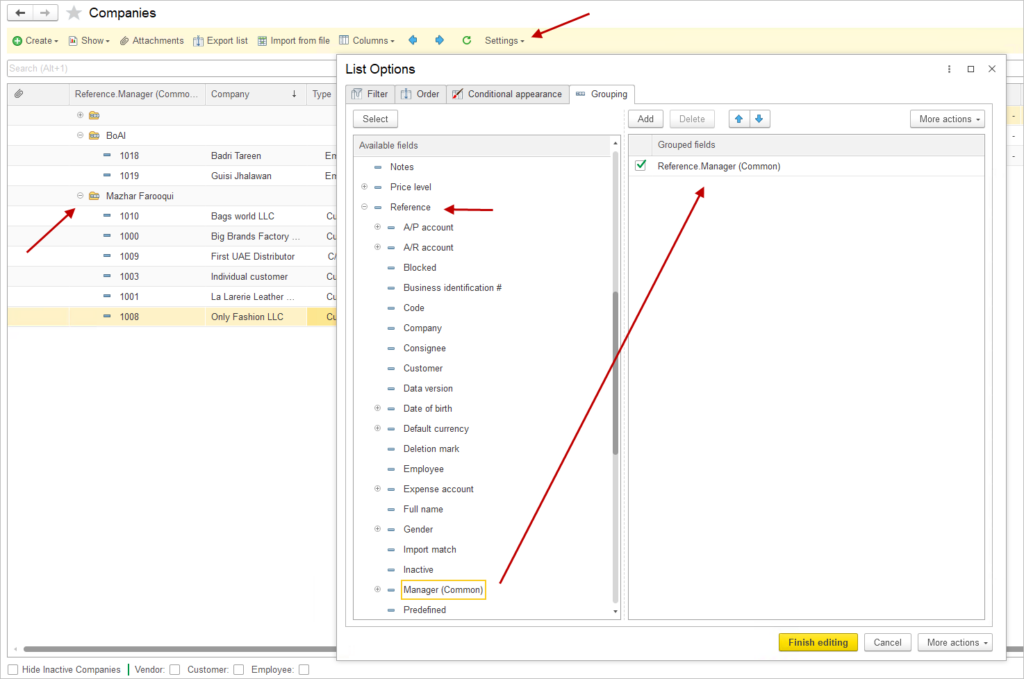
If you want to add grouping by your new custom field into a list, use Settings – Configure list menu.

Then Grouping tab there. Use panel Available fields, chose Reference – <you name of custom field> item and add it into Grouped fields panel.
Required by condition for Custom Field #
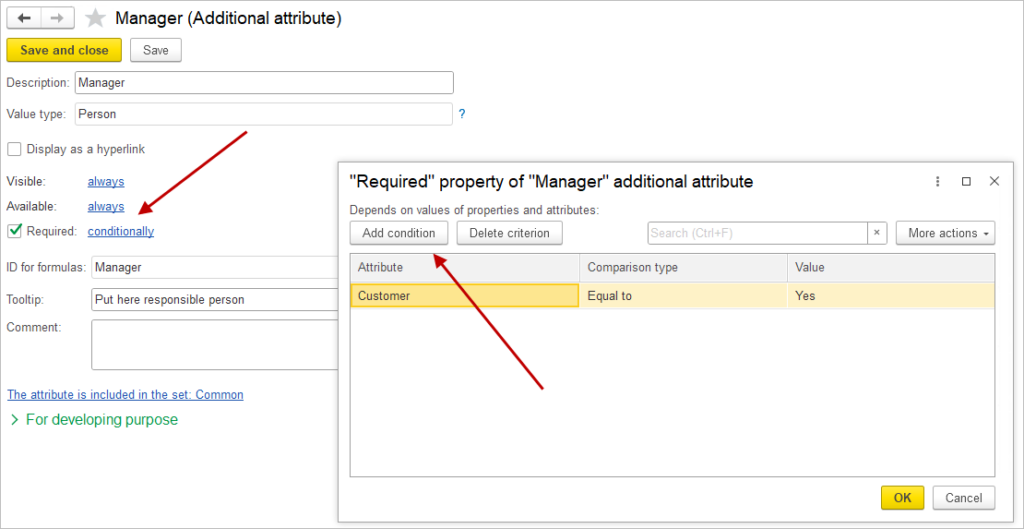
If you need a required field with a mandatory check condition, use the Required – conditionally mode when you create it and set the condition you need there.
How to use Custom field as a filter in the report #
Let’s take an example. There is a custom field on the Items – the Brand. You need to use it to filter the report.

In the report click Filter – Add filter – Open selection window.

Switch the list to Advanced mode, find the Item and open + icon of hierachy of it. There is a Brand field, chose it. Press Done.
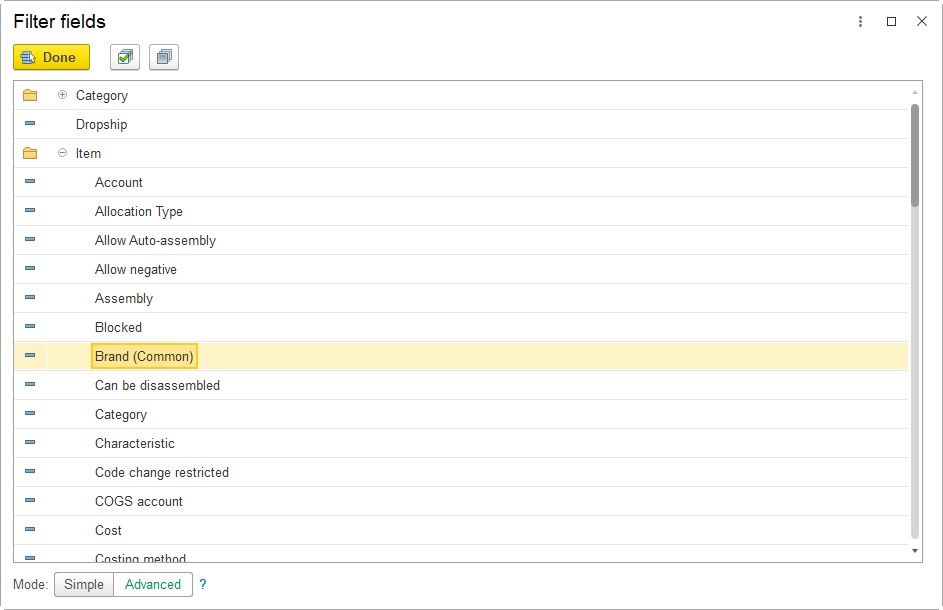
Now you can use filter by Brand in your Item list for the report.

