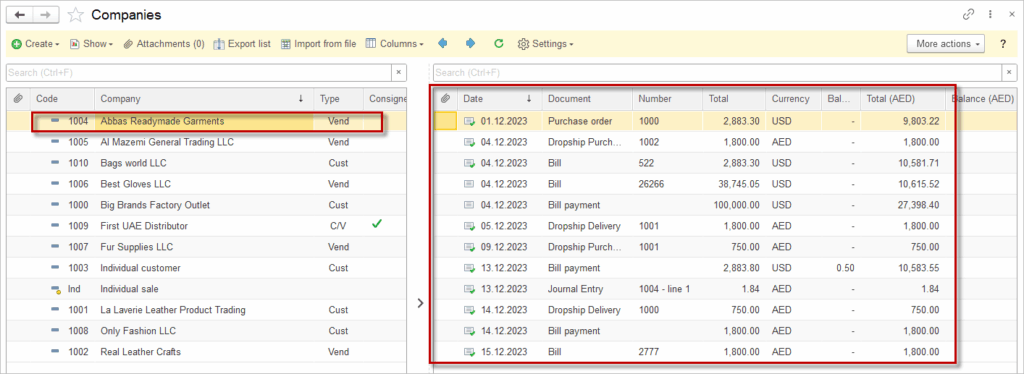
The Companies List brings together the relationship you have with customers and vendors in one easily managed page. It is not only a list, but a working place, were user can:
- Instantly tell whether a company is a customer, a vendor or both by the indicator column next to the name.
- See the current balance, payment terms and any custom fields you have created.
- View every invoice, order, payment or receipt in the right pane for each company.
- Initiate invoices, orders, payments or receipts by clicking the Create above the transaction documents.
- Export the lists to excel.
- Create a new customer or vendor
- Enable / Disable Companies
Companies are the main thing you need when working with Customers and Vendors. AccountingSuite allows your Customers to be Vendors and your Vendors to be Customers. One business contact that can handle both roles.
For the highlighted Company, user can see the posted document on the right-hand pane in the list. For the Journal Entries, where multiple Companies might be involved, the Transaction list displays the line number for the highlighted Company.

For user’s convenience, there are separate Customers and Vendors menu items in a Menu with the same functions as Companies with predefined filters.

Create Customer #
Remember that one way to create multiple Customers at the first start is to import the list of Customers using the Data import tool.
If you are creating a Customer similar to another existing one, you may copy it to save time. Right click the Customer in the list view and choose Copy. Change the info that is different for the new Customer (the code must be unique) and click Save.
- Navigate to Lists – Companies (or Lists – Customers).
- Click Create – New.
- Tick the checkbox Customer (remember, your Customer can also be your Vendor. In this case, Tick both Customer and Vendor checkboxes).
- Select the Entity type.
- Enter the Name of the company.
- Enter the Code (optional).
- Enter information required on tabs Addresses / Contacts, Financial, Project, Notes.
- On the Financials tab, Sales and A/R account can be specified. If left blank, then the default posting accounts from the Accounting settings will be used. Only if a Customer needs any specific account other than the default ones (e.g., account in a different currency), this must be specified in the Financial tab.
- Click Save.


Create Vendor #
Remember that one way to create multiple Vendors at the first start is to import the list of Vendors using the Data import tool.
If you are creating a Vendor similar to another existing one, you may copy it to save time. Right click the Vendor in the list view and choose Copy. Change the info that is different for the new Vendor (the code must be unique) and click Save.
- Navigate to Lists – Companies (or Lists – Vendors).
- Click Create – New.
- Tick the checkbox Vendor (remember, your Vendor can also be your Customer. In this case, Tick both Customer and Vendor checkboxes).
- Select the Entity type.
- Enter the Name of the company.
- Enter the Code (optional).
- Enter information required on tabs Addresses / Contacts, Financial, Project, Notes.
- On the Financials tab, Expense and A/P account can be specified. If left blank, then the default posting accounts from the Accounting settings will be used. Only if a Vendor needs any specific account other than the default ones (e.g., account in a different currency), this must be specified in the Financial tab.
- Click Save


Create Employee #
Remember that one way to create multiple Employees at the first start is to import the list of Vendors using the Data import tool.
If you are creating a Employees similar to another existing one, you may copy it to save time. Right click the Vendor in the list view and choose Copy. Change the info that is different for the new Employees (the code must be unique) and click Save.
- Navigate to Lists – Companies.
- Click Create – New.
- Tick the checkbox Employee (remember, your Employee can also be your Customer or Vendor. In this case, Tick both Customer and Vendor checkboxes).
- Enter the Employee name.
- Enter the Code (optional).
- Enter information required on tabs Addresses / Contacts, Financial, Project, Notes, Gender, Date of birth.
- If it is a Vendor or Customer too, then on the Financials tab, A/P account can be specified to use with Employee payables G/L account.
- Click Save

Is it possible to add more details of the employee: identification numbers, documents etc. Use Custom field for this.
The employee is on the general list of companies (Clients and Vendors) to unify calculations and can be an accountable person and buy goods for the company. Or he can provide car or warehouse rental as a vendor. He can buy the company’s products as a customer.
Tax settings for Companies #
To make sure, the taxes are accounted for correctly, specify the applicable Taxes in the Tax tab.
If the VAT toggle is ticked, the Tax registration number becomes a required field.

