Backup must be performed before any operation that may damage the data in the information database.
If you have configured the storage of attached files separately from the database, then configure periodic copying of this folder with files by external tools.
For more information about managing solutions based on 1C Enterprise Platform, see the articles on https://1c-dn.com/library/administration/.
The cloud version is backed up automatically.
Built-in tools #
If you are using the on-premises version, you should set up regular backups of the information database to reduce the risk of data loss. The frequency of backups depends on the intensity of new data input into the database.
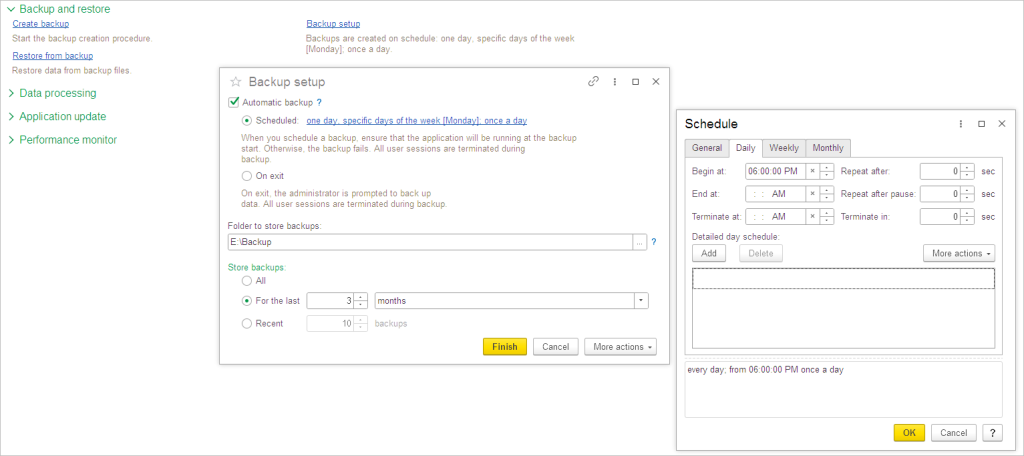
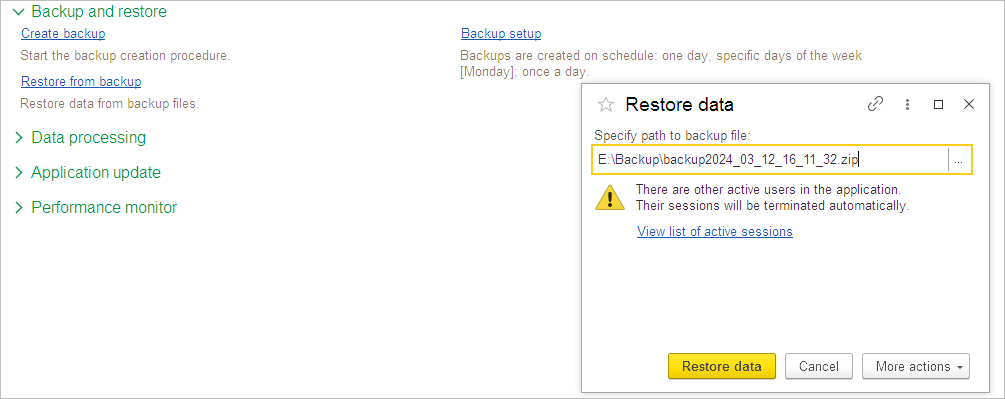
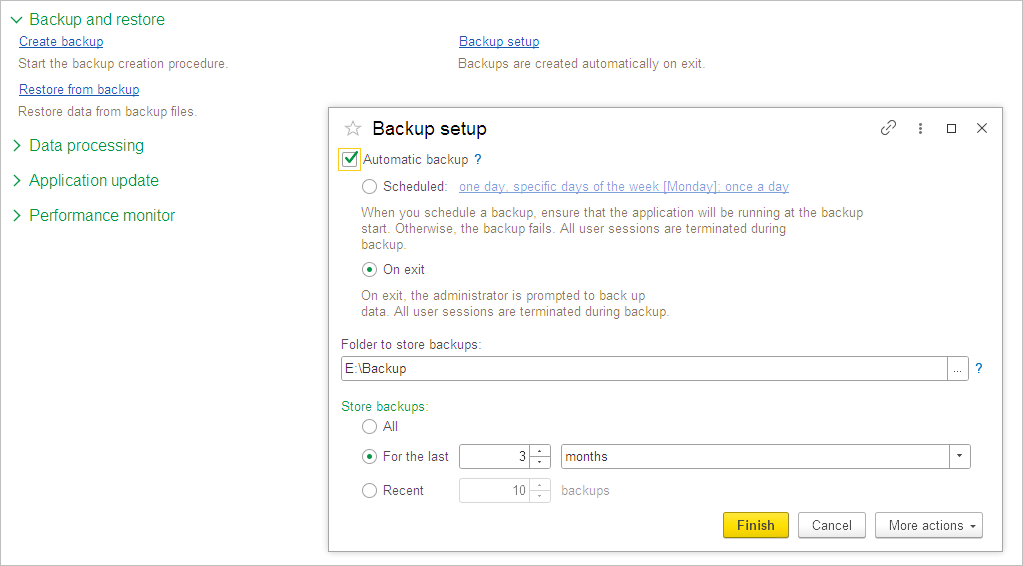
Use Backup setup on Admin Panel – Update and service – Backup and restore menu.
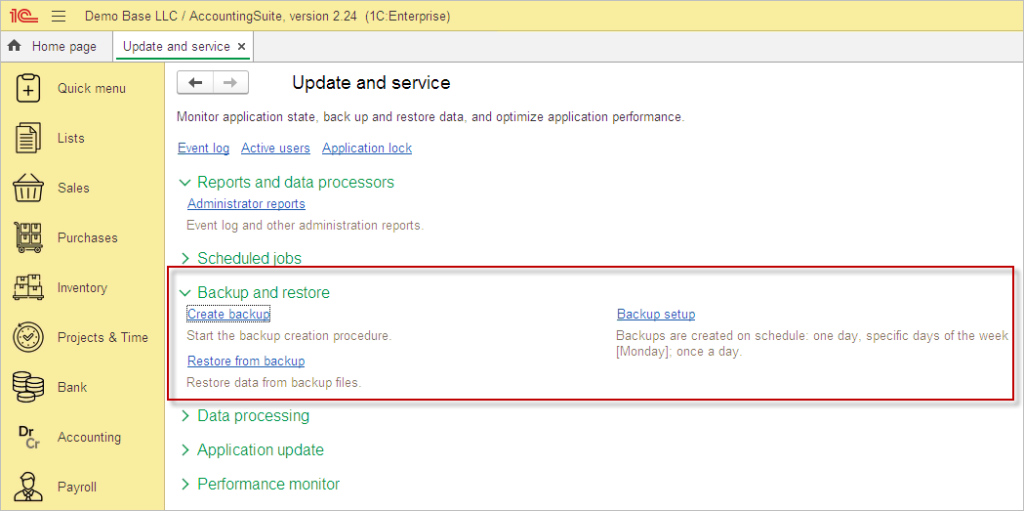
Set up your schedule or set Automatic backup to Off and use Create backup for manual backup from time to time.
The automatic backup feature only supports file-based databases. For the backup to complete successfully, the application must be running when the process begins—if it’s not active, the backup will fail. Note that this method forcibly terminates all user sessions during the backup operation. While convenient for small projects during initial setup, this should only be treated as a temporary or auxiliary solution. For robust, production-ready data protection, you should always configure proper backups using your operating system’s native tools or your DBMS’s dedicated backup facilities instead.
On scheduled time it shows message to start backup process. You can snooze or skip it.

You can always use manual backup. Create backup helps you to back up your database to disk. Please close all other users’ active sessions before pressing the Save backup button.
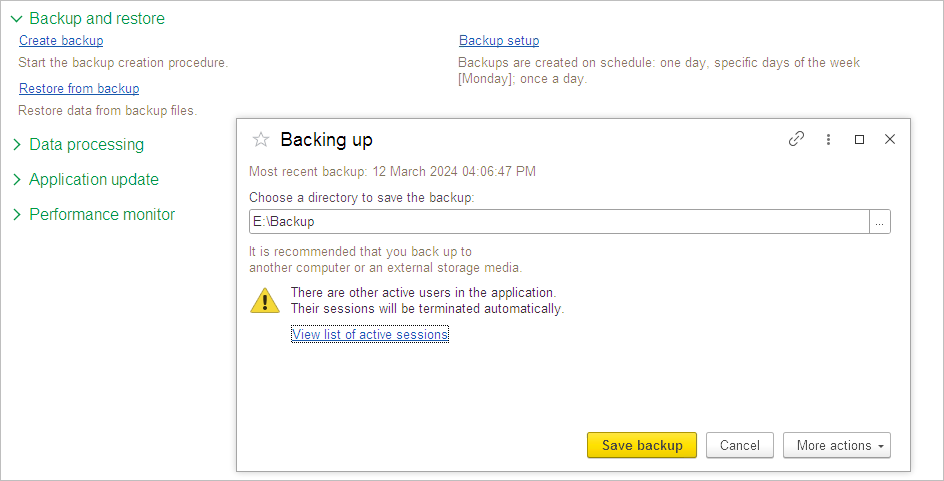

To restore the database from the file, use Restore from backup. Please close all other users’ active sessions before pressing the Restore data button.

Please note: Pay attention to Show in list checkbox in User Setting. For security reasons you can hide users from users list on login screen.
The Cloud version has it always Off. You need to know creditance (login and password) to enter database after backup restore, you cannot choose user from user list for Cloud database.
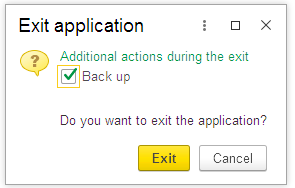
It is strongly recommended to set up reminder to create copy of your accounting data. You can set backup On exit as a reminder.
In this case on exit you will see a message about backup. Press Exit to skip backup and just exit. Press Continue to make backup or return to work.
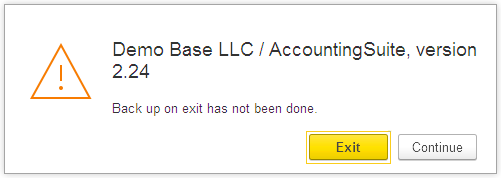
After pressing Continue you will see the pop-up ‘Click here to exit and perform additional actions’. Press on it.

It will show the backup option on exit. Press Exit to create backup and close the software.
Please create such backups from time to time to save results of your work.
Dumping and restoring infobases with 1C Designer #
You can Dump an infobase to a file or Restore an infobase from a *.dt file. You can use these features to create infobase backups or restore infobases from backups. It works with File mode and with Client/Server mode databases.
Dumping and Restoring infobases allows you to switch between the File mode and Client/Server mode.
Dumping an infobase (creating a backup) #
- Select the infobase to dump:
- From the list of available infobases, choose the one you want to export or back up.
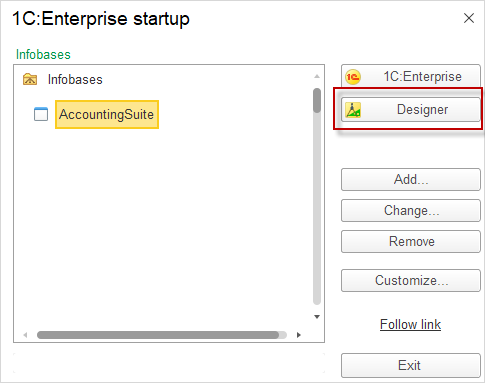
- Open designer:
- Click the Designer button to open the Designer environment.
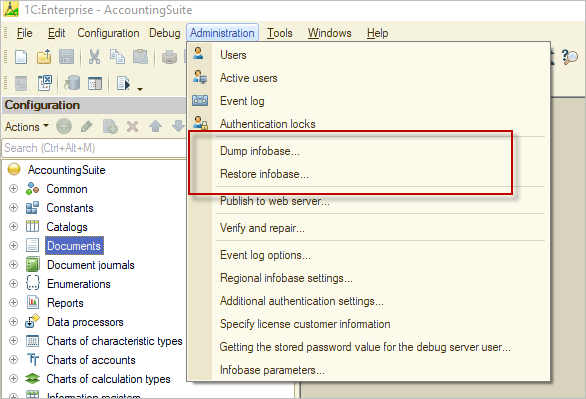
- Dump the infobase:
- In Designer, go to Administration in the menu and select Dump infobase.
- Choose backup location:
- A file dialog will appear. Select the location where you want to store the infobase backup *.dt file.
Restoring an infobase (uploading a backup) #
- Create an empty infobase or chose the target infobase from your list:
- Before restoring as a new copy of data, you need to create a new, empty infobase where the data will be imported.
- Chose the infobase in designer:
- Open the infobase you created in designer.
- Restore the Infobase:
- In Designer, go to Administration and select Restore Infobase.
- Select the infobase DT file to restore:
- A file dialog will appear. Choose the backup DT file (the infobase dump file) that you want to restore.
- After the recovery process, the system will prompt you to log in to the database
- Please note that the restored copy of the infobase may contain a different list of users and their passwords
External backup tools #
File mode of the database #
During the backup operation (both the creation of a backup copy and its restoration) of the information database in the file version, there should be no connections to the information database .
A backup copy is created in any program that supports working with files. Using the file management program, you need to open the directory with the information base. To create a copy of the information database, you can simply copy the 1Cv8.1CD file to a separate directory. To restore (in case of loss, damage, etc.) the information base, it is enough to copy the saved file to the previous directory.
Note that to copy the information database, you can also use specialized software designed for data backup and recovery. You can set schedule to do it in non-working hours.
Automated Backup Using a BAT File #
Best for: Regular backups.
Example script (backup_1c.bat):
@echo off
set "date=%DATE:~6,4%-%DATE:~3,2%-%DATE:~0,2%_%TIME:~0,2%-%TIME:~3,2%"
set "source=C:\1C_DB\MyBase"  // Path to the 1C database
set "dest=D:\Backups\1C_%date%.zip"  // Backup destination

"C:\Program Files\7-Zip\7z.exe" a -tzip "%dest%" "%source%"
echo Backup created: %dest%
How to set up:
- Install 7-Zip (or use built-in
tar/zip). - Schedule the script (via Windows Task Scheduler).
Key Notes:
- Ensure 1C is closed (no active users) during the backup. Copying the database file will also work during active user sessions, but data integrity is not guaranteed.
- Use another disk device to copy. This will protect the data from disk damage.
- Leave the computer on while the backup is running.
- For large databases, consider incremental backups (e.g.,
robocopy /MIR). - Test the backup by restoring it to a test environment periodically. To make sure that the copy disk is working correctly.
Client-server mode of the database #
It is recommended to back up the information base in the client-server version using the means of the DBMS (database management system) used.
The backup will consist of several steps:
- Performing a backup of the database itself.
- Performing a log backup. It is organized, if necessary, to be able to view the log after restoring the backup copy.
- Performing a backup of the binary data storage. Copying is performed using the built-in language or the standard Binary Data Storage Management function.
Restoring from a backup (in this case) is performed in the same order:
- Restore the database from a backup.
- Restore the log from a backup (if the log was backed up).
- Restore the binary data storage from a backup.
Scheduled Backup of a 1C Server Database (Using 1C Platform Tools)
To automate backups of a 1C:Enterprise server database, you can use built-in 1C tools or integrate with external utilities. Here are the best methods:
1. Database Dump via 1C Configurator (.dt File) + Task Scheduler #
Best for: Full .dt backups (structure + data).
Step 1: Create a Backup Script
- Create a
.batfile (e.g.,backup_1c.bat): - Test the script manually (run
.bat).
:: @echo off
set "date=%DATE:~6,4%-%DATE:~3,2%-%DATE:~0,2%"
"C:\Program Files\1cv8\8.3.24.1761\bin\1cv8.exe" CONFIG /S"localhost\test1" /NAdministrator /P1qazxsw2 /DumpIB"C:\Users\mayer\Desktop\1C_Backup_%date%.dt"
Step 2: Schedule in Windows Task Scheduler
- Open Task Scheduler (
taskschd.msc). - Create a task:
- Trigger → Daily at 2:00 AM.
- Action → Start a program (select
.bat). - Run with elevated privileges (if required).
- Save.
Pros:
✅ Full database copy (portable to another server).
✅ Supports archiving (e.g., via 7z in script).
Cons:
❌ Requires users to disconnect (best done at night).
2. SQL-Level Backups (For MS SQL/PostgreSQL) #
If the database runs on SQL Server/PostgreSQL, use native DB tools:
For MS SQL Server
- Via SQL Server Management Studio (SSMS):
- Go to Maintenance Plans → Backup Database Task.
- Configure schedule.
- Or via T-SQL:
DECLARE @BackupPath NVARCHAR(256)
DECLARE @BackupFileName NVARCHAR(256)

-- Set backup path and file name with formatted date
SET @BackupPath = 'C:\Program Files\Microsoft SQL Server\MSSQL16.MSSQLSERVER\MSSQL\Backup\'
SET @BackupFileName = @BackupPath + '1C_DB_' +
                     FORMAT(GETDATE(), 'yyyyMMdd_HHmmss') + '.bak'

-- Execute backup
BACKUP DATABASE [1C_DB] TO DISK = @BackupFileName
WITH COMPRESSION
For PostgreSQL
pg_dump -U postgres -F c -f "D:\Backups\1C_$(date +%Y-%m-%d).dump" 1C_DBPros:
✅ Fast, supports incremental/differential backups.
Cons:
❌ Requires SQL admin rights.
4. Best Practices #
- Storage:
- Follow the 3-2-1 rule (3 copies, 2 media types, 1 offsite).
- Use cloud storage (
AWS S3,Google Drive, etc.).
- Testing:
- Restore backups monthly to verify integrity.
- Logging:
- Log backup results (e.g., to
backup_log.txt).
- Log backup results (e.g., to
Comparison Table #
| Method | Best Use Case | Pros | Cons |
|---|---|---|---|
| 1C File Database Built-in Backup | Simple scheduled backups | Unreliable, minimal setup | Limited features |
| .dt Dump + Task Scheduler | Full backups for migration | Portable, flexible | Requires downtime |
| SQL Backups | MS SQL/PostgreSQL databases | Fast, supports SQL features | Requires DB admin access |