Access Groups #
Access groups allow you to set up and manage general access rights settings for a group of users performing similar functions in the application. Only application administrators, listed in the predefined Administrators access group, have the rights to edit the Access Group list. Additionally, a user designated as Responsible in the access group can modify the group membership.

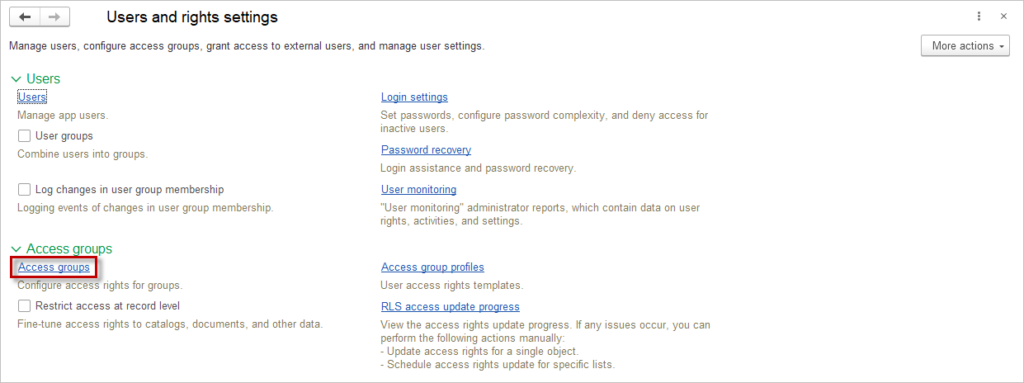
To create a new access group, go to the Access Groups list in the Admin Panel – Security settings – Access groups section.
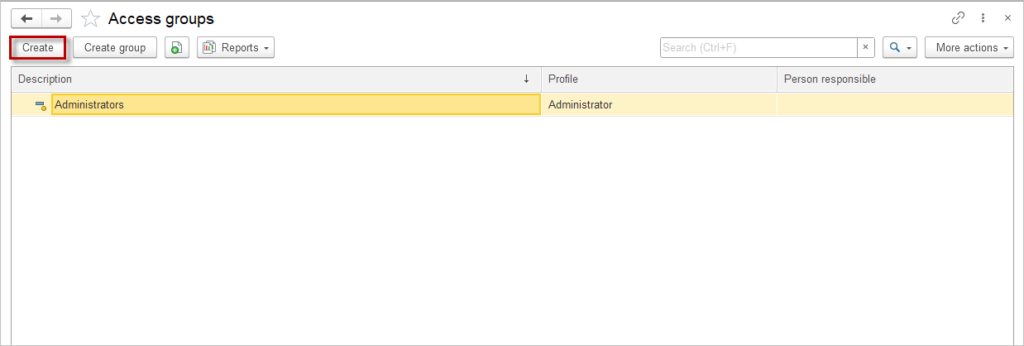
- Click Create.
- Fill in the Description field.
- It is recommended to name the access group in the plural form, ensuring that the name includes the profile (specified in the “Profile” field) and clearly characterizes the defined access rights settings.
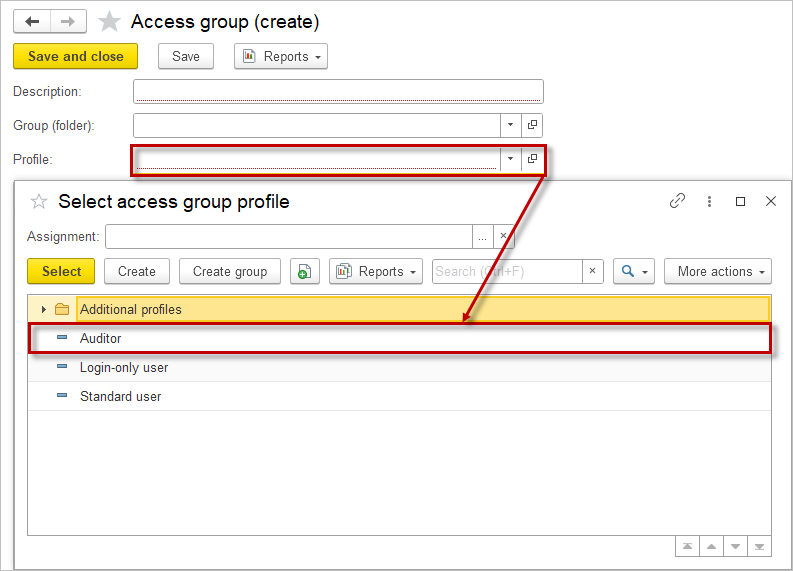
In the access group card, select one of the available Access group profiles.
Allowed members of the access group are determined by the profile according to the selected purpose.
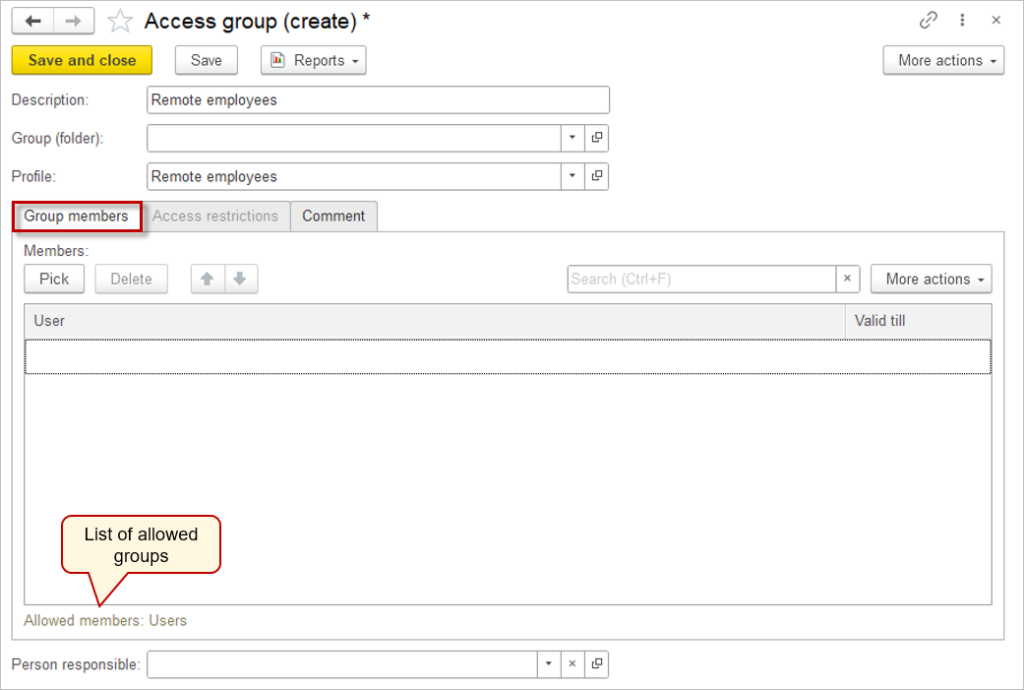
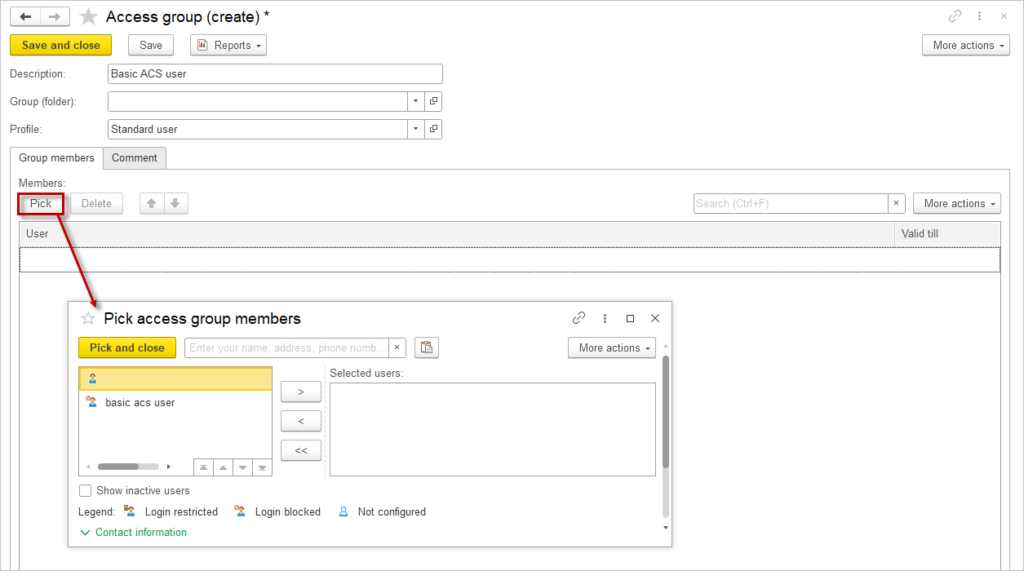
On the Group members tab, list the users (and user groups) to which the access rights settings should apply. The lists from which you can select group members are listed in the Allowed users field at the bottom of the tab.
To add users click Pick button.
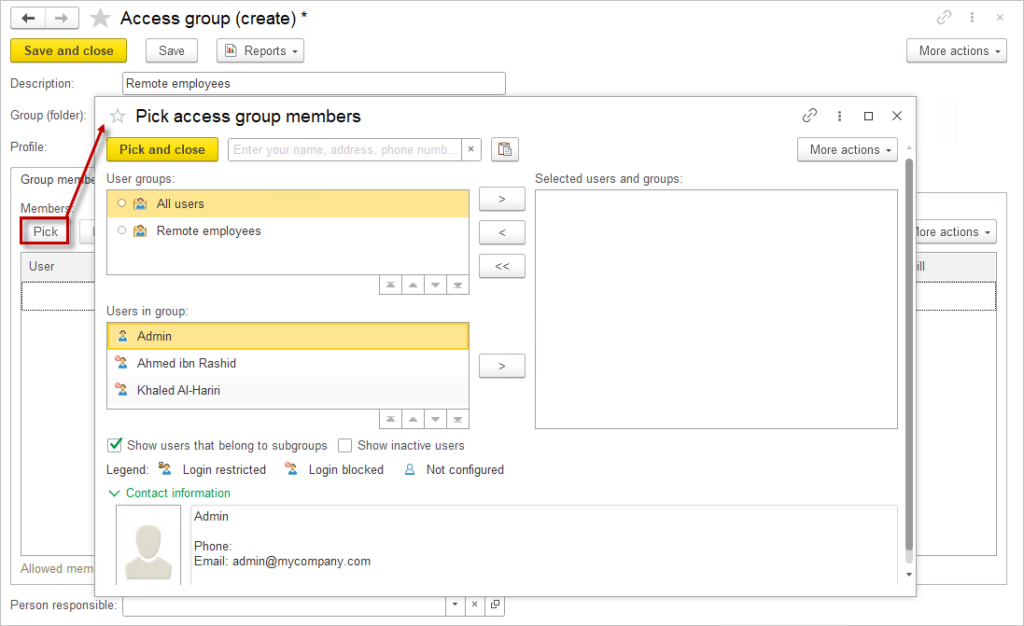
- Select the needed users. The selection window consists of two parts:
- In the left part, choose the necessary user group (you can select the entire group at once) and the desired users from that group.
- Use
 button to add users to the selected list.
 - In the right part, the selected users are listed.
Then, click Pick and close to return to the access group setup.
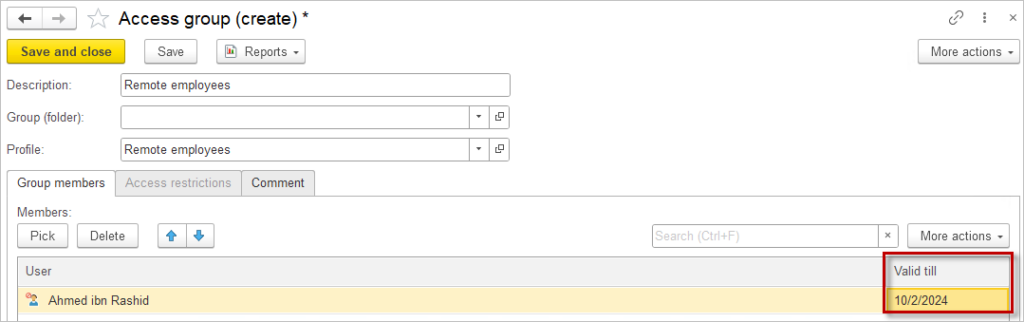
In the Valid till field, specify the date after which the member will automatically be removed from the access group. This allows you to automatically limit the duration of temporarily granted rights.
Access Group Profile #
An access group profile is a set of roles (permitted actions) and access types that define data access restrictions within the program.
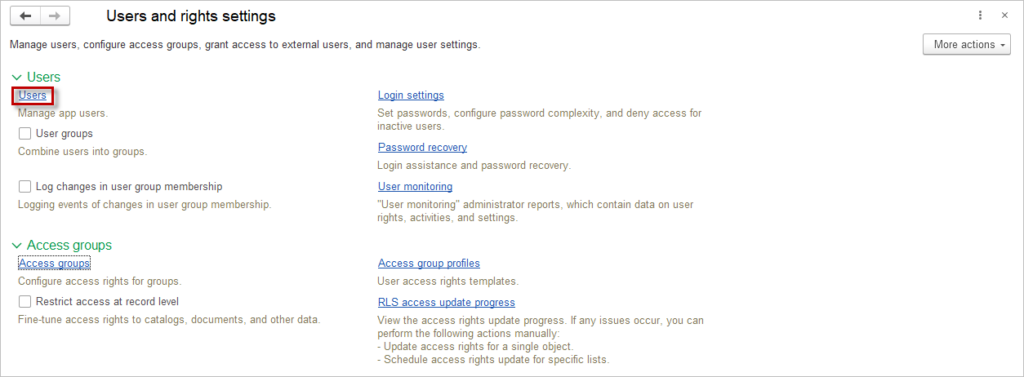
Creating and modifying access group profiles is done via the menu command: Settings – Users and Rights – Access Group Profiles. Selecting this command displays the list of access group profiles. Some profiles are available by default in the program.
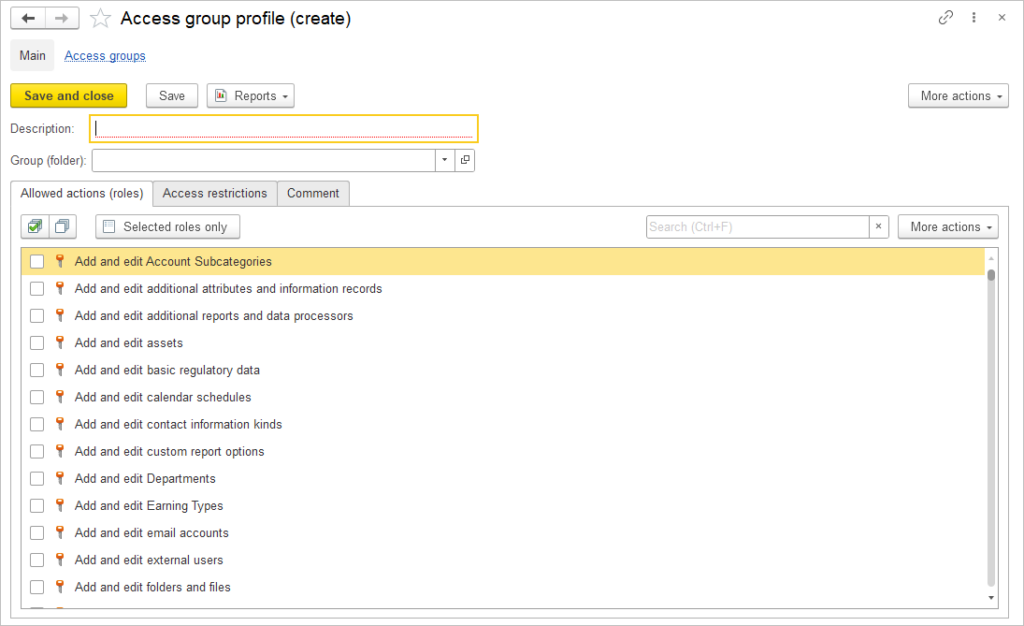
If necessary, the administrator can define additional profiles as required. When creating an access group profile, specify the actions (roles) permitted for users in the group on the Allowed actions (Roles) tab.
Here is a list of the basic types of actions that can be granted:
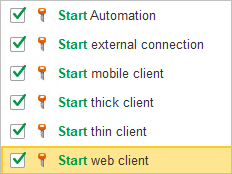
- Start rights – allows the user to launch the application. Choose which type of client your user will use. Type “start” in the search bar to see a full list.
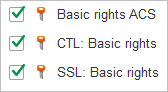
- Basic rights – without these permissions, the user will not be able to log into the application, even if the Login allowed checkbox is checked on their profile. To view all basic rights type “basic rights” in the search bar
- Basic edit/read ACS rights
- CTL: basic rights
- SSL: basic rights
- Permissions to view objects – allow users to see systems, objects, and links. For example, if your employees do not need to work with purchases, you can turn off the visibility of this module for them. To see a list of all view rights type “view” in the search bar.
- Edit permissions – users with these permissions can interact with objects to add or edit them. To prevent mistakes, only give editing permissions for documents that your employee will work with. If they only need to view objects, but not change them, give them read-only access. To see a list of all editing actions type “edit” in the search bar.
- Read-only access – these rights allow the user to view cards of objects but not to edit them. Grant these rights to new employees to prevent them from editing sensitive information. To see a list of all read rights type “read” in the search bar.
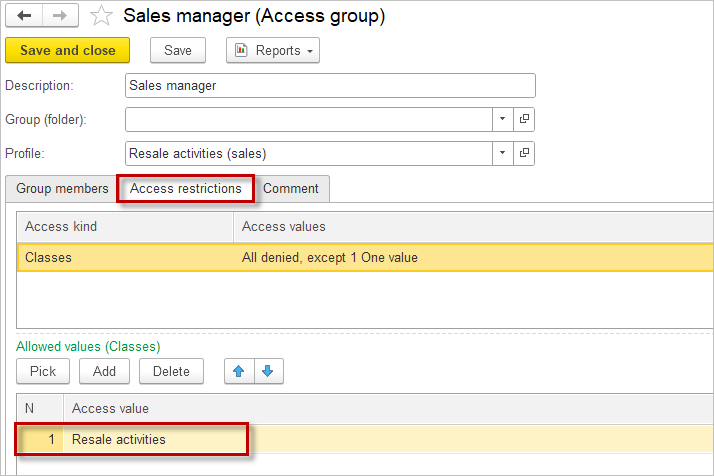
Access Restrictions by Class #
For additional fine-tuning of access restrictions, certain Classes can be specified either in the Access group profile OR in the Access Group. This ensures, that users will not have access to the denied Classes or will only have access to the data for allowed Classes. It is a Record-Level Security or Row-Level Security (RLS) access approach.

Please note: If access is granted to the parent Class, then the access is also granted for all Classes that have been assigned with this parent.
To restrict the access to data in the Access group profile, on the Access restrictions tab select: “All denied, configure exceptions in profile” or “All allowed, configure exceptions in profile” in the Access values. Specify the exceptions below,
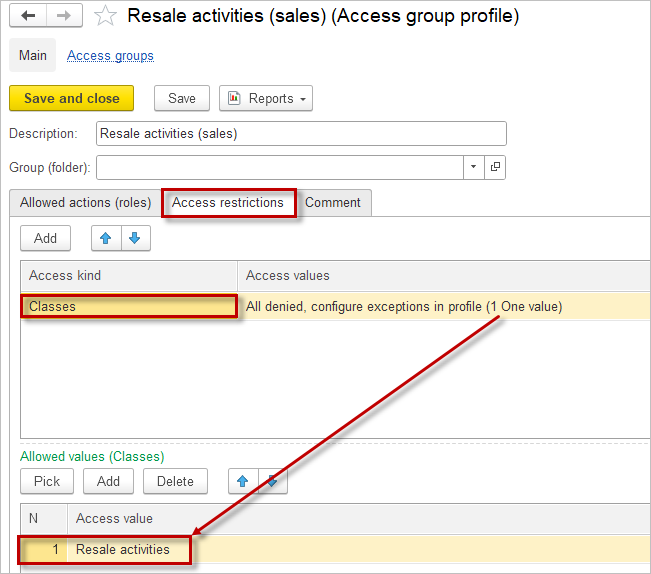
To restict the access to data in the Access groups, on the Access Resctrictions tab of the Access group profile select: “All denied, configure exceptions in access groups” or “All allowed, configure exceptions in access groups” in the Access values.

Then, navigate to the Access group and select the exceptions for Classes there.
Sales rights only example #
As an example. If you want to create User with Sales rights only, start with mandatory common roles for it.
Please noted that to work with documents it needs to add: Add Edit Tax Invoice Issued and Edit Posted Documents.
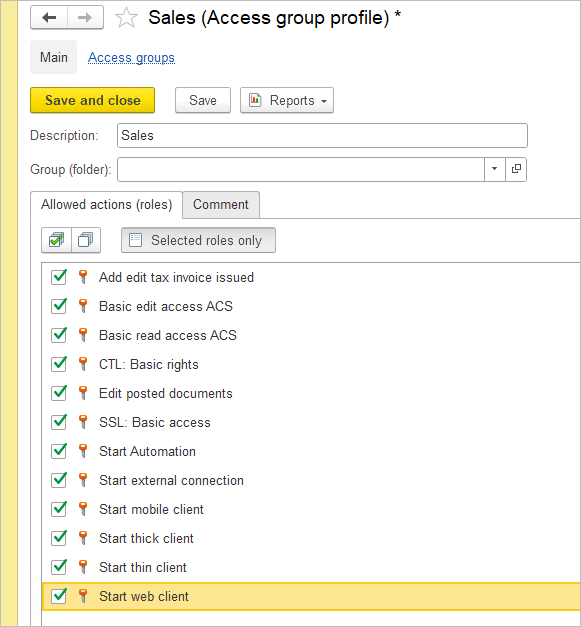
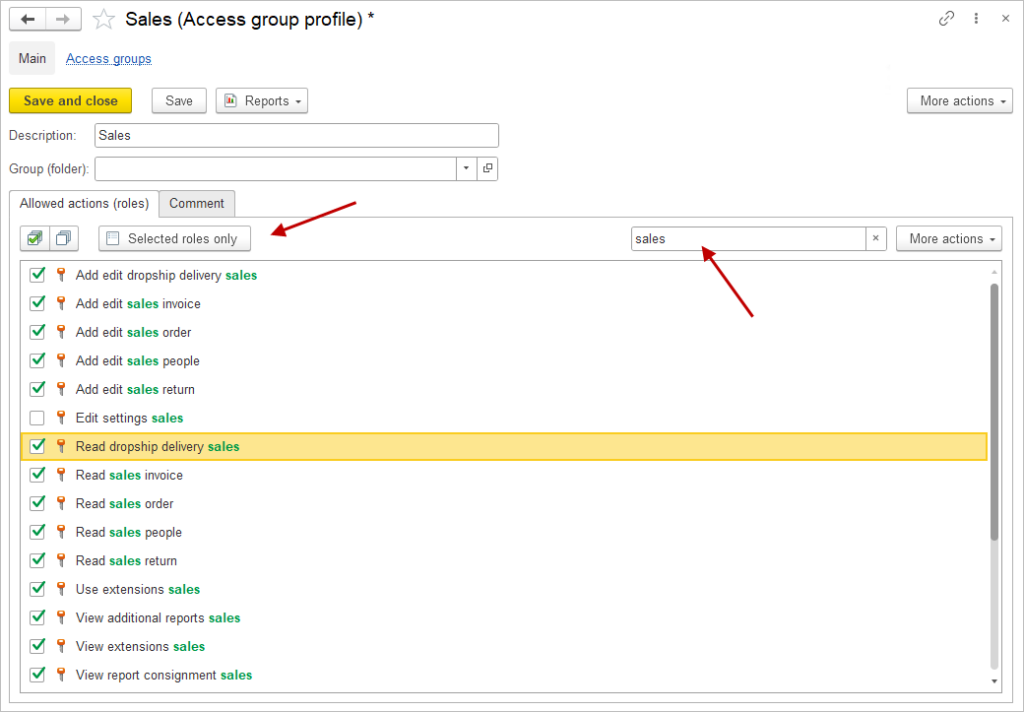
After adding mandatory common roles use Find field to filter by ‘sales’ and select roles you need.
Check user right, and stay there only new group ‘Sales’.
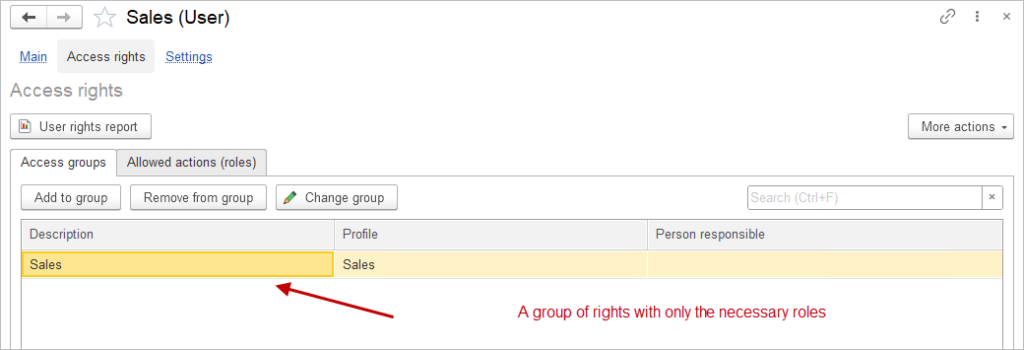
This user will have limitation of sales documents and reports only.
Specific Roles #
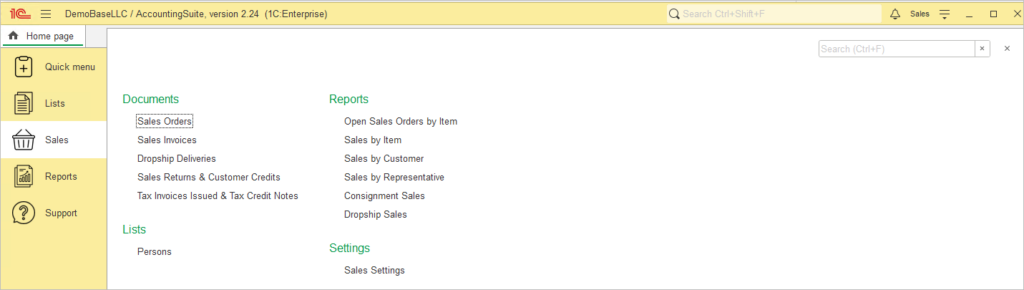
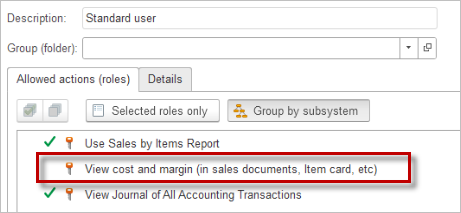
View Cost and Margin Role #
The visibility of the sales margin section in Sales documents is controlled by the “View cost and margin” role. Users assigned to this role can see the margin section within sales documents, and the cost related information on the Item Card. If the role is not assigned, the margin and cost section remains hidden.
Read-only Role #
The Read-only role is intended for users who need accesss to data in the system but do not need (or should not be allowed) to make changes/ This role provides a safe-way to share information without the risk of accidental or unauthorized modifications to data.
To create this role, go to the Access Groups list in the Admin Panel – Security settings – Access groups section.
- Click Create.
- Fill in the Description field.
- In Profile field select Auditor option. This profile is preconfigured in your system and includes all necessary settings for read-only purposes.
Creating User and Granting Login Permissions #
To create a user, you need to log in to AccountingSuite with an account that has administrator rights.
Let’s start by creating an access group. Go to Admin Panel – Security Settings. Here, find the Access Groups link and click on it.
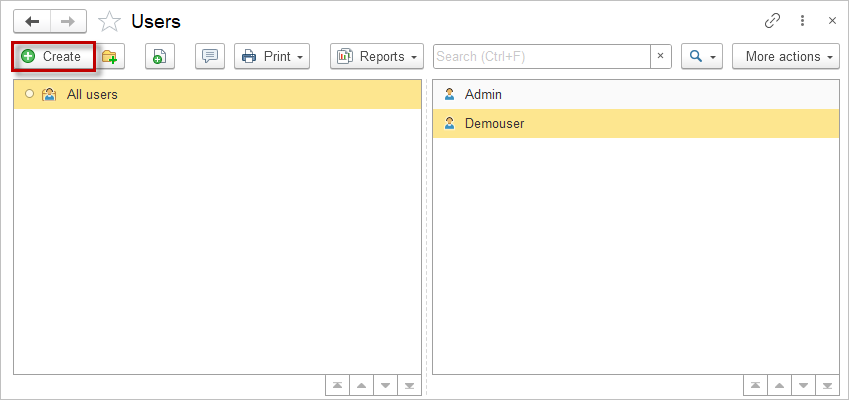
In the form that opens, click the Create button.
In the creation window, enter the group name and select an access profile. AccountingSuite has three pre-created profiles for you:
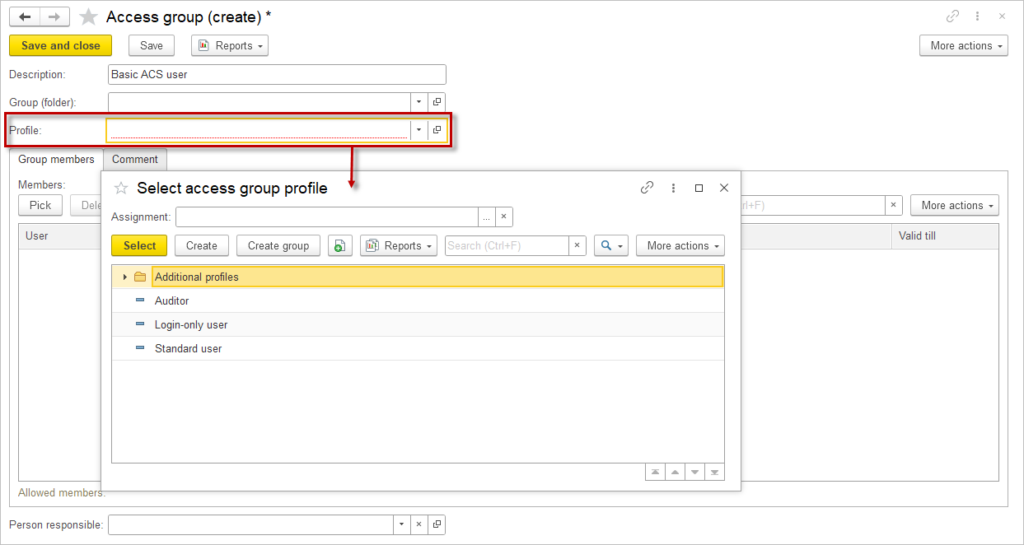
- Auditor – a read-only profile. Users with this profile can only log in and view data but cannot add or modify anything.
- Login-only User – this user can only launch the program but cannot perform any actions within it.
- Standard User – this profile grants access to all lists, documents, and reports. Users with these rights can view, edit, and add new data but do not have access to admin settings. This profile is the most suitable for your typical user
Select the profile you need and save the changes. If you already have an existing user, you can add them by clicking the Pick button and selecting them from the user list.
If the user does not exist yet, proceed further.
Next, go to Admin Panel – Security settings and click on the Users link.
Here, click on Create.
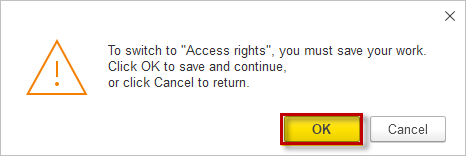
In the open form, fill in the required fields and check the Login allowed box. Adjust any other settings if you want. Then, click on Access Rights.
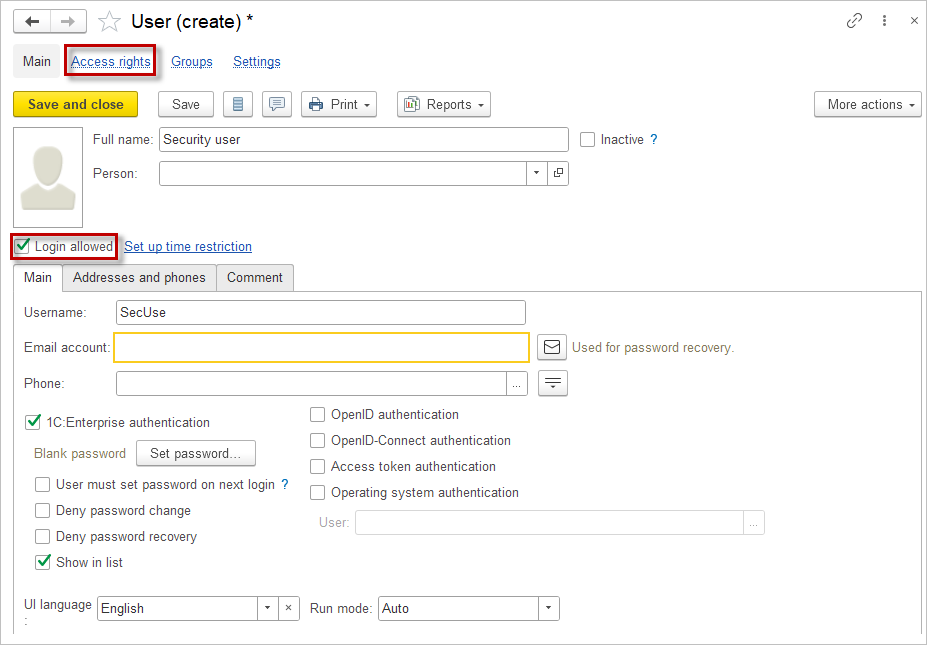
The application will prompt you to save the data first, so click OK.
Once the data is saved, click Add to group and select the desired role.
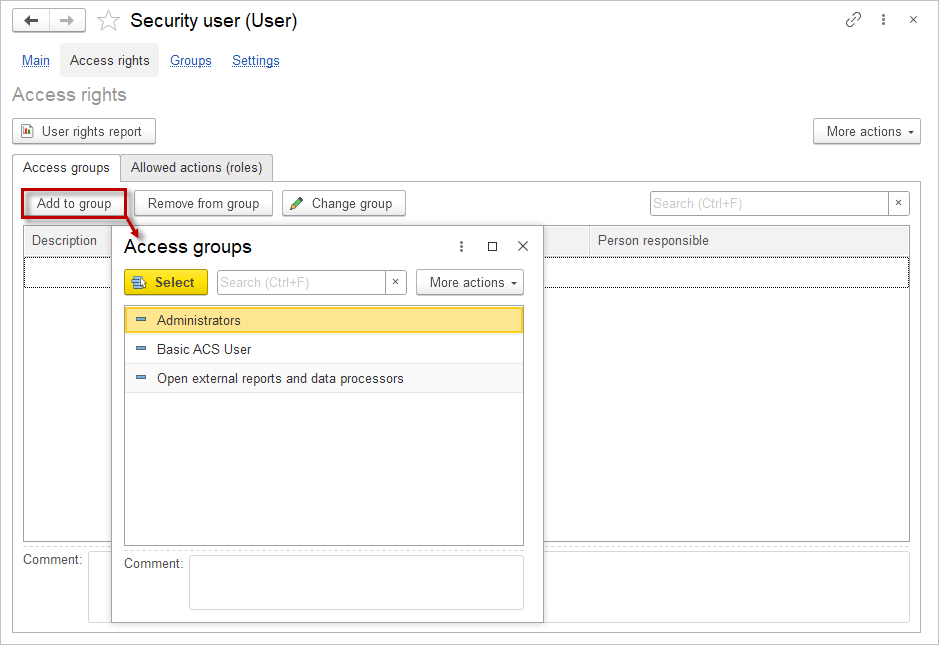
By default, only administrators group is available. Any custom groups you have created will appear in the list.
Record-Level Access Update #
Access updates are automatically scheduled when options for restriction types (by item, by individual, etc.) are changed, when migrating to new application versions, or when installing, updating, or removing application extensions that affect access to lists.
Row-level security (RLS) allows database administrators to define policies to control how specific rows of data display and operate for one or more user roles.

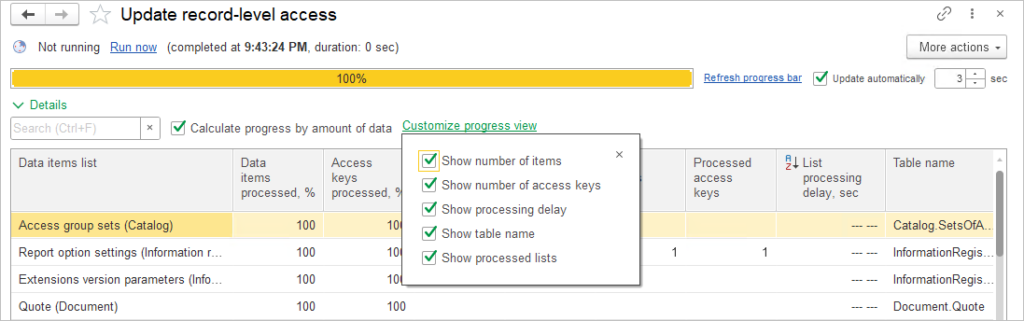
Access updates are carried out evenly across all lists in small portions lasting 1-2 seconds. For lists without dates, portions are selected by ascending link ID (e.g., for directories). For lists with dates (e.g., documents), portions are selected by descending dates (from the most recent to the oldest data). Data for the last 7 days is processed first, then for the last month, the last quarter, and finally, by years into the past.
For progress updates, the Upadate automatically checkbox is enabled with a 3-second interval. If the actual update time exceeds this interval, which usually occurs with large databases, the interval will automatically increase to match the actual update time. If needed, the interval can be reduced to the required value. Use the link to Refresh progress bar or Cancel at any moment.
Enable the checkbox to Calculate progress by amount of data. The Customize progress view link allows you to modify the view of the processed data list by enabling the necessary checkboxes:
- Show number of items;
- Show number of access keys;
- Show processing delay;
- Show table name;
- Show processed lists.
There may be situations where access updates are completed, but access differs from what is expected. To resolve such an issue, open the More actions menu and use the Configure access manually command:
- If the problem is with a specific object (document, list, etc.), select it (choose the data type, then select the specific item from the opened list) and click the Update Access button. The update will be performed, and a result message will be displayed: whether the access was updated or no update was necessary (calculated rights are current).
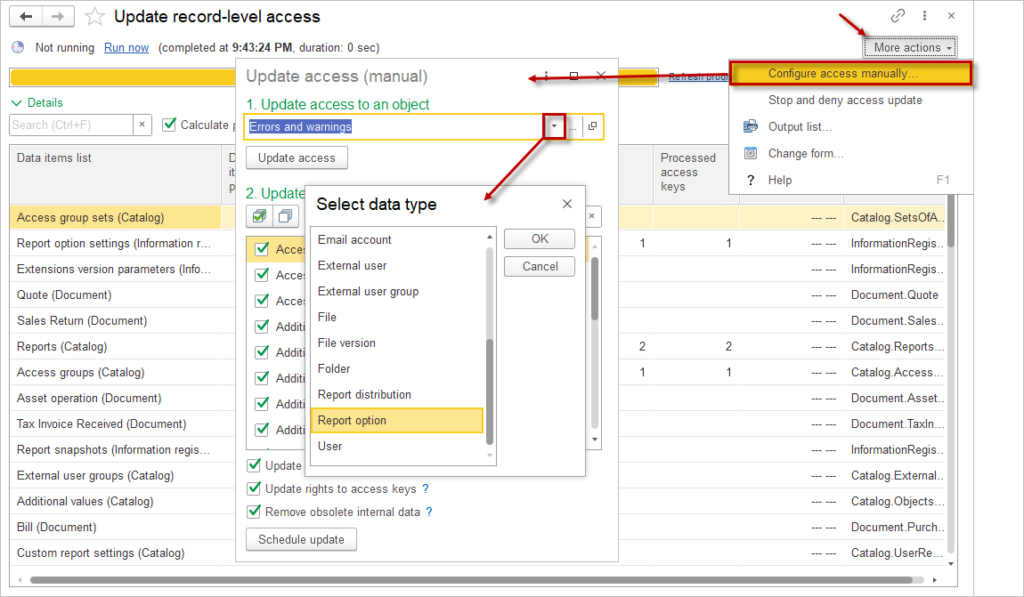
- If the problem involves multiple objects or register entries, you should schedule an update for the entire list.
- Schedule updates for the entire list or for selected parts:
- Update data item access keys;
- Update rights for access keys;
- Remove obsolete internal data.
- Schedule updates for the entire list or for selected parts:
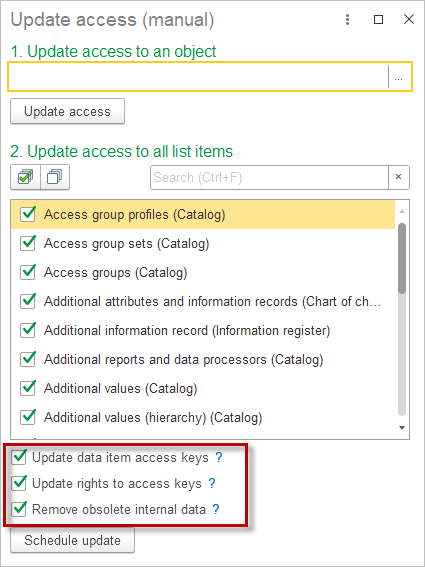
If it is unclear where the update is needed, then it is recommended to update all three parts.
When opening, all lists are checked for updates. Such an update may take a long time, especially when updating access rights to keys. Therefore, only the required lists should be selected using checkboxes.
After that, click Schedule Update. The update will be performed in the same order as in the case of automatically scheduled updates. You can close the window and click Run now to avoid waiting for the scheduled task Record-Level access update to run.
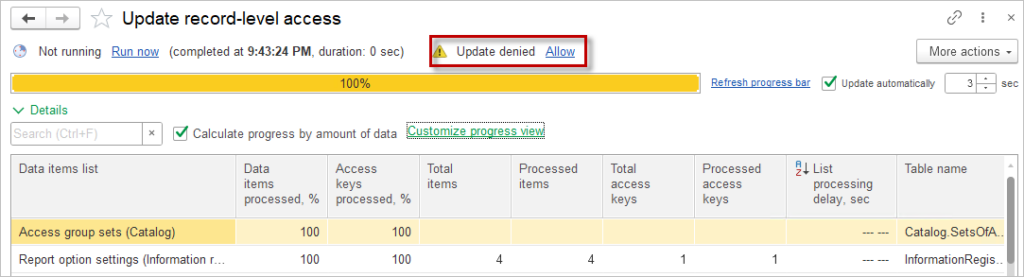
If necessary, you can Stop and deny access update using the More action menu command.
If access updates are prohibited, a warning and a Allow link will appear in the window. Attempting to start a scheduled task when access updates are prohibited will result in a task launch error. To enable the update via the scheduled task, click the Allow link. When clicking Run now, a prohibited update is permitted.