AccountingSuite is designed to be flexible and adaptable to the unique tax regulations of different countries. It offers customizable features that allow users to configure settings based on their specific need.
Follow these steps to ensure accurate tax accounting and full legislation compliance:
- Identify the list of relevant taxes that apply according to local legislation, and enable the functionality of these taxes in the General Settings.
- Create the required Taxes in the Taxes list.
- Group the Taxes. Grouping the taxes is essential for maintaining the tax settings for the items in the next step.
- Assign Tax groups to the Items. The advantage of this is that you can assign all the taxes that apply to the item in one click.
- Maintain the Customer and Vendor Tax settings.
Once you have completed these steps, the taxes are automatically calculated in the sales and purchase documents.
Taxes (list) #
The Taxes list contains all of the taxes applicable as per local tax legislation requirements.

Create a Tax #
- Navigate to Lists → Taxes
- Click Create.
- Enter the ID, Description and the Tax type. Tax types available are: VAT, WHT, Excise, Levy and Other. If there is no required tax in the drop-down list, make sure that this tax is enabled under Admin Panel – General settings – Taxes.
- Click Add to specify the tax rate and the dates applicable from… to… for this tax.
- Select the Calculation base for the tax (Net Amount or Net Amount + VAT). For the Excise tax type Quantity can be set as Calculation base.
- Enter the Agent, if applicable (selected from the Companies list).
- Click Save.

Tax rates #
There may be several rates available for a single tax. The tax rates are stored in the tax.

Add a new Tax rate #
If you need to enter a new Tax rate, add a rate to the existing Tax.
It is not recommended to create a Tax with the same Type just to enter a new rate.
- Navigate to Lists → Taxes.
- Select tax to enter new rate for.
- Specify the Description, Rate, Start and End date (if applicable).
- Rates that have not yet started or have already expired will be displayed in grey when listed.
- Click Save.

Tax Groups #
A tax group is a reusable set of tax rates that can be assigned to Items, Customers, and Vendors.
In the General settings, for each master record type (items, customers, vendors), user can specify a default tax group. When a sales or purchase document is created, the system compares the Tax group on the Item with the Tax group on the Customer or Vendor. Only the taxes that exist in both groups are applied to the document.
This design provides flexibility for complex tax scenarios, such as selling the same item to different customers at different VAT or withholding tax combinations, without needing separate item records for each tax treatment.

Tax Determination Logic #
Following logic applies for Tax Rate detemination:
| Tax in the Item Group | Tax in the Company Group | What will be applied |
| Tax + Rate | Tax + Rate | System will search for the common Rate and apply it If common Rate has not been found, the higher Rate will apply |
| Tax + No Rate | Tax + Rate | Tax Rate from the Company Tax Group |
| Tax + Rate | Tax + No Rate | Tax from the Item Tax Group |
| Tax + No Rate | Tax + No Rate | Highest Tax Rate available in the system |
| No Tax | Tax + Rate or Tax + No Rate | No Tax |
| Tax + Rate or Tax + No Rate | No Tax | No Tax |

Create a Tax group #
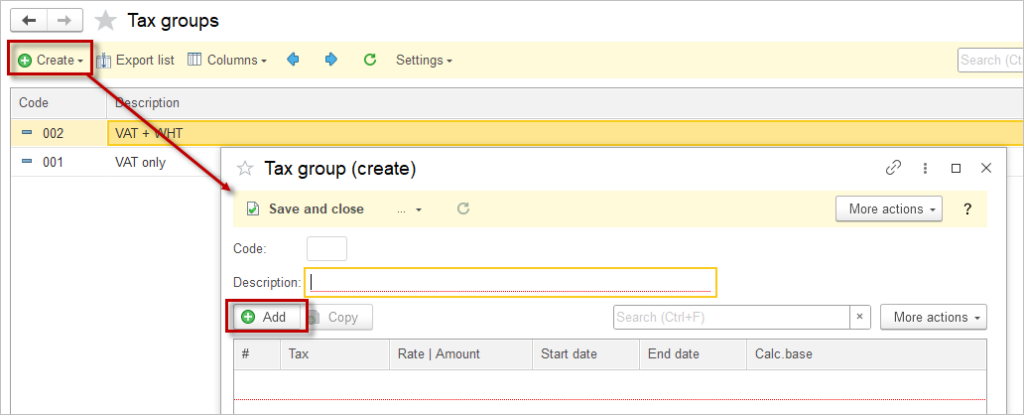
- Navigate to Lists → Tax groups
- Click Create.
- Enter Description.
- Click Add to select the Taxes for this group.
- Click Save.


Repeating taxes are available in the Tax Group, even if their validity time period overlaps or is not defined.
User can add a Tax without specifying its Rate. See the table for Rate determination in case exact Rate is not specified.

Assign Tax group to an Item #
- Navigate to Lists → Items
- Open the Item.
- On the Setup tab enter the Tax group.
- Click Save and Close.
- To assign Tax group to multiple Items, use Bulk attribute edit option.
- Navigate to General Settings – Default tax group to select the Tax group that will be automatically added to all Items.


Maintain Tax settings in Vendor/Customer #
- Navigate to Lists → Companies and open the Company.
- The Vendor or Customer tab of the company card contains tax settings that control how taxes are applied to transactions for this company.
- The Tax group field defines the default combination of taxes that will be used when documents are created for this company. This field is filled automatically from the system’s General settings but can be manually changed for a specific company when needed.
- The switches under Tax group (such as VAT payer, Subject to WHT, etc.) will be adjusted automatically according to the selected Tax Group and can be turned on or off, and their on/off state has priority over the selected tax group.
- Save. Now, only the applicable taxes will be calculated in the Puchase / Sales documents.


In the example shown on the right hand side, the Customer is assigned to the VAT + WHT group, but the Levy charged toggle is enabled, so documents for this company will include both VAT, WHT and Levies despite the group name.

Adjust Taxes #
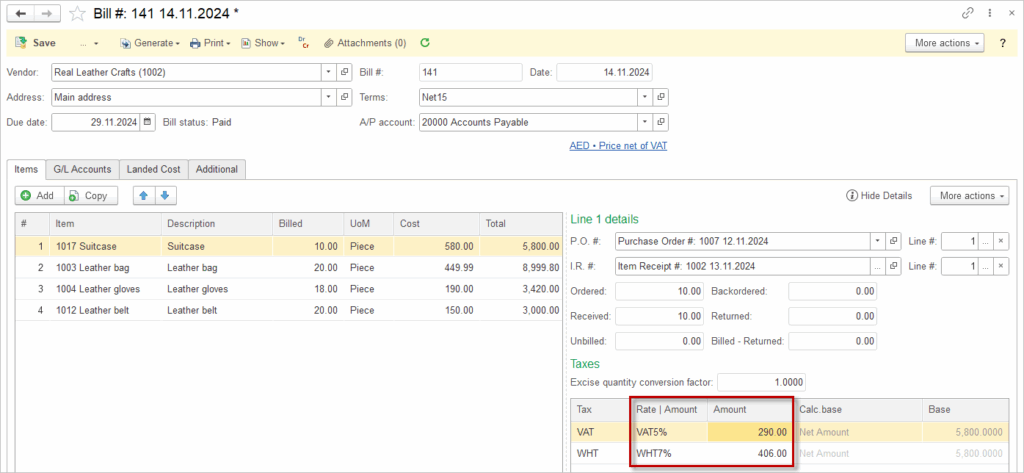
After completing the setup, all relevant taxes will be automatically calculated in Sales and Purchase documents. If you need to manually adjust taxes such as VAT, Withholding Tax (WHT), or other tax types, follow these simple steps to ensure accurate tax adjustments in your transactions:
1. Open the doument, select the desired line item and click on Line Details.

2. In the Line Details window, you can either select a different tax rate or manually enter the tax amount.

3. Save the document.
Other Tax type #
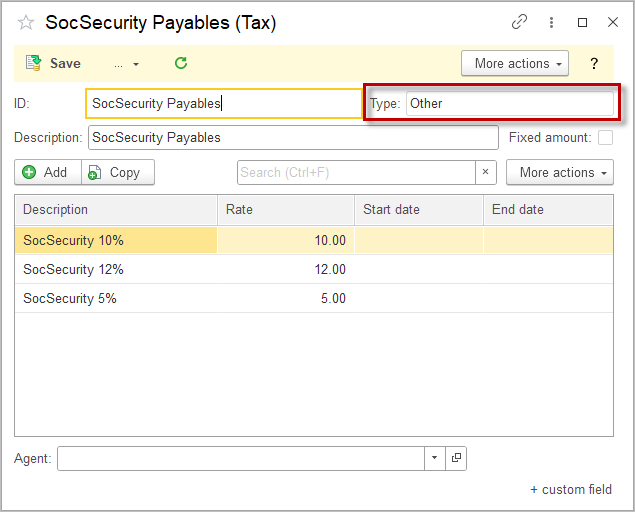
The software includes an Other tax type for taxes not covered by VAT, WHT, Excise, or Levy, such as social security (learn more in Deductions article), profit tax, and property tax. This tax type stores rates used as an Extra dimension in document postings, helping users build analytical reports. The Other tax is always calculated on the Net amount and this base cannot be changed.


Please use the Other tax type only for taxes apart from VAT, WHT, Excise, or Levy to preserve data integrity and ensure correct calculations.
