AccountingSuite has Assemblies functionality commonly used in the manufacturing industry, among others. It allows you to define a group of items in your inventory that you use to make another item. Defining an Assembly is the first step in using the more advanced inventory features such as assembly builds and creating assemblies within assemblies.
In AccountingSuite, the Assembly is defined on the item card that is created for the final product. Before starting, ensure that all components or “ingredients” of the final product have been entered as inventoried Items.

Maintain Item’s settings #
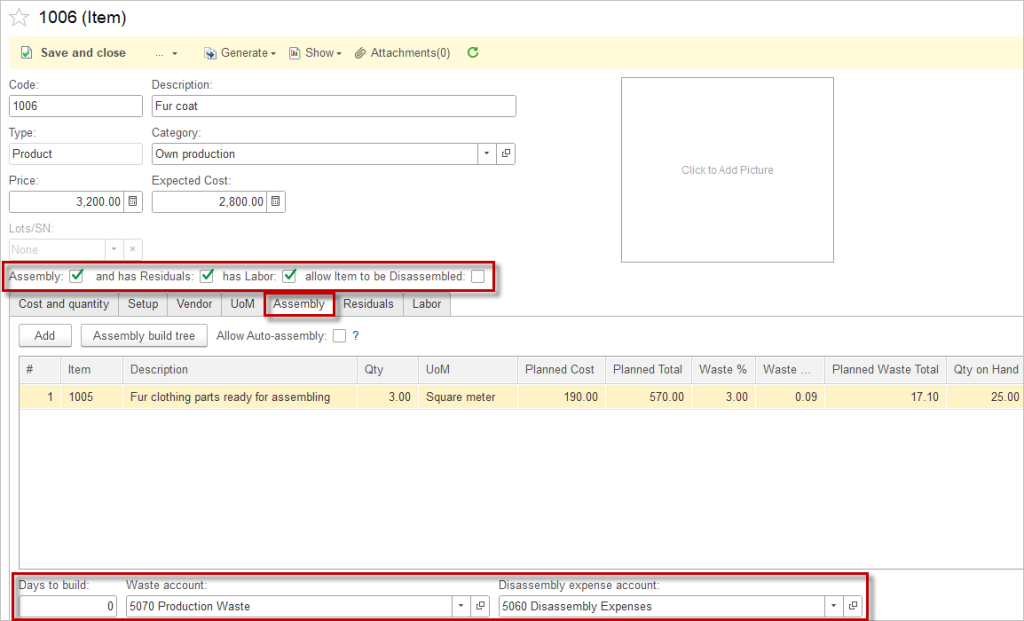
- On the item card, tick the Assembly box.
- On the Assembly tab, choose the items that are raw materials needed to build the final product and their quantity.
- For each item, define Waste (in % or quantity) for raw material remnants that will not be used in another assembly.
- Enter days to build
- Waste account and Disassembly expense account are pre-filled in accordance with Accounting settings, but they can be changed.
- On the Residuals tab, chosse the items that are remnants that will be inventoried.
- On the Labor tab, enter the number of hours needed to finish the final product in the quantity field.


Create Assembly build #
- Navigate to Inventory → Assembly Build.
- Choose the Item to build from the drop-down menu. The list of raw materials needed will populate in the materials tab. Labor items appear in the labor tab.
- Choose the Location of the build. This is where the inventory of the completed items will be increased.
- Change the Build Date, Quantity, Unit of Measure if needed.
- If your assembled item will be assigned a lot or a serial number, click the Lots/Serial Number tab and assign them.
- Enter a Memo (optional).
- Save the document.
Please note:
- The Assembly Build will fail to post if there are not sufficient raw materials in stock.
- On an Assembly Build, individual items may be added, changed or removed to reflect the actual use at the time of manufacturing.
- An assembly item may contain another item that is an assembly on its Assembly build. There is no limit to how far deep you can nest assemblies but they must be built in order from the deepest nested assembly on up.
Accounting #
Recording an Assembly build creates the following transactions in the General Journal:
- Debits: Inventory (of final product and residuals). Inventory sum will include labor cost occured for the assembly
- Debits: Production waste cost account (for waste items)
- Credits: Inventory (of the items used to build the final product including waste and residuals)
- Credits: Payroll Expense account (if “Has labor” box is ticked on the item card)
Auto-Assembly option #
When a product is designated for auto-assembly, AccountingSuite automatically checks inventory levels for both the finished item and its components as soon as a Sales Invoice is processed. If sufficient quantities of the finished item are not available, the system generates an Assembly transaction to combine the constituent parts into the completed product. This assembly is linked to the Sales Invoice, ensuring that inventory quantities for every component are adjusted accordingly. Should the required components also be assemblies themselves, some systems allow for a cascading effect, creating sub-assemblies as needed.
In the Inventory settings, the Auto-Assembly option can be enabled. Select the default assembly method:
- Materials only or
- Subassemblies first

Allow Auto-Assembly box must be checked in the Item.

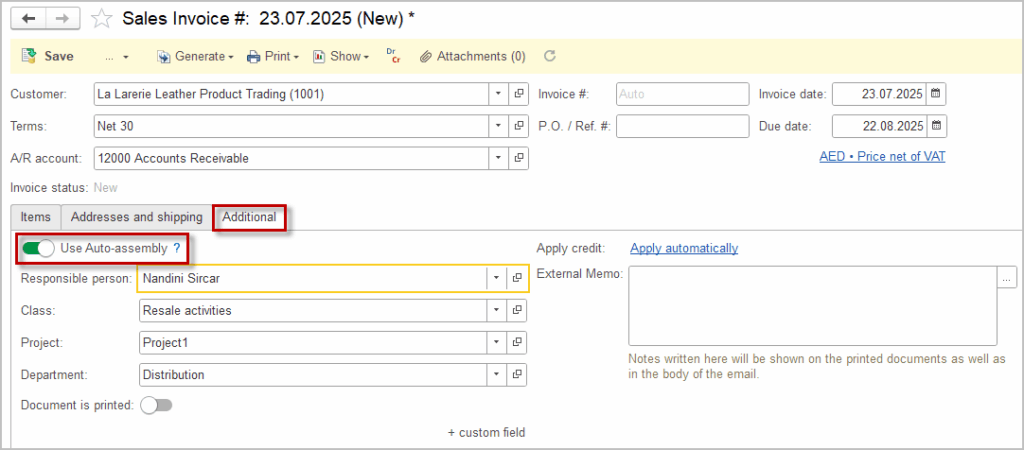
Use Auto-assembly option has to be ticked in the Sales invoice after the Items have been added to the Items tab.

Status indicators #
In the Assembly Build process, there are two primary statuses used to track the progress and completion of assembly tasks: Completed and Pending. These statuses help monitor the stages of assembling products, ensuring accurate inventory management and allowing adjustments during the process.
In Assembly Build, the Completed status means that the assembly process is fully finished and all necessary components have been used to create the final product. Once marked as Completed, the software updates the inventory levels accordingly by:
- Decreasing the quantity of the raw materials or components used.
- Increasing the stock of the assembled (finished) product.
This indicates that the product is ready for sale or further use.
The Pending status in Assembly Build indicates that the assembly process is not yet finalized. This can happen if:
- Some components are missing or not available in sufficient quantity.
- The assembly build is waiting for approval.
- The build is still in progress and not fully completed.
In this state, the inventory is not adjusted, allowing changes or modifications to the build before marking it as Completed.
